


Numerous businessmen, educators, students, etc., rely on Zoom, a secure and reliable video platform, to host/participate remote meetings. And the Zoom automatic recording service auto saves the meetings, which gives big convenience to those who are too busy to join the Zoom meeting on time, or unable to take down essential information in the Zoom. However, there are still many limitations on Zoom recording as participants, which blocks you from secret auto Zoom recording.

How to do an auto recording on Zoom on PC as hosts? Can you record a Zoom meeting on PC as participants without permission? No worries. This ultimate guide will show you how to automatically record a Zoom meeting on PC as hosts and as participants without limitation. Let’s read this 3-minute guidance.
- This is an Article Index.
- Do not insert any text in here.
- This index will be generated automatically when displayed on the front end.
- Of course we still love you.
How to Set up Zoom Automatic Recording Settings on PC
To resolve the issue ‘can I record a Zoom meeting automatically’, here's a detailed guide on setting up the built-in automatic recording settings on Zoom. When you plan to host a meeting on Zoom, it’s necessary to do as follows to enable the auto recording feature in advance:
Step 1. Open Zoom in the browser on your PC.
Step 2. Click on "My Account" in the top-right corner and you’ll see your profile and the settings pages.
Step 3. Select "Settings" under the "PERSONAL" section in the left hand panel. Then, click on"Recording" at the top.
Step 4. Firstly, ensure "Local recording" is switched on.
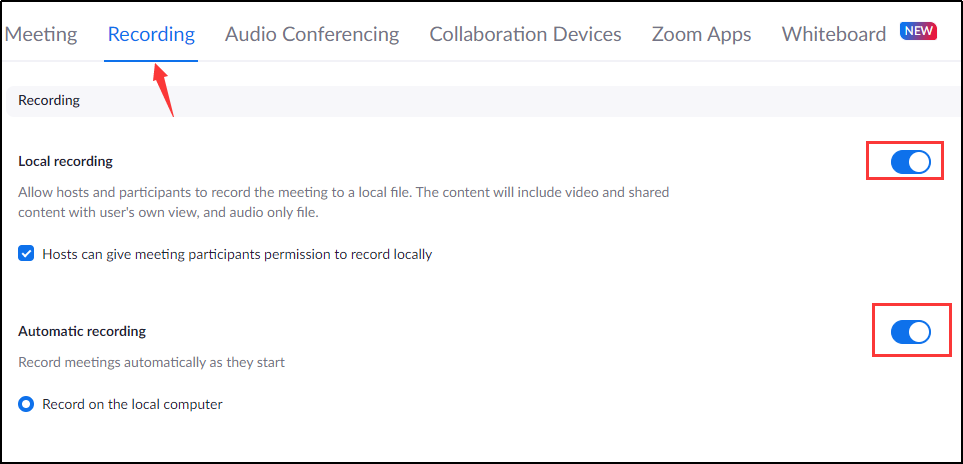
Note: If this button isn't turned on, you won't be able to save any recordings at all, no matter if they are automatic or not.
Step 5. Next, enable the "Automatic recording" feature and click the "Record on the local computer" option.
Normally, this is the only available option, and if you want to have the other option for Zoom cloud recording, you must upgrade to a paid account subscription.
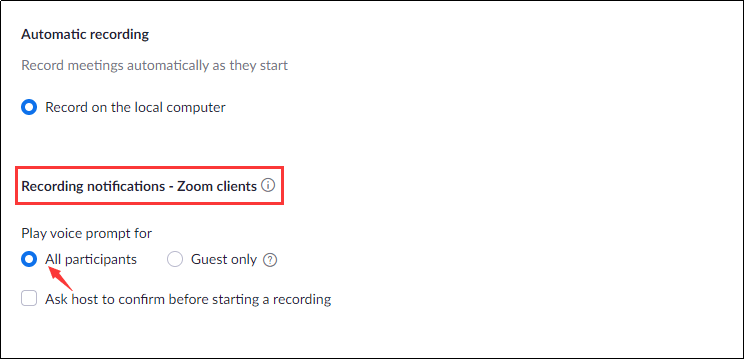
Step 6. You can also click on All participants under Recording notifications - Zoom clients, which will notice participants in your meeting that they are being recorded when the meeting starts.
Step 7. Once you've made these settings of Zoom automatic recording, you’ll see a small pop-up appearing at the top of your screen: "Your settings have been updated." That’s the end of settings before auto Zoom recording.
How to Do a Zoom Automatic Recording Within the App on PC
After you set up these basic configurations for Zoom auto recording as the above steps, whenever you start a Zoom meeting as a host, whether it's a new meeting or the one you scheduled in advance, it will automatically be recorded from the moment you begin. Here's how it works:
Step 1. Lauch a meeting as a host on Zoom and it will show Recording... on the top of the screen.
Step 2. If you need to pause or stop the recording, just click on the pause or stop buttons at the bottom or top-left corner to pause/halt recording.

Step 3. When the meeting is over, it will stop recording and save the video to your computer as you set up.
Many people also ask that can you record a Zoom meeting on Chromebook, actually, it’s similar to record a Zoom meeting on PC, but the precondition is that you must have a paid or education account on Zoom, otherwise you can not enjoy auto Zoom recording on Chromebook for free as on PC.
Although Zoom offers built-in auto recording function on PC, there are lots of limitations on Zoom recording for participants. What’s worse are the poor recording features, which is not good enough for advanced users. The following content will specifically show the Zoom automatic recording’s limitations, and offer you the best alternative to get HD auto recording on Zoom without any limitation.
Built-in Zoom Automatic Recording’s Limitations on Participants & Recording
The limitations for Zoom automatic recording are listed below:
- Storage Limits to Paid Cloud Recording
Zoom cloud recording offers multiple subscription plans for limited cloud storage, namely, Pro 1 GB/User, Business 1 GB/User, Education 0.5 GB/User, Zoom Rooms 1 GB/Zoom Room.
- Only Available for Hosts/Co-hosts in the Zoom Meeting
Only those who are holding the meeting as a host or co-host, can have access to the Zoom auto recording function hassle-free.
- No Secret Recording as Participants
If you want to record Zoom as a participant, you will need to ask for the meeting host’ permission. And the start of recording will notify the host and other participants, no way to secretly record the meeting.
- Audio Crash & Low-resolution Video Issues
Zoom recording within the app will encounter masses of audio and video issues when the internet connection is unstable, or the browser is disturbed by pop-up ads or attacked by viruses.
- Time Limits to Video Recording
There is a time limit of 40 minutes of Zoom recording on your Basic plan, which means it will stop recording if the meeting period is over 40 minutes.
Obviously, the built-in Zoom auto recording feature has many tedious limitations on recording. So how to auto record Zoom meetings on PC in an easier way without permission and limitation? You’re highly recommended to use iTop Screen Recorder, a professional free screen recorder offering HD and flexible screen recordings.
How to Do a Zoom Automatic Recording Without Permission/Limitation on PC
With iTop Screen Recorder, you’re allowed to record Zoom without permission on PC, no matter if you are a host or participant. You don’t have to configure the complex settings for auto Zoom recording, and all you need is to install the software and enjoy Scheduled Recording with HD audio and clear images within 3 steps easily. Let’s drop in the detailed steps to activate auto Zoom recording and you’ll be amazed by the wonderful screen recorder.
How to Set up Zoom Automatic Recording with iTop Screen Recorder
For people who wonder “are Zoom meetings automatically recorded without notifying”, you can do as follows on iTop Screen Recorder:
Step 1. Download iTop Screen Recorder to your Windows.
Step 2. Configure the basic settings for automatic Zoom recording.
Click the “Options” icon on the top right of the main interface and select Settings. To get a HD Zoom auto recording, please configure the parameters like this: Video Size: 4096x2160 (4K), Frame Rate: 60, Quality: Original.

Tips: Please ensure the Mic and Speaker buttons are open, so that you can get HD audio in the video with its noise reduction technology.
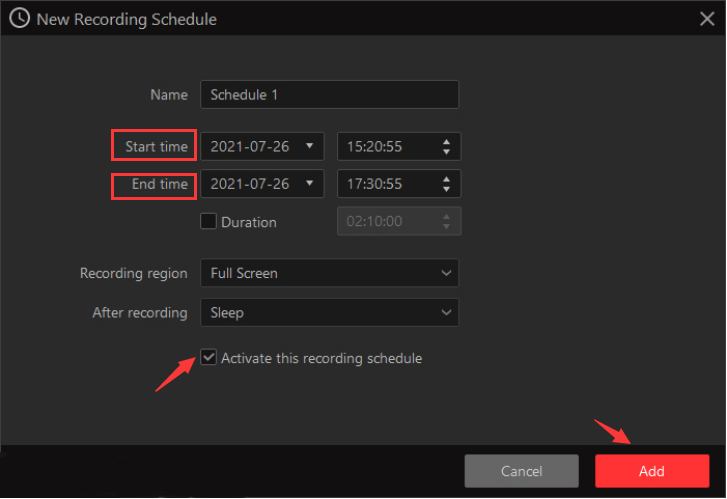
Step 3. Create scheduled recording tasks.
Go back to the main interface and click Recording Schedule under Options. After activating, create a New Recording Schedule task, set a start and end time of the recording. Tick Activate this recording schedule and click Add.
Once you’ve created the scheduled recording task in advance, it will automatically record the screen at the scheduled time, so please ensure to open your Zoom beforehand without background. Also, you’re allowed to pause the recording by clicking the pause icon at the bottom.

When finished, the recorded video file will be auto saved to your computer and you can access recorded Zoom meetings any time. Nothing to be worried about!
What Can the iTop Screen Recorder Do for You?
Besides offering Zoom auto recording, this fantastic free screen recorder, iTop Screen Recorder, can bring numerous benefits to you.
- HD & Smooth Zoom Automatic Recording Without Permission
It offers HD audio with noise reduction when you record zoom meeting without permission and the whole recording will be smooth, no lagging, to provide you with high-resolution video.
- No Time Limit for Zoom Automatic Recording
There’s no time limit for Zoom recording on iTop Screen Recorder, so you don’t have to worry about the meeting length, just relax until the meeting is over.
- Multiple Video Formats for Zoom Automatic Recording
More than 12 output formats are supported to save recorded videos, like MP4, AVI, FLV, MKV, MOV, TS, and GIF or save audios in the format of MP3, AAC, AC3, FLAC, WMAV2.
There’s no doubt that the iTop Screen Recorder can do so many goods to you, to have an auto recording on Zoom without permission and enjoy HD audio & video, don’t hesitate to download the favorable tool right now!
FAQ on Zoom Automatic Recording
1. How to Disable Zoom Automatic Recording on Zoom?
Login to your Zoom in Web, click on My Account > Settings > Recordings in turn and switch the Automatic recording feature to off.
2. Zoom Automatic Recording Not Working!
If your Zoom automatic recording is not working, just simply download iTop Screen Recorder as an alternative of the free screen recorder and all your anxieties will be gone!
3. How Do I Download All Zoom Recordings at Once?
Select Recordings from the menu on the left under your account, select the recording you wish to download from the list. To download all recorded files, select the Download (# files) button.
Sum up
Zoom automatic recording on PC is necessary for people who always have Zoom meetings online. You can try to enable auto recording on Zoom settings with multiple steps. Also, a better solution to solve the problem of can you record a meeting on Zoom must be the powerful third-party software, iTop Screen Recorder. Download it and you’re free to record Zoom automatically without permission!


