Developed by Apple Inc., iTunes is a software program that acts as a media player to play videos and audio, as a media library to save and sync digital music collection with your iPhone, iPad, or iPod touch, and as a client app for the iTune Store to buy or rent music and videos.
People access it with an Apple account and use it to listen to music, podcasts, and audiobooks, and watch the newest movies and TV shows. However, depending on the differences between iTunes purchases and iTunes rentals, and the limitations of rentals, most people need to screen record iTunes videos for watching them anytime, anywhere.

Keep reading to know the reasons and how to record iTunes movies and music on Windows/Mac.
- Contents
- How to Recover Temporarily Deleted Data from Laptop
-
How to Recover the Permanently Deleted Data from Laptop
- Recover the Deleted Data from Laptop with Data Recovery Software
- Recover the Deleted Data from Laptop with File History on Windows 11/10
- Recover the Deleted Data from Laptop Using Backup and Restore
Why Do People Screen Record iTunes Videos?
Since iTunes supports users to download movies and TV shows on their devices, why do people still seek an iTunes screen recorder to film the videos for later? This brings us to the difference between the iTunes purchases and iTunes rentals.

iTunes video player provides a purchase plan and rental plan for users to watch movies, and TV shows, and streaming on it. Let’s check the differences in the price, quality, and limitations of the two plans below.
Purchases:
- Support HD.
- Support 5 devices: Apple TV, computer, iPhone, iPad, or iPod
- The price of purchase plan wide from $9.99 to $14.99
- Once you purchase the video, it belongs to you forever. The purchase plan allows you to download videos locally on your computer or store them in iCloud. You can watch the videos whenever you wish. Even if the downloaded videos disappear from your device, you can re-download it from your purchase history without a time limit.
Rentals:
- Support HD.
- Support 5 devices: Apple TV, computer, iPhone, iPad, or iPod
- The price of the rental plan wide from $0.99 to $9.99
- The rent videos have a solid period of validity. Once you click “Rent”, the video can only belong to you for 30 days. And from the moment you start to watch the rented video, you only have 24 hours (US) or 48 hours (other countries) to finish watching. Otherwise, the rented video will automatically disappear from your hard drive or be withdrawn by iTunes.
In conclusion, renting videos is more cost-effective, the cost to buy a movie can rent at most 15 movies on iTunes video player. But sometimes, you may not get too much free time to watch a movie from the beginning to the end. You’ll be interrupted by trivial matters occasionally. Hence, you may need to screen record with voice on iTunes video player.
When you choose to rent movies, the newest one is the most expensive. And SD videos are cheaper than videos in HD.
How to Screen Record iTunes Movies on Windows?
Because iTunes has a download limitation and time sensitivity on the rental plan, people turn to an iTunes screen recorder to capture the whole movie and save it on their computer for watching it many times.
When you use a Windows computer, you can screen record iTunes movies with iTop Screen Recorder.
It is able to record all on-screen content no matter if the content is online or offline. And it has experience in recording gaming, streaming, voice calls, movies, online classes, team meetings, etc., as well as it is a professional to screen record protected videos.
Details of its features:
- 100% free to use in anonymity. iTop Screen Recorder is totally free to use if you want to record iTunes videos without extra pay. You won’t miss it! From recording to exporting, you’ll not be asked to fill up any personal info, not even to mention the payment details.
- Record video in HD & 4K. View experience is important for watching movies and TV shows, this free screen recorder also values recording quality as you do. It allows users to choose the video quality as SD, HD, or 4K before starting to record.
- Support 120fps recording. When you record iTunes movies at 120fps, you’ll see the graphical motions are smoother, with fewer details lost, input lag, and blurred action movements.
How to Screen Record iTunes Movies by iTop Screen Recorder?
You need to rent the video you want to record on iTunes video player first, and then walk through the below steps.
Step 1. Quickly download this screen recorder Windows 10 on your computer.
Step 2. Set the recording preferences.
First set the simple items on the interface such as record part of screen or the entire screen, record audio from a mic or system, and record with a webcam or not.
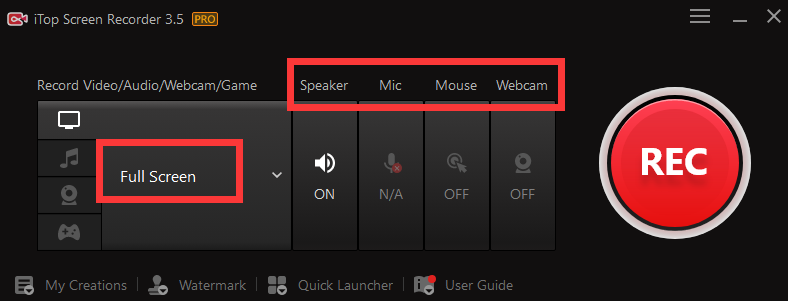
Then, go to the details of video and audio recording, such as storage location, format, size, quality, bitrate, channel, etc.

Step 3. Get back to the interface, and click “Rec” to start recording.

Step 4. Play the movie and click “Stop” at the floating bar when the movie ends.
Step 5. Find your recorded iTunes videos in “My Creations” or on your computer.
iTop Screen Recorder also has a built-in free video editor, if you want to edit a video to share on YouTube, you can use it to modify your videos in 5 minutes. With it, you can trim, cut, change speed, and add text, BGM, filter, transition, and sticker to your videos.
How to Screen Record iTunes Movies on Mac?
Watching movies on a computer or laptop is always more comfortable than watching films on the phone. Therefore, a practical recommendation for an iTunes screen recorder for Mac is also needed. MacOS has its default multimedia player - QuickTime Player - which is capable of playing videos, audio, and images, as well as recording screen and audio. Same to the above 1080p screen recorder, QuickTime Player also can be used to do simple editing on the recorded videos.
Follow the below steps to know how to record iTunes movies on Mac via Quicktime Player.
Step 1. Open the movie on iTunes that you want to screen record and stop it at the beginning.
Step 2. Run the QuickTime Player app on your Mac, and then choose File > New Screen Recording.
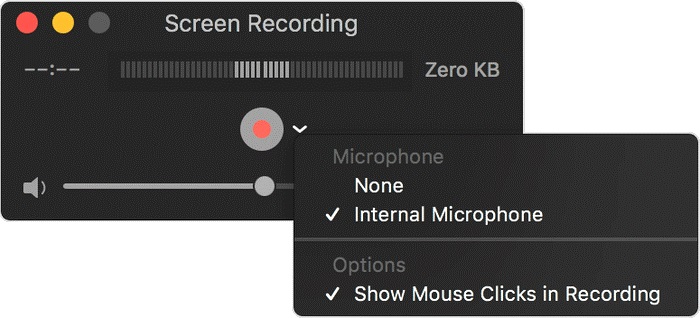
Step 3. Click “Rec” on QuickTime Player and play the movie on iTunes. Be sure to play the movie on the whole screen and record with QuickTime Player on the entire screen too.
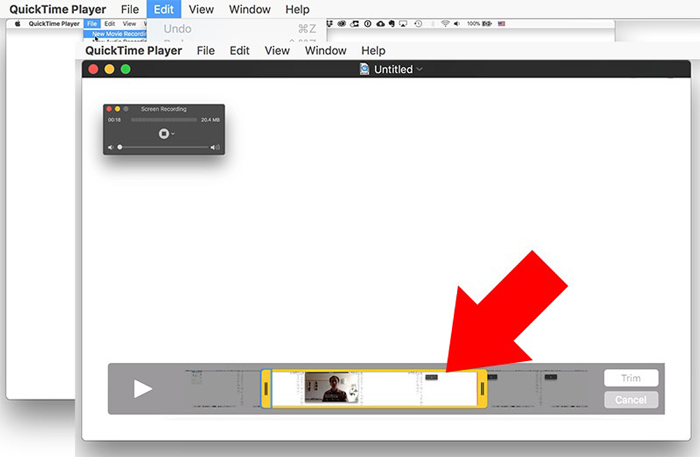
Step 4. When the movie is finished, click “Stop”, and go to File > Save the recorded iTunes video to the place you prefer.
Step 5. If there are unwanted clips at the beginning or the end of this recording, you can use the editing feature to cut them off.
Except for recording iTunes movies with QuickTime Player, you can also use this tool to figure out how to record Netflix on Mac.
The Bottom Line
In a word, the problem of how to screen record iTunes videos can be concluded as how to clip on PC and Mac. This article has a stepwise guide for each. So if you want to record iTunes movies on Mac, QuickTime Player is the NO.1 choice, and if you prefer to watch iTunes on PC, downloading and trying iTop Screen Recorder is also a wise option!