


Social media is utilized by people around the world in their everyday life. According to the marketing survey conducted by Twitter Inc., a video tweet has a six-time higher chance to be retweeted than a photo tweet. Compared to text or photo content, videos deliver an informative message that is difficult to explain in words. They are more catchy and appealing to the public. With the rapid growth in video on social media, there is a rising need on creating high-quality how-to videos. When making instructional videos such as a product demo, tutorial, lecture, meeting, or game, adding your narration to explain is necessary during video recording. Keep reading and learn how to screen record with voice efficiently on PC, Mac, Android, and iPhone in the following content.
- This is an Article Index.
- Do not insert any text in here.
- This index will be generated automatically when displayed on the front end.
- Of course we still love you.
How to Screen Record with Voice on Windows PC
As for users who need to screen record with voice on PC Windows, iTop Screen Recorder can be their best choice to record the screen smoothly in HD quality with stereo sounds. iTop Screen Recorder also supports flexible screen capture, multiple output formats, video editing & trimming, and scheduled recording…etc. Most importantly, iTop Screen Recorder makes it possible to record sounds from both internal and external.
Extra Benefit of Using iTop Screen Recorder:
- Free-to-use software to screen record with voice
- record voice in screen recording
- Powerful features
- Editing supported
The following guidance will lead you to screen record with voice on PC.
Step 1. Download and install the recorder on your PC. Click the “Recording Option” icon for configuration. If you want to add your narration during screen recording, turn the “Microphone” on, so the external sounds could be collected.
Step 2. To get voice in screen recording, toggle the Speaker and Mic switches on. Start the screen recording with voice by clicking the red “REC” icon and you will see a three-second countdown to inform you to get ready. While recording, your voice will be recorded as well through the microphone. If you want to pause the recording, click the “Pause” icon on the floating toolbars.

Step 3. To end the recording, click the red “DONE” icon or press F9. It supports multiple video formats including MP4, AVI, FLV, MKV, MOV, TS, and even GIF. Besides if you need to edit recorded videos, you can use the free video editor.
How to Screen Recorder with Voice on Mac
Then how to make a voice-over video of the screen on Macs? Macs don’t have a built-in recorder that supports screen recording with your voice. To narrate what’s happening on Mac, you have to download a third-party application, and one of the most popular choices is Dropshare. It is a comprehensive tool that allows you to capture screens, record screencasts, and upload files.

Download and install the Dropshare on your Mac. Go to recording settings to enable the microphone to collect both system audio and external sounds. Hit the red icon to stat and your voice will be simultaneously recorded. Click the red icon again if you want to stop recording.
How to Screen Record with Voice on iPhone & iPad
For iPhone & iPad users who need to screen record with voice, they’ve got a better option which is better than a third-party application. The iOS built-in screen recorder can perfectly handle this. Benefiting from the device’s internal microphone, you could find the hidden feature of screen recording with external audio in a matter of seconds.
In the following text, we will elaborate step by step on how to screen record with voice on iPhone and iPad.
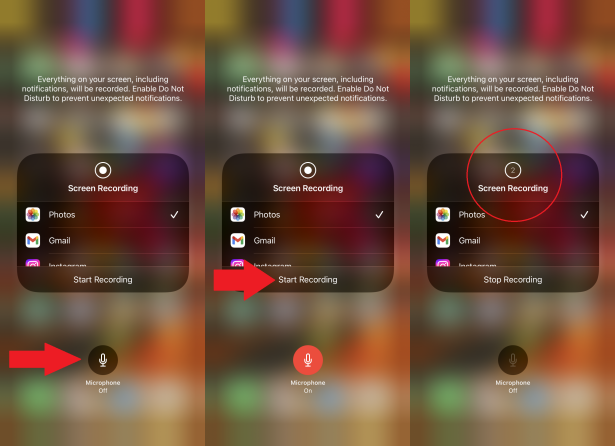
Step 1. Swipe down from the top of the screen to access the “Control Center” if you use the latest iOS devices such as iPad and iPhone X. If you are using an old iOS device with a home button, for instance, iPhone 8, “Control Center” could be accessed by swiping up from the bottom of the screen.
Step 2. In the “Control Center”, you could find a “Screen Recording” icon, which is the last one in the penultimate row. Long press the button to open a new interface for recording. As you could see, “Microphone” is turned off by default. To record your voice, you need to tap the icon to turn the microphone on.
Step 3. Get started by tapping the “Start Recording” icon, and the external audio will be recorded simultaneously. Kindly note that the in-built recorder will record everything that happened on the screen including notification. To prevent unexpected notifications, turn on “DO NOT DISTURB”. Once finished, tap the “Stop” icon to end, and your video recording could be found in the output folder.

How to Screen Record with Voice on Android
The ADV Screen Recorder could be an excellent choice for you to screen record with voice. The ADV Screen Recorder can both mobilize/activate your phone’s camera and mic at the same time so that we can screen record the screen while recording your voice. A full HD audio/ video quality screen recording with voice is supported.

Highlights of ADV Screen Recorder:
- Full capability to screen record with voice
- Clean & fast to record screen and voice
- Free to use
By simply following the below steps, you could know how to screen record with voice on Android phones.
Step 1. Download and install the app on your phone. A window will pop up, asking you if you allow audio recording. Choose "I Agree" to continue.
Step 2. Go to the recorder setting for audio, camera, and overlay configuration. You could choose to record the screen with your voice by selecting the “Microphone” option in the audio setting.
Step 3. Go back to the main interface where you could find a magic button overlay. Tap the “Record” icon to start and your voice will be recorded simultaneously. Pause is available during the whole recording process. When finished, tap the “Stop” icon to end your video recording with voice could be found in the output folder.

Conclusion
Screen recording with narration is powerful while sharing information. This brings a new challenge on how to screen record with voice. With plenty of screen recorders rolling out in the markets, there are still many problems people face when recording screens with voiceover on their phones or laptops. For instance, some screen recording software only supports internal audio recording, and the external sound is not allowed to be recorded. While others give no possibility to pause while recording. Therefore, we strongly recommend you download iTop Screen Recorder to record screen and voice at the same time and obtain a better screen recording experience.
Powered by Froala Editor


