


We often need to record PC audio from time to time, for example, we have to create a presentation or lecture, record meeting conversations or work calls, or capture radio, music, podcast, interviews, for enjoying offline, the list goes on. A free audio recorder for a PC is an ideal solution if you don’t want to spend any money.

Check our guide to the top 3 ways to record PC audio free effortlessly without a microphone. Let’s get stuck into the best audio capture software for PC where we have lots of more advanced options for a zero-budget crowd and start with iTop Screen Recorder.
Method 1: Record PC Audio on Windows 10/11 with iTop Screen Recorder
iTop Screen Recorder is a top-rated screen recording program that includes a few audio recording modes to capture PC audio with high quality on Windows 11/10/8/7. Here are some worth mentioning features from the tool.
iTop Screen Recorder offers several audio recording options that can capture system audio even when not running in the background, as well as external sound from a microphone, and is a good choice to record music, interviews, podcasts, and more. It is able to record audio in high quality. The recorded sound quality is nearly the same as the source audio. It also offers a denoiser to help remove background noise and guarantee the best sound quality. What’s more, it lets you record PC audio in various formats, like MP3, FLAC, and more for easier playback, editing, or sharing.
Guide to Recording PC Audio with iTop Screen Recorder
It’s quite easy to record audio from a PC with iTop Screen Recorder, thanks to the well-designed intuitive interface. Use the following steps to capture PC audio with the program.
Step 1. Free download iTop Screen Recorder, follow the step-by-step guide to install it and launch the program on your computer. It works on Windows 11/10/8/7. There’s no adware, redirects, or tricks. It’s 100% free and clean.
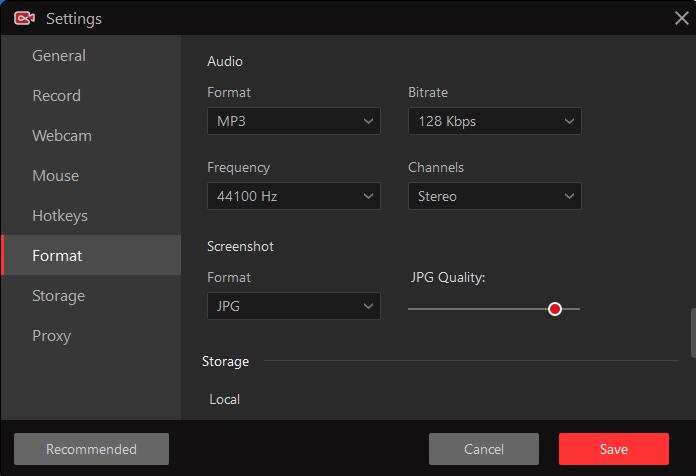
Step 2. Set up preference. Click the Settings button to get more audio options. You can set the audio format and frame rate. AAC or MP3 is recommended for good quality and compatibility.
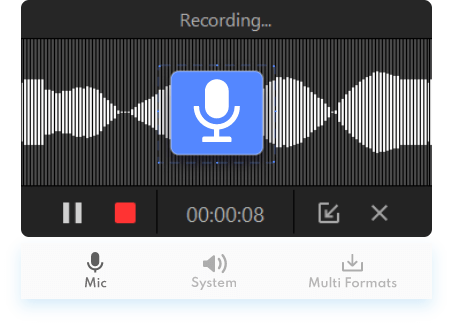
Step 3. Access to audio recording mode if you want to record audio only from PC. Enable Speaker for recording system audio, Mic for capture your internal/external microphone, or both speaker and mic for recording any audio on computer.

If you want to record screen with voice, please select recording area at first. Turn Speaker or Microphone on to record PC audio with high quality.

Now, Click the red REC record button or hit the F9 on the keyboard to start recording PC audio for free. You can press the F10 hotkey to pause the recording or click the Stop button/F9 hotkey to complete the audio recording from the PC.
Step 4. The audio recording will be saved under the video list. You can click the edit icon to edit the audio recordings freely.
iTop Screen Recorder is originally designed as a professional free screen recorder that is used to capture PC screen and audio. So, you can record a video with sounds in 1080p HD, 4K and save it to MP4, AVI, MOV etc. Thanks to hardware acceleration and low CPU usage, it can make a screen recording with no lagging.
It also builds in a video editor to add music, text, transitions, filters and visual effects to video. You can also cut, split and merge audio and video tracks to enhance your recording.
Method 2: Record PC Audio with Stereo Mix
Stereo Mix is a good way to record audio on Windows without microphones. It’s a Windows built-in feature that allows users to play, output, and record audio. Stereo Mix is disabled by default on the newer version of Windows. You need to enable the Stereo Mix audio source on the PC before recording audio. You’d better know that the option may not be available on some PC because the latest Windows drivers fail to support Stereo Mix. Follow the step-by-step guide on how to record PC audio with Stereo Mix.
Step 1. Type Control in the search bar near the Start button on your PC. Click and open Control Panel from the popping-up results.
Step 2. Select Hardware and Sound > Sound to open the Sound Window.
Step 3. Click the Recording tab on the Sound Window. Right-click the Stereo Mix option and choose Enable to make the Stereo Mix enabled. If you don’t see the feature, try downloading and installing older Windows drivers for your audio chipset. Resort to other ways to record audio from computer if the method doesn’t work or you think it’s too troublesome.
Step 4. Click the OK button to apply the change and close the window. Now, you can open the audio recording software and record PC audio without Microphone freely. Note that you should choose Stereo Mix from the input device instead of Microphone or Line-in input.

Method 3: Record PC Audio with Voice Recorder
Voice Recorder (formerly known as Sound Recorder) is a built-in audio recorder on Windows 10, enabling users to record lectures, conversations, presentations, podcasts, and other audio on Windows 10. You can record audio on PC in M4A format, as well as trim, rename, delete, and share your audio recordings. Its interface is intuitive and clean. However, if you want to record audio from a PC in MP3, WAV, AAC, or other audio formats, Voice Recorder for Windows 10 surely lets you down. Follow the guide below to record audio from a PC with high quality.
Step 1. Open Start on your Windows 10 PC. Search for Voice Recorder and click it to open the Voice Recorder app.
If you haven’t Voice Recorder on your PC, go to Microsoft Store, and search for Windows Voice Recorder. Open its download page, and click the Get button to download and install the app on your PC. Then you can find the app from the Start menu.
Step 2. Click the Record button or use the Ctrl+R shortcut to start recording PC audio with this voice recorder for Windows.
Step 3. Click the Flag button to add a marker to the audio recording’s key moments. This won’t interrupt the audio recording process. You can click the Pause button or Alt + P keyboard shortcut to stop recording. The recorded audio file will be saved in Documents > Sound recordings with m4a audio format. Apart from the ability to record audio on a PC, the Voice Recorder app for Windows 10 also allows you to trim, rename, and share your audio recordings on a PC.

Conclusion
You have several ways to record PC audio for free without microphones. However, Stereo Mix may not be supported by the latest Windows drivers. While Voice Recorder app on Windows 10 only outputs a .m4a audio file and fails to work unexpectedly. The third-party recording software like iTop Screen Recorder, the best screen recorder for Windows 10, 8, 7 and the latest 11, embraces full features and compressive performance in recording audio. Free download iTop Screen Recorder to capture audio on PC, such as lectures, interviews, podcasts, music, and anything else. Besides, it also records screen activities with HQ audio to help create tutorials, professional vlogs, reaction videos, and more.


