


On Windows 11, the Snipping Tool is more than a screenshot tool because it adds a quick screen recording feature to capture your current screen easily. Simply press “Win+Shift+S”, you can open and access the Snipping Tool screen recording menu. However, the Snipping tool is still at an improvement stage, so by default, it only helps to record video without any sound for now. Meanwhile, there are quite a few challenges, from the failure of 'Snipping Tool audio recording' to frequent crashes and freeze, for the latest Snipping Tool.
Not a big deal, this article has advanced solutions to fix common problems of Windows 11 Snipping Tool, and the best free alternatives to screen record with audio on Windows desktops.
Snipping Tool Video Recording on Windows 11 - Tutorial
Some of you may fail to switch to the recording mode because you may not update to the newest Windows 11 system. The Snipping Tool screen record feature requires Windows 11 version or higher. You can go to Windows Start menu > Settings to check your operating system. If not, just open the Microsoft Store > Library > click the "Get updates" button to update the Snipping Tool.
Now, let’s see a tutorial for how to use the Snipping Tool Windows 11 to record the screen.
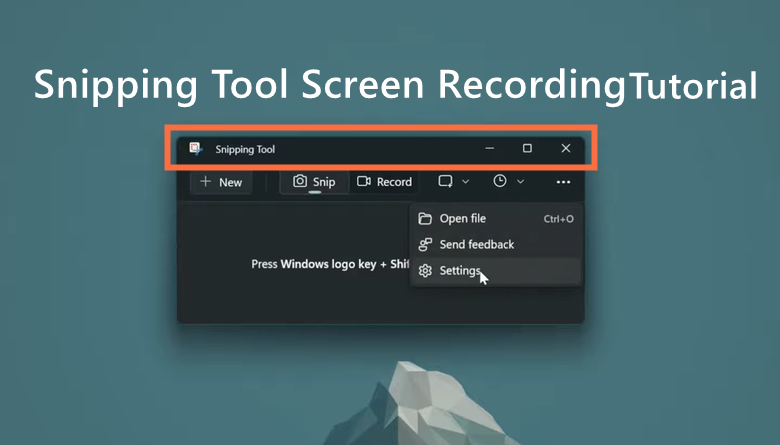
Step 1. Search for the Snipping Tool from your ‘Start Menu’ or directly open it by pressing “Win+Shift+S”.

Step 2. Click on the Snipping Tool. You can see the newly-added ‘record’ option on the popping-out window. Switch to the new option and then hit the ‘New’ button.
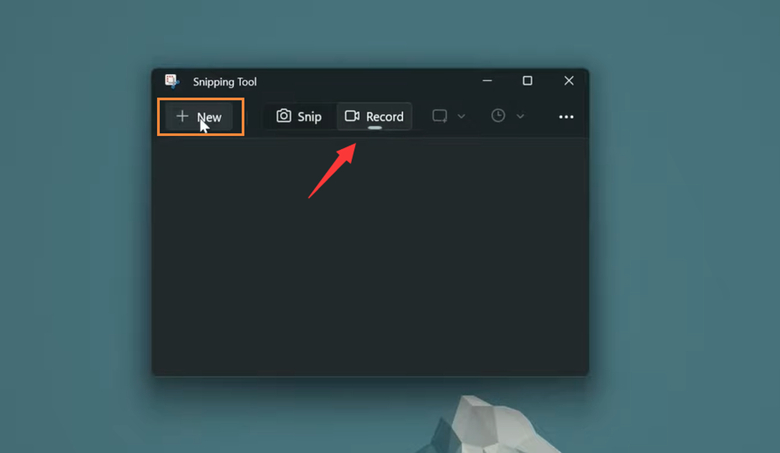
Step 3. Now you can outline the area you want to later record on. Once everything is ready, hit the ‘Start’ button, and after the 3-second countdown, your Snipping Tool video recording begins.
Include what you want (YouTube videos, TikTok web version, Twitch live streams, etc.) to record in the area, and everything will be captured successfully.

Step 4. Hit the red rectangle button to stop recording. Now you can decide where to store your footage.
Quick Answers for Windows 11 Snipping Tool Video Recording
In this part, this page will offer you some frequently asked questions and evident disadvantages of this simple recording tool as well as some complaints reflected by Windows 11 users.
1. Does Snipping Tool record audio?
Obviously not. Temporarily, the snipping tool screen recording fails to screen record with voice, which means you cannot capture the system sound on your PC, including the music you played or the videos' sounds from major streaming vendors.
2. What is the Snipping Tool's recording time limit?
The Snipping Tool does not limit the video length, which means theoretically you can record a 24-hour-long video. Yet the reality is cruel—given that the Snipping Tool is not equipped with any file compression technology, the video it produces will be super large! And the longer you record, the higher the risk of a sudden crash.
3. Will the Snipping Tool record video in high quality?
The video obtained from the Snipping Tool seems to fail to deliver a crisper video whose resolution exceeds 1080p. And 2k or 4k and ultra 4k are never going to be reached, too. Yet the smoothness is flawless, though.
4. Which video format will the snipping tool save in?
Your recording file is saved in MP4 format, which is pretty convenient to transmit to other platforms. But if you wish to save it as AVI or GIF, then you may be reduced to seeking help from some 3rd-party format converters.
5. Where do Snipping Tool photos/videos go?
Preview your materials from a 'thumbnail,' and then you can decide where you'd like to store your footage or screenshots.
Best Alternative to Record Video with Audio on Windows 11/10
Since the Snipping Tool fails to record video with audio. You can use the best free Windows screen recorder to capture video with audio without limit. As one of the most popular solutions and the best Snipping Tool alternative, iTop Screen Recorder avoids all the flaws mentioned in the last section, respectively:
1. Easily record system sound & microphone sound. Also enable recording audio only in MP3, AAC, AC3, FLAC, and WMAV2 formats.
2. Flexible to capture video of any area on screen and output in MP4, GIF, AVI, FLV, MKV, MOV, and TS formats.
2. Record quality clips for 3A gameplay or streaming videos without a black screen.
3. Stable performance with no lag.
4. Little burden to your system thanks to the hardware acceleration technology.
5. 1080p screen recorder that records without quality loss.
This Snipping Tool alternative screen recorder delivers the best performance in free recording in Windows 11 OS. It provides the best parameters that could be obtained from the market. Besides, you can easily find some extra features appended to this software to make your videos way better than those created from the Snipping Tool.
1. The noise reduction function for improving the audio in your YouTube footage.
2. The video editor for adding texts, captions, and filters into your videos.
3. The built-in screenshot feature allows you to capture your screen with the hotkey (F11).
4. The powerful screen recorder manages to record protected content; for example, it can record Zoom meeting.
How to Record Video with Audio on Windows 11 with iTop Screen Recorder
Audio recording, quality 4k clips: iTop Screen Recorder is a much better alternative freeware for the Snipping Tool screen recording feature in Windows 11.
The integrity of a video editor, a free Windows screen recorder, and a screenshot tool, although it demands some download and installation, makes the process quick and 100% green. It is so far one of the best recorders this market has ever seen, and please feel free to try it. Now, let’s see how to use this free screen recorder to quickly create quality footage like a breeze of the wind!
Step 1. Download iTop Screen Recorder to record your Windows 11 desktop.
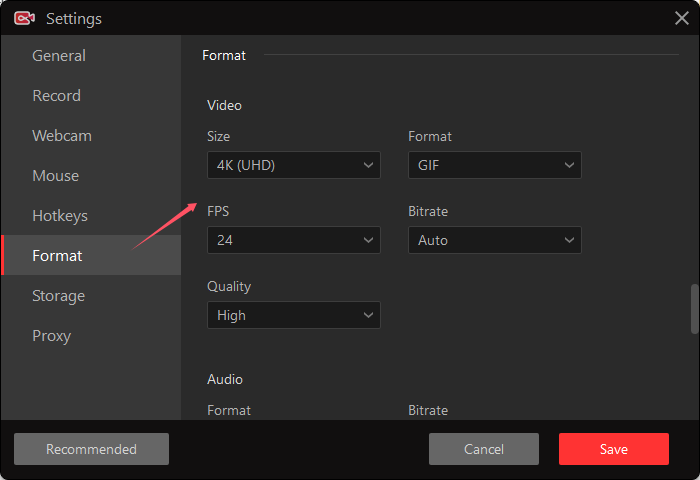
Step 2. Choose the recording area, audio source, webcam, etc.
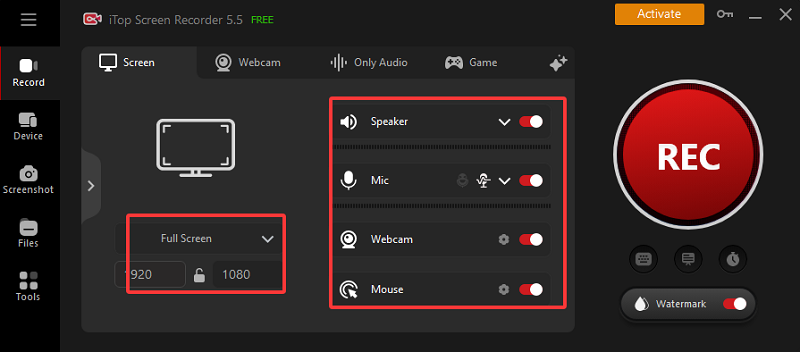
Go to Settings to confirm the format details for video and audio.
Step 3. Hit F9 to start recording. Hit F10 to pause or resume. And hit F9 to stop recording.
This screen recorder allows you to record the entire screen, the selected region, and a designated program (game especially).

Tips: You can redefine the recording area by dragging and moving the rectangle.
Step 4. When the recording is over, you can directly navigate to the file location or enter iTop Video Editor to bring more effects to your videos.
Further Reading: How to Fix Snipping Tool Not Working on Windows 11/10?
‘The snipping tool not working on your computer right now?’ Due to many causes, the Snipping Tool can go on strike because it is basically a simple default program without constant fixing plans by Microsoft. The screenshot feature and snipping tool screen recording feature will not be available since then. Possible factors that undermine this simple screenshot & screen recording tool can be attributed to other bugs and issues from 3rd-party software on your PC.
Here are some common scenarios when your Snipping Tool doesn't work properly:
#1. The Snipping Tool auto-stops recording
This often occurs when your Windows 11 is an outdated or corrupted version. You can update the operating systems and if it not work, go further to Settings > Apps > Snipping Tool > Advanced options and click "Repair". If it persists, click "Reset" to reset the app to its default settings.
#2. The Snipping Tool is blocked by other Applications you installed on the PC
Software, including Malware Fighters or Focus Assistants, can have terrible interaction with your Snipping Tool. The solution is simple, cancel the focus assist function. And add the Snipping Tool to the safe list of Malware Fighters.
#3. The Hotkey ‘Win+Shift+S’ is occupied
To solve this problem, you can use a Hotkey Spy to check what window and process are receiving the Win Hotkey message (in other words, the shortcut orders). Find the overlapped hotkey and change it so you can reactivate the Snipping Tool again.
#4. Corrupted Files or Outdated Version
If you ever tried uninstalling the Snipping Tool and reinstalling it, then some broken files will remain undeleted.
#5. The Incorrect System Date and Time
To solve this problem, just adjust your time and date to the right time point, and everything will be okay.
Conclusion
This page is an overall review of the newly added Snipping Tool video recording feature on the Windows 11 operating system. If you need a final verdict on whether it is a good recorder on Windows 11 or not, then you can rest assured that it is a functional tool. But when you demand more advanced options, assuming that you wish to edit your videos in depth or capture the screen in ultimate resolution, the Snipping Tool might get you upset. Then you can turn to a screen recorder like iTop Screen Recorder that offers the features for you and it charges no penny! Please feel free to try it.


