


Need to share a specific section of your Excel spreadsheet in an essay, report, or presentation? Capturing a visual snapshot of your data is the quickest and most accurate way to showcase key information. Whether you want to include the entire spreadsheet, a specific range of cells, or even just a chart, this guide will demystify how to take screenshot in Excel on Windows 10 and 11. We'll explore both built-in functionalities and third-party screen clipping tools, offering you versatile options to perfectly screenshot Excel and share it with ease. Let's dive in!

How to Screenshot Excel with Built-in Tools
Microsoft Excel, your trusty data analysis companion, also comes equipped with tools for capturing snapshots of your spreadsheets. Let's explore three built-in methods to take screenshot on excel directly:
Screen Clipping Option - Capture Selected Areas in Excel with Precision
The Screen Clipping option offers a flexible way to take a screenshot of specific areas or cells in Excel. Here's how to use it:
1. Navigate to the "Insert" tab: This tab houses Excel various insertion tools, including pictures and screenshots.

2. Locate the "Screenshot" button: Under the "Illustrations" section, you'll find the "Screenshot" button. Click it to reveal the available options.

3. Choose "Screen Clipping": Instead of capturing the entire window, opt for "Screen Clipping" to define a custom capture area.

4. Select your capture zone: Your screen will dim slightly, and your cursor transforms into a crosshair. Drag the crosshair to draw a selection box around the desired area of your spreadsheet.
5. Release and Paste: Once you've selected the area, release the mouse button. The captured image will automatically be pasted onto your Excel sheet at the current cell location.
6. Refine and Format (Optional): You can use Excel picture editing tools to resize, crop, or add borders to your screenshot as needed.
Additional Tips:
- Use the Shift key while dragging to maintain a perfect square or rectangle selection.
- Hold down Alt while dragging to move the selection box without resizing it.
- Right-click the pasted screenshot to access further editing options like "Format Picture" and "Save as Picture."
With the Screen Clipping option, you gain granular control over what you capture, making it ideal for highlighting specific data points or charts within your spreadsheet.
Copy as Picture - Focus on Individual Elements
While not a true screenshot excel tool, Excel "Copy as Picture" feature helps you create images of specific spreadsheet elements you want to share. Here's how:
1. Select the cells, chart, or object: Highlight the specific area you want to capture as an image.
2. Choose "Copy as Picture": Right-click again and select "Copy as Picture." This opens a dedicated menu with formatting options.

3. Select Format: Decide whether you want the image to appear "As shown on screen" (including formatting) or just as a "Picture." The former is often preferred for visual fidelity.

4. Paste the image: Open your desired application (e.g., Word, email client) and paste the image using "Ctrl + V" or the paste function.
Benefits:
- This method captures only the selected area, ensuring a clean and focused image.
- You have control over the formatting for a polished appearance.
Limitations:
- It doesn't capture the entire screen or multiple areas at once.
- Editing options within Excel are limited compared to dedicated screenshot tools.
Camera Tool - Screenshot Excel Sheet Data
The Excel Camera Tool is a nifty feature you might not know about, but it can be pretty handy for capturing and sharing specific data within your spreadsheets. Here's the lowdown:
What it does:
- Takes a "snapshot" of any selected range of cells, tables, or even charts.
- Inserts the snapshot as a linked picture onto your worksheet.
- The key part is that this picture is linked to the original data. So, if you update the data, the changes automatically reflect in the picture!
Benefits:
- Share a dynamic view of your data without worrying about manual updates.
- Embed snapshots in presentations or reports for clarity and easy reference.
- Keep your data and visuals consistent without duplicate efforts.
How to screenshot Excel with it:
1. Enable the Camera Tool: It's not on the main ribbon by default. Right-click on the Quick Access Toolbar and select "Customize Quick Access Toolbar." Choose "More Commands" and scroll down to find "Camera Tool" under "Commands Not in the Ribbon." Click "Add" to add it to your toolbar.
2. Select your data: Highlight the range of cells, table, or chart you want to capture.
3. Click the Camera icon: It's now on your Quick Access Toolbar.
4. Paste the picture: Click on the worksheet where you want to place the image.
Bonus tips:
- You can format and resize the picture like any other image in Excel.
- The picture updates automatically when the source data changes, but you can also right-click and choose "Update Picture" to force an update.
- This tool works across different sheets within your workbook.
- You can copy and paste the picture into other Office applications like Word or PowerPoint.
Also Read: 6 Methods on How to Screenshot Windows 11/10/7/8 >>
How to Screenshot Excel with Snipping Tool
While Excel offers built-in options, sometimes you need more flexible screenshot tools. Here's where Snipping Tool, a handy utility pre-installed on Windows, comes in.
Snipping Tool allows you to capture specific parts of your screen, perfect for grabbing targeted sections of your Excel spreadsheet.
How to Take a Screenshot in Excel with Snipping Tool
1. Launch Snipping Tool: Search for "Snipping Tool" in the Start menu or press Windows key + Shift + S.
2. Choose your capture mode: Select from four modes:
- Rectangular Snip: Capture a rectangular area (default choice).
- Freeform Snip: Draw a custom shaped selection around your desired area.
- Window Snip: Capture the entire active window (e.g., your Excel window).
3. Full-screen Snip: Capture your entire screen.
4. Target your screenshot: Click and drag your mouse to select the desired area in your Excel sheet.
5. Capture and Edit: Release the mouse button. The captured image appears in the Snipping Tool window. You can now annotate, save, or copy it.

While Snipping Tool doesn't offer some advanced features of third-party tools, it's a convenient and readily available option for simple screenshot in Excel.
Also Read: 6 Best Snipping Tool Alternative for Windows >>
How to Screenshot Excel with Screen Recorder
While built-in tools offer practicality, sometimes you need more robust screenshot capabilities. Here's where iTop Screen Recorder enters the scene, a versatile screen recording tool with a seamlessly integrated screenshot feature perfect for Excel.
Forget juggling multiple tools! iTop Screen Recorder built-in screenshot tool empowers you to capture and save various elements of your Excel spreadsheets with ease.
Key Features:
- High-Quality Excel Screenshots: Capture crystal-clear images of your data, preserving crucial details without pixelation.
- Flexible Area Selection: Whether you need a specific cell range, a chart, or the entire sheet, the screen recorder lets you define your capture zone precisely.
- Full Sheet Capture: Capture entire Excel sheet in one go, ideal for sharing comprehensive overviews.
- Annotation Options: Enhance your screenshots with text, arrows, and shapes for clear communication or highlighting key points.
- Multiple Format Options: Save your screenshots in various formats like PNG, JPG, and BMP, ensuring compatibility with different needs.
- 100% Free and Safe to Use: Access screenshot and screen recording features at no cost. No virus, no malware, you can screenshot Excel safely with iTop Screen Recorder.
How to Take a Screenshot in Excel with iTop Screen Recorder
Step 1: Download and install iTop Screen Recorder on your PC. It is fully compatible with Windows 11, 10, 8 and 7.
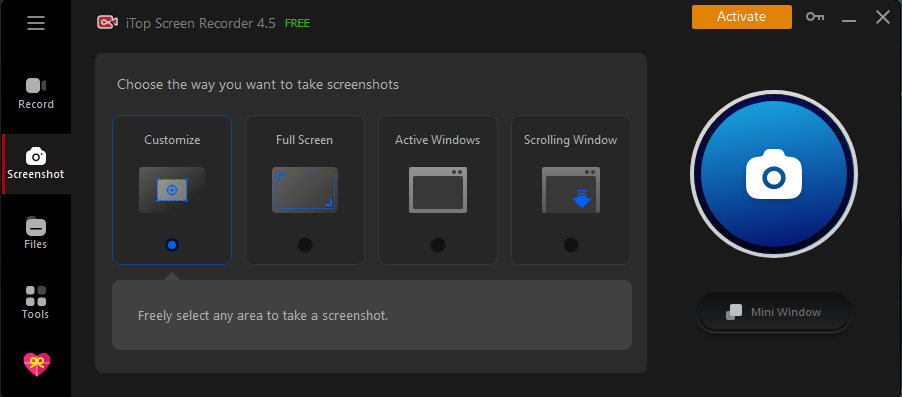
Step 2: Launch iTop Screen Recorder. Select Screenshot and choose capture mode.
- Customize: Capture specific area or cells in Excel.
- Full Screen: Capture whole content on the screen, including Excel window and other things.
- Active Windows: Only Capture Excel window.
- Scrolling Window: Capture entire Excel spreadsheet and all data. It is also usually used to save webpage as image.
Step 3: Click Capture button. Then, select area you want to screenshot in Excel. Use annotation tools and text to highlight important info if needed
Step 4: Click Copy to copy the Excel screenshot and share it to others. Otherwise, click Save to save the screenshot in your hard drive for later editing and sharing.

Remember: While this response cannot contain images, hopefully, the detailed descriptions provide a clear understanding of iTop Screen Recorder screenshot tool and its capabilities for Excel. Consider exploring the tool further to unlock its full potential for capturing and sharing your spreadsheet data visually.
Conclusion
Capturing screenshots in Excel goes beyond personal convenience; it's a vital tool for seamless collaboration and information sharing. Whether you're presenting data to colleagues, creating project reports, or crafting instructional visuals, the built-in screenshot Excel tools (Screen Clipping and Copy as Picture) and Windows Snipping Tool provide basic solutions. However, third-party screen capture tools like iTop Screen Recorder, can give greater flexibility and enhanced image quality to screenshot Excel.


