


A screenshot is a digital static image that contains all the visible contents on your display screen. Because images convey more explicit information than words, taking screenshots is one of the most effective ways to cut the confusion. Nowadays, demonstrating screenshots has gradually become a popular choice in effective communication, information exchange, documentation keeping, etc. However, do you know how to screenshot Windows 10? Whether you are using Windows 7, 8, or 10, there are plenty of methods available on the web that teach you how to take Windows screenshots. In this article, we have rounded up the 6 best methods for screen snap. Keep reading, and use these practical tools to take a Windows screenshot quickly!

- This is an Article Index.
- Do not insert any text in here.
- This index will be generated automatically when displayed on the front end.
- Of course we still love you.
How to Take a Screenshot on Windows 10 with Print Screen Key
The second easy trick to screenshot Windows 10 is using the Print Screen (Prtscn) Key. It is a good alternative if you don’t want to download a third-party tool. The Prtscn button is located in the third position from the end of the top keyboard row. To grab a screenshot and copy it to the clipboard, you can:
Step 1. Tap the Print Screen key directly to capture the entire screen.

Step 2. The screenshot will be copied automatically to your clipboard, and you have to paste it out in Microsoft Word or Paint to review.
Also read: How to Record Zoom Without Permission >>
How to Screenshot Windows 10/8/7 with iTop Screenshot
How do I take screenshots on Windows 10/7/8? Professional screenshot software must be the best solution. Exclusively available for Windows, iTop Screen Recorder offers a built-in screenshot option, which is a free all-in-one screenshot tool. It allows people to have 100% flexibility to capture entire or partial screen pictures.
How to Screenshot Windows 10/8/7 with iTop Screenshot?
Step 1. Download the iTop Screen Recorder from the official website and install it on your PC as per instructions.
Step 2. Double-click to run the software. Go to Menu > Settings to customize configurations such as languages, image format, image quality, hotkeys, storage locations, etc. Hit the Save button to confirm all the changes you made.

Step 3. Navigate the feature list > Click the Screenshot tool > Choose the way you want to take a screenshot on Windows, such as Customize, Full Screen, Active Windows, and Scrolling Window. Here, we select Customize option.
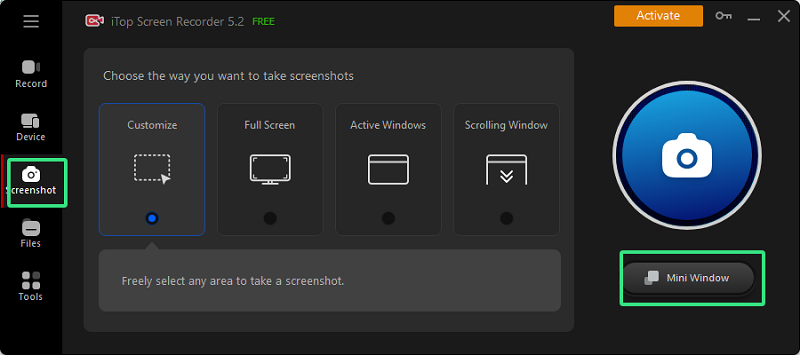
Enable the “Mini Window” mode. It will be floating and hiding on the upper right corner of your window. Thus, you can screenshot Windows at your disposal.
Step 4. Click on the blue Capture icon, frame the capture area with your mouse, and take a Windows 10 screenshot. You can also use the Full-Screen and Scrolling-Screen shortcut icons to grab the entire page or the scrolling page easily.
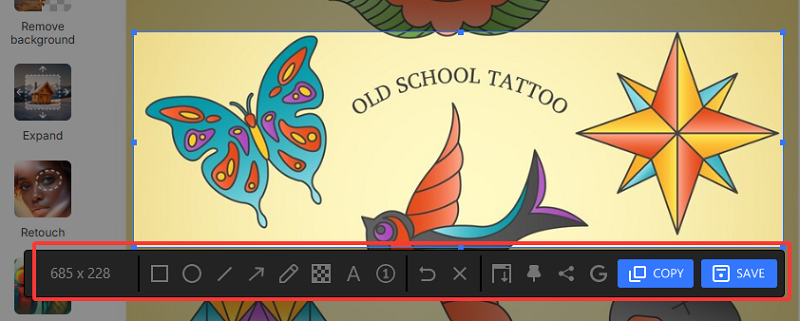
While screenshoting, you can use the shapes, line, arrow, paintbrush, pixelation, text, number tool, pin, and share to social media directly. Also, it allows you to search for similar images or content on Google or copy the screenshot for sending right away.
Step 5. The captured picture is available for further actions like editing, saving, sharing, or pining to the desktop. Find it the “Files” section > Local Storage.
Bonus Tips:
On the interface of iTop Screen Recorder, you might notice a recorder icon, which is another excellent piece of software developed by iTop Company to facilitate screen recording. Perfect for multiple occasions, the iTop Screen Recorder allows people to capture high-definition videos without lagging for free. Meanwhile, it also supports a wide range of output formats, flexible screen capture, quick video sharing, scheduled recording, and more.
Here are the main features of iTop Screenshot that we highlight below:
Feature 1: Flexible Area Screenshot Capture
iTop Screenshot provides its users with a flexible screenshot capture area. Whether you want to grab an entire desktop, a region, a window, or even just an icon, you can always rely on iTop for a quick and high-quality screenshot image.

Feature 2: Scrolling Screenshot Capture
Want more than a standard Windows 10 screenshot? Hope to capture beyond what you can actually see on the screen? Use iTop's extended screengrab function to satisfy your needs. Capture all you want by scrolling down and making them whole.

Feature 3: Edit Screenshot Online
Having a lightweight editor built-in, iTop Screenshot allows people to edit screenshots directly and add frames, circles, lines, or texts online.

Feature 4: Save Screenshots to Clipboard or Disk
In addition, iTop Screenshot provides two options to save screenshots, and people can either save them to a clipboard or disk, depending on their next moves.

Feature 5: Share Screenshots to Other Platforms
Instant sharing is another great feature of iTop Screenshot. With just one click, screenshots can be quickly uploaded to multiple platforms, including Instagram.

Feature 6. Pin Screenshot to Desktop
iTop Screenshot supports pining screenshots to the desktop so people can view relevant screenshots while working or studying to improve efficiency.
How to Use Windows 10 Screenshot Shortcut Key + Print Screen Key
The Windows screenshot shortcut key is usually placed on the bottom left corner of the keyboard, and it can be easily recognized because it has a conspicuous Windows logo on it. To grab a screenshot and save it in the dedicated folder, you can:
Step 1. Press the Windows key + Print Screen key simultaneously to capture the entire display, and your screen will briefly go dim for just a second.

Step 2. The Windows 10 screenshots will be saved automatically to the dedicated screenshots folder for review.
How to Screenshot Windows 10 with the Alt + Print Screen Key
The Alt key is at the bottom of your keyboard, next to the Windows key. To capture a single active window, you can use the combination keyboard shortcut “Alt + Print Screen.”
Step 1. Tap on the Alt key + Print Screen key at the same time to snap your currently active window.

Step 2. You can easily take a Windows 10 screenshot, and the screenshots will be saved automatically to the clipboard. You have to paste the shot into another program to save it for review.
Also Read >> Screen Recorder for PC Free Download No Time Limit
How to Screenshot on Windows 7/8/10 with “The Snip & Sketch Tool”
The Snip & Sketch tool is one of the Microsoft Windows screenshot utilities that assists Windows users in taking screenshots of open windows, free-form areas, rectangular areas, or the entire screen. Next, let’s learn how to screenshot Windows 10, Windows 8, and Windows 7 PCs with the Windows snipping tool.
Step 1. Input the “Snipping Tool” in the search box, select it from the results, and press the Windows logo key + Shift + S to open it.
Step 2. Hit Mode to expand the drop-down menu and choose snip types. Once the screenshot area is confirmed, the desktop will darken for a while.

Step 3. Take a Windows 10 screenshot, and use the buttons at the top for editing, saving, emailing, or copying it to the clipboard.
How to Take Windows 10 Screenshot with "The Game Bar”
The last method for how to screenshot Windows 10, how to take screenshots on Windows 8, and how to screenshot on Windows 7 PC is the Game Bar. The tool can be used for screenshot taking or video recording in most Windows apps and games.
Step 1. Press Windows Key + G to launch the Game Bar on your desktop.
Step 2. Click the camera icon on the menu overlay to take a full-screen screenshot. The picture file will be saved to the Captures folder in PNG format.

People using Windows 10 on a Microsoft Surface device can press the Power and Volume Up buttons to take a quick screenshot. And the captured picture can be found in the screenshots folder.
In conclusion, the article provides six methods for showing you how to screenshot windows 10/7/8. You can choose either the built-in Windows utilities or turn to a third-party screenshot tool like iTop Screenshot. With these tools, you can either screenshot your desktop, the online content, and also your loved TV shows, your loved anime like screenshotting Crunchyroll anime, etc.
Among these methods, we strongly recommend downloading iTop Screenshot for a more professional screenshot experience. Click here! And the iTop Screen Recorder is also worthy of trying. Download it below!


