A screenshot is useful when you need to show others what you see on your computer monitor or save important things you might like to refer back to later. For example, you want to report an error message to IT support and show them exactly what type of problem you’re having. Sometimes these still-image screen captures work perfectly for a simple explanation. However, if the problem you come across is complicated or there are too many things to save, a screen recording might be a better option. Both screenshots and screen recordings are part of screencasting.
This article will cover what a screencast is and how to record screencast Windows step by step. In addition, you will find 5 useful tips at the end of the article to help you record a screencast video more professionally and efficiently.

What is a Screencast?
A screencast is a digital video that captures what you see on your computer screen. It can be considered as a video equivalent of a screenshot and is often known as a screen capture video or screen recording. Screencasts usually include audio narration and may also include an embedded webcam video.
Unlike traditional pictures or videos recorded with a camera, you typically need a screen recorder to grab an image or recording of on-screen activity in a screencast.
How are Screencasts Used?
Compared to image or video alone, a screencast can help you communicate more clearly - you can show someone exactly what you want them to know. Therefore, screencast videos are widely used in various industries and scenarios. Here are some common examples of why you need to record a screencast.

1. Workplace Training Tutorials
Screencasts are perfect to be used as instructional videos, teaching new employees how to use a piece of specific software or how to use workplace tools. This shortens the amount of time needed for employee training.
2. Business Explainer Videos
An explainer video that highlights a company's product or service can be effective for marketing. Recording screencast is necessary if your company is selling intangible products.
3. Teaching Materials
Screencasts are popular in a hybrid learning environment where concepts and subjects are visually taught in real time. Educators can even use screencasts to make on-demand presentations to communicate with fellow teachers, parents, administrators, and more. They improve the effectiveness and efficiency of communication.
How to Record Screencast Windows 10 with Audio in 6 Easy Steps
It is intimidating for many people to record screencast Windows because they believe they need to be technically proficient and use expensive and sophisticated equipment. In fact, it is very easy to record screencast and edit recordings. All you need are a healthy Windows computer and a multi-functional screencasting tool.
Whether you are making a screencast for personal use, a classroom, a YouTube video, or a business, read below to record screencast windows 10 with audio in 6 easy steps.
Step 1: Choose Right Screen Recording Software
Since a screencast usually contains voice-over, screenshots, webcam, and editing, it is essential to choose a tool that comes with full features to save your energy.
Thankfully, iTop Screen Recorder is such a tool that can fulfill all your needs for recording screencast Windows, no matter if you are making a product demo, a feedback video, a lecture for your classroom, or anything else.
- iTop Screen Recorder is a top-notch screen recorder that can capture screenshots and screen videos on Windows 11/10/8/7.
- You get a no-lagging recording when capturing high-quality 1080p and 4k videos.
- This screencasting tool can record your system audio, your microphone, and your camera.
- It has a built-in audio and video editor to let you create your own screencast recordings.
- It offers 12+ output video and audio formats including MP4, MP3, AVI, MOV, and FLAC, and easily shares your screencast to several of the most popular destinations.
Step 2: Prepare for Recording
To make the recording process smoother and less difficult for video editing, careful and sufficient preparations before a screencast recording is important.

- If you are going to record the entire screen, it is a good idea to tidy up your desktop and use less-distracting wallpaper.
- If you need to record part of your screen or an active window, remove unwanted tabs, close unused apps, and remove sensitive information from view.
- To help you focus on the task on the screen, you had better turn off all notifications.
- If you need to record a webcam and record a screencast with audio, make sure your microphone and camera on your computer are functioning well.
- You should write a script and have a plan about how you want to record screencast Windows including the audio narration, the length of the video, materials needed, etc.
Step 3: Record Your Audio
A screencast is a video recording of your computer's on-screen activity that typically contains some sort of voice-over. The voice-over explains what is happening in a video and provides a full visual and audio experience to viewers. It can be narrated by a real person or a computer.
Record audio with iTop Screen Recorder on PC:
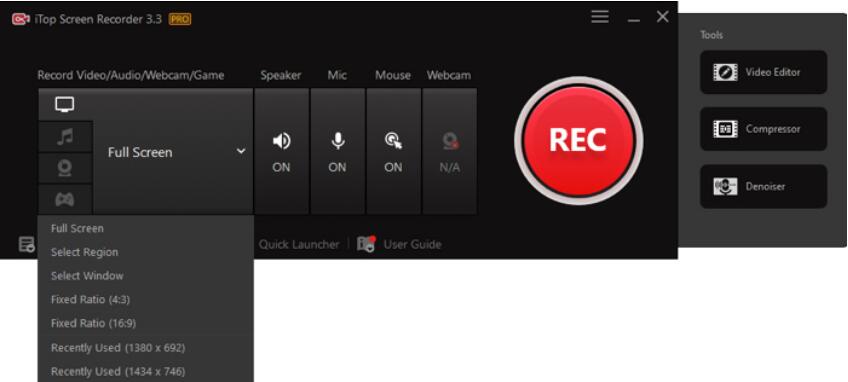
Step 1. Open iTop Screen Recorder and select the Music icon to change to the audio recording mode.
Step 2. Turn off the Speaker and turn on the Mic to allow the recorder to capture your voice from a microphone.

Step 3. Go to a quiet room, connect your microphone to your computer, and click the REC button to start recording your audio.
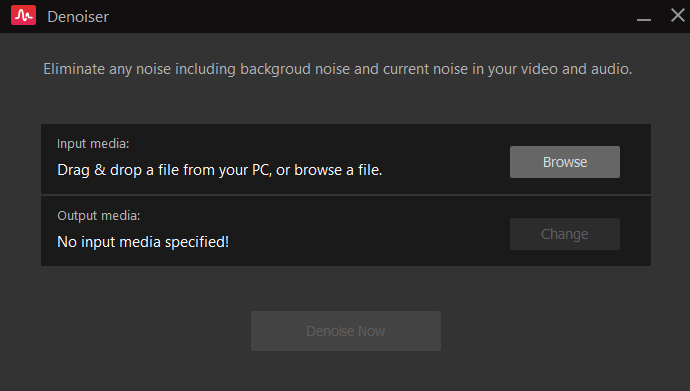
Step 4. Press F9 to stop recording your audio and open the Audio Denoiser to remove the background noise in your audio file for quality enhancement.

Step 4: Record Your Screen
The most important step in the process is making a screencast of your computer screen because it dictates how the final recording will appear. It is wise to do a sample recording to make sure everything like the computer, the software, and other materials is ready to be captured.
1. Open iTop Screen Recorder and choose what part of the screen you would like to record by clicking the arrow.

2. If you want to record screen Windows 10 with audio, turn on Speaker and Mic to record the system audio and external audio respectively.
3. If you would like to make your mouse click more visible, turn on the Mouse.
4. If you want to incorporate a human element in your screencast to increase personality and engagement, go to the camera icon to turn the webcam on and choose a background.

5. Click the REC button to start screencasting on your PC. iTop Screen Recorder allows you to take a screenshot during recording.
6. Press F9 to finish recording.
Step 5: Edit Your Screencasting Recording
It is common that you make mistakes during audio and video recording, so it is time to make adjustments to your recordings. iTop Screen Recorder makes it easy to edit your captured images, audio, and videos.
1. Open iTop Screen Recorder and go to Video Editor > Advanced Editor.

2. Select a screencast recording to edit.
3. You can cut, trim, rotate, split, and merge the content as needed.
4. You can add captions, blurring, subtitles, stickers, and images to make the screencast recording more informative and engaging.

5. To level up your video, add background music, transitions, filters, and other effects.
Step 6: Export and Share Your Screencast
After you have recorded a screencast Windows 10 and polished it to near perfection, you are ready to export and share your screencast. iTop Screen Recorder lets you directly export the video to your computer or choose to upload the video to YouTube or other video hosting platforms.
1. Click Export in the editing window, select a video format, and click Export.
2. Click the three dots next to the Export button and select YouTube if you are making a YouTube video.
5 Tips for Screencasting on Windows
Here are some tips and tricks that can help you make your screencasts more captivating and more result-driven.

1. Keep it short. Viewers' attention drops off a cliff after 2-3 minutes, so you should keep your video short in length and concise in content.
2. Practice and test before recording. You will stress out if you realize your audio wasn't picked up, the computer shut down halfway, settings weren't right, etc. toward the end of the recording.
3. Make a draft and ask for feedback. You should create a drafted screencast and share it with your family, friend, or coworkers for advice.
4. It is okay to make a mistake. When you are recording audio or screen, don't give up when making mistakes. Just keep screencasting.
5. Use background music, captions, subtitles, etc. wisely. These components are probably overused, which will divert your audience and reduce conversions.
Also Read: How to Screenshot Windows 10/8/7 Entire or Part of the Screen >>
Conclusion
The first time you record screencast Windows can be frightening, but if you follow the instructions in this post, you will be able to create excellent screencast films. If you are not a techie and you don't have any experience, using iTop Screen Recorder is one of the easiest and fastest ways to record a screencast.
 Vidnoz AI creates engaging videos with realistic AI avatars. Free, fast and easy-to-use.


