


Including a robust set of features such as HD cameras, session recording, screen sharing, content sharing, live chat, and attendance tracker, Adobe Connect is an Adobe Flash-based video software used by millions of people worldwide mainly for online learning, training, webinars, and meetings. By providing collaboration tools of whiteboard widgets, live chat, polls, and surveys, the platform makes it possible for businesses and individuals to easily communicate and interact. The latest published Adobe Connect gives hosts complete control of their presentations. Meanwhile, it also enables participants to access webcam and drawing rights.
With the upgrading of software and the different needs appearing, many people may face the problem of how to record Adobe Connect. Fortunately, this article introduces two ways to solve the problem. Keep reading and find the solutions in the following content.
- This is an Article Index.
- Do not insert any text in here.
- This index will be generated automatically when displayed on the front end.
- Of course we still love you.

Part 1. Basic Method: Record Adobe Connect with Built-in Recorder
Adobe Connect can be used for many different occasions, and it really does a lot of help for many people, and bring a great influence to their life, work and study. At the same time, many people want to keep this moment as good memories or reviewing, they choose to record as the first choice. Recording Adobe Connect meeting is necessary for future reviewing. You might want to know how to record teams meeting and record all the important information you and your colleagues share in the Adobe Connect meeting room and the simplest method is to use Adobe Connect's built-in recorder. Since the recording process is almost the same for PC and Mac, this article only takes MacBook as a demonstration example. Here is a tutorial that elaborates on how to record meeting in Adobe Connect.
Step 1.
To record Adobe Connect, firstly you must join the meeting. The Adobe Connect meeting recording will automatically start when you click the “Record Meeting” option, which you could find in the drop-down menu under the Meeting Tab.

Step 2.
Before Adobe Connect Meeting is officially recorded, there is a pop-up window that has the meeting name filled. You would be asked to write down a description to continue the recording. Once finished, hit “OK” to proceed with your Adobe Connect meeting recording.
Step 3.
Now your Adobe Connect recording is in process. Once finished, hit the “Stop Recording” on the control bar to stop. Pause recording is also available. You could pause the Adobe Connect recording by simply select the “Pause” button.

Step 4.
Preview your Adobe Connect recording and save it on your computer. If you need to modify the video, select the “Edit Video” button in the Actions column to trim any unnecessary or unwanted portions. If you want to download the recording, hit the “Make Offline” button.
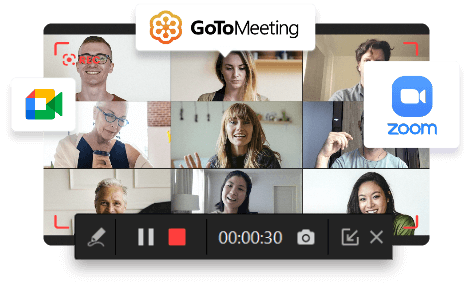
You May Also Like: How to Record Lectures on Zoom Easily and Efficiently >>
Part 2: Optimum Method: Record Adobe Connect on PC Quickly
Adobe Connect built-in recorder has an easy-to-use interface that allows people, even first-time users, to record Adobe Connect meeting smoothly. In addition, there are no extra tools or specific skills required, which makes it the most convenient solution to record adobe connect.
However, Adobe Connect built-in recorder only supports videos to be saved in FLV or MP4 file, which could not satisfy the multiple needs of different groups. Moreover, Adobe Connect is not tailor-made for recording. When it comes to long video recording, there will a problem of noticeable delay and memory issues, impacting the video quality.
Fortunately, iTop Screen Recorder, the best screen recorder, helps solve these problems. iTop Screen Recorder is a powerful all-in-one screencast tool that supports flexible screen capture and webcam recording with audio. Adopting GPU hardware acceleration technology, iTop Screen Recorder is an ideal choice for either individual or business to efficiently and stably make tutorials, lectures, meetings, demos, or games recordings.
Check out the top six features of iTop Screen Recorder below:
Feature 1: Record the Screen with Audio
Feature 2: Flexible Screen Capture
Feature 3: Unlimited Recording Time
Feature 4: Multiple Output Choices
Feature 5: HD Quality Video with No Watermark
Feature 6: No Lagging While Recording
How to record Adobe Connect on PC step by step with iTop Screen Recorder?
After getting to know the fantastic features, you might be desperate to give it a try. By following the three steps below, iTop Screen Recorder enables you to simplify the video recording and record Adobe Connect in high quality.
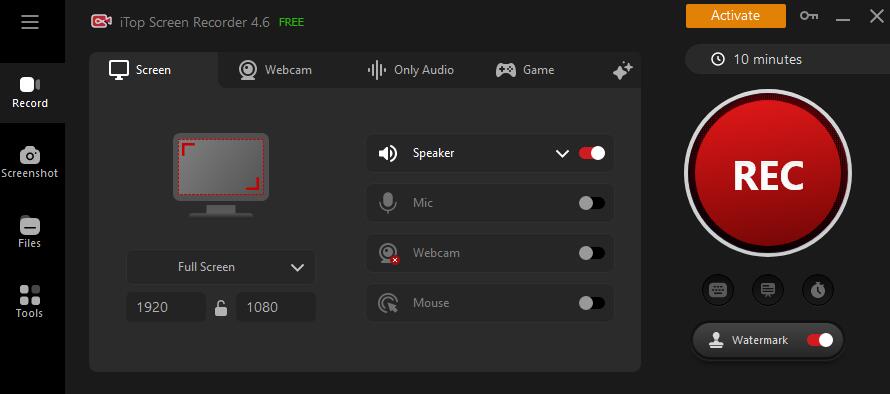
Step 1: Download, Installation, and Configuration
Download and install the latest vision of iTop Screen Recorder on your PC. Click the “Option” icon and select “Settings” for configuration. You could configure each function as per your need by ticking the related items such as audio, mouse, and webcam.
Step 2: Record the Screen
Get started by clicking the red “REC” button. There will be a three-second countdown that reminds you to get ready for the video recording. Pause, and screenshot options are available during the recording, where you can find them on the floating toolbar appearing on your screen.
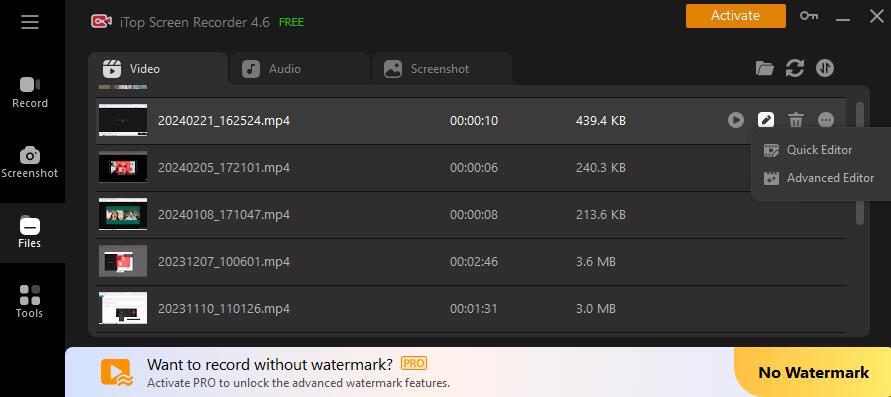
Step 3: Save and Edit
Hit the red square button or press F9 to complete the recording. iTop Screen Recorder supports video to be outputted in more than twelve formats including MP4, AVI, FLV, MKV, MOV, TS, and even GIF. Also, it is a 1080p screen recorder which will give you high-quality recordings. Edit function is also possible with iTop Screen Reorder in-built editor for trimming and cutting the captured video. Once finished, you could share your video immediately to a wide range of platforms with one simple click.
You May Also Like: iTop Free Screen Recorder – Video Recording & Video Editing Software >>
Part 3: How to Record Adobe Connect on iOS/Android Devices?
Adobe Connect mobile app is available on the Google Play and Apple App stores. Users who want to record Adobe Connect on iOS/Android devices could download Apowersoft Screen Recorder to solve the problem. Apowersoft is a handy screen recording software to record anything happening on screen. It works for both iOS and Android devices. After download and installation, go to "Settings" > "Control Center" > "Customize Controls", and then tap on the green (+) to add "Screen Recording" to your "Control Center". Open Adobe Connect Mobile and start recording Adobe Connect by tapping on the “Recording” icon. Video recording will automatically be saved on your phone when you are done.
Conclusion
The need of recording Adobe Connect is becoming a heated topic today. People may face some common inconveniences while using screen recorders. For instance, some softwares have a recording time limit or notable watermarks on video, while others may contain an annoying advertisement or malware. Different from those video tools, iTop Screen Recorder is a reliable product that allows users to capture their screen activity without any hassle. Additionally, it supports high-quality recording at HD video size (4096×2160). Last but not least, iTop Screen Recorder is completely free without any hidden fee. It is strongly recommended to download and try the mufti-functional recorder to obtain a better experience in video recording.
Powered by Froala Editor


