DaVinci Resolve is a professional post-production program for video editing, color correction, visual effects, motion graphics, and audio post-production. Sometimes, when you use this software, you may want to export a still to create a thumbnail, collect it as promotional material, use it for visual analysis, or just share how perfect a shot you achieved with your friends. Whatever, this guide will show you how to take a screenshot in DaVinci Resolve.
How to Take a Screenshot in DaVinci Resolve Using the Color Page
If you want to showcase the result of your color work, share the final work with others, or review the visual polish of a scene, then you can take a screenshot using the Color page. Before grabbing the still, go to the playback timeline settings and ensure the proxy resolution is set to “Full.” This guarantees that your screenshots are captured at the highest resolution. Now, follow us to see how to take screenshot in DaVinci Resolve.
Step 1. Drag your video clip into DaVinci Resolve and place it on a timeline.
Step 2. Click on the Color tab in the bottom toolbar.

Step 3. In the timeline, move the playhead to the exact frame you wish to capture.
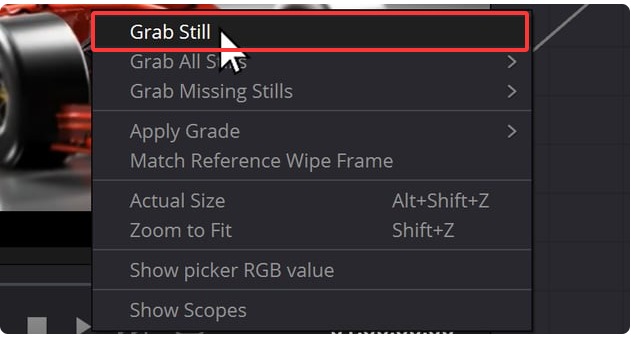
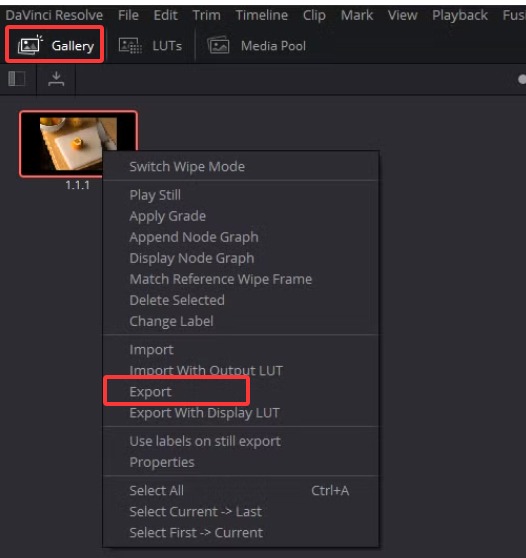
Step 4. Right-click on the video preview window and select “Grab Still” from the context menu. The captured still will appear in the Gallery section of the Color page.
Step 5. In the Gallery, right-click on the newly created still image and select “Export.” Choose the desired format (PNG or JPG) and set a desired location to house it.
How Screenshot DaVinci Resolve Using the Edit Page Menu
Suppose you want to capture the visual representation of your clip (more specifically, your basic edits, effects, and title placed on the clip) on the timeline. In that case, you can directly grab a still from the Edit page. Here are the steps on how to take a screenshot in Davinci Resolve.
Step 1. Go to the Edit Page.
Step 2. Drag the clip you want to screenshot onto the timeline.
Step 3. Move the playhead to the exact frame in the timeline that you want to capture.
Step 4. Click on File in the top menu bar and select “Export” > “Current Frame as Still.”
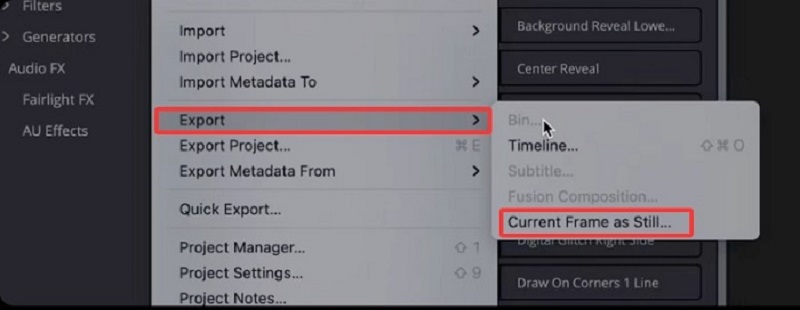
Step 5. A dialog box will appear to let you choose the desired location and image format (JPG or PNG). You can select one based on your needs. Once done, click the Save button.
How to Screenshot in DaVinci Resolve Using iTop Screen Recorder
How to screenshot davinci resolve? If you want more advanced options for screenshot DaVinci Resolve, just consider iTop Screen Recorder. It is primarily designed as a screen recorder, but its extra screenshot tool also wins the hearts of people for its intuitive design, flexible screenshot options, and annotation feature. After taking a screenshot, you can use the built-in editing tools to annotate or highlight important information, making your visual communication clearer.
If you want to know how to take a screenshot in DaVinci Resolve, just follow these steps. Plus, these steps also apply to taking a screenshot on WhatsApp.
Step 1. Download and install iTop Screen Recorder on your computer.
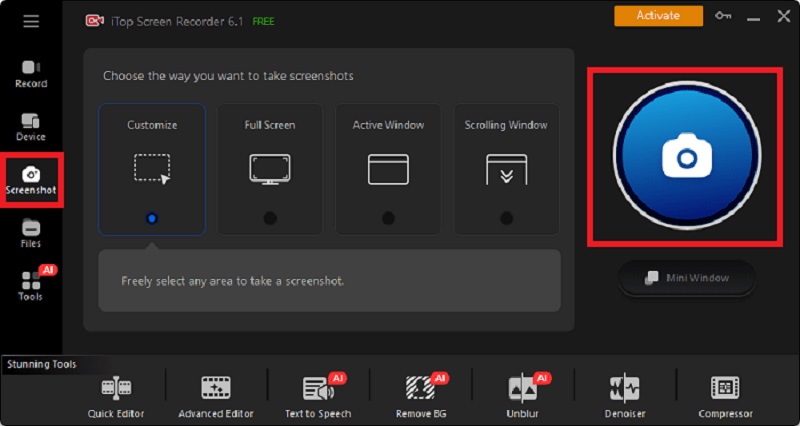
Step 2. Open iTop Screen Recorder and navigate to the Screenshot section on the left panel.
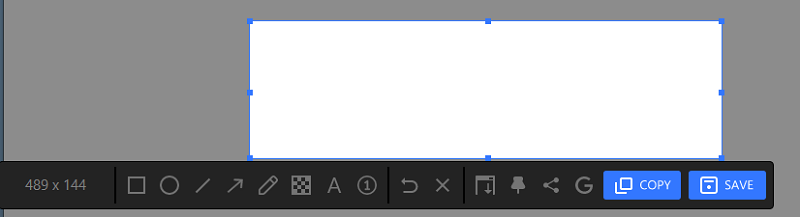
Step 3. Select the type of screenshot you want to capture (full screen, active window, or custom area). Then, click on the Capture icon to save your desired image.
Step 4. Once finished, you can copy your screenshot and paste it into your clipboard. Or you can directly save it in your desired location.
More Features of iTop Screen Recorder:
Record Your Screen and Webcam with Audio: iTop Screen Recorder allows you to capture not only your screen but also your webcam and audio simultaneously. This feature is great to record Zoom meeting.
Flexible Screen Recording with High Quality: You can screen record protected videos, capturing any area of your screen in high quality. Whether you want to capture a specific application, a full-screen gameplay session, or a custom-sized region, the software provides crystal-clear recordings to meet your needs.
Record Your Screen Without a Time Limit: iTop Screen Recorder offers unlimited recording time, allowing you to capture lengthy sessions without interruptions. So, you can use it to record Beyond live or TV shows.
Polish Your Recordings with Built-in Video Editor: You can trim unwanted sections, merge clips, add effects, and insert annotations—all within the same software. Just imagine that you screen record Instagram DM and edit it to make it look perfect.
Export Your Videos in Multiple Formats: Once your recording is complete, iTop Screen Recorder allows you to export your videos in various formats, including MP4, AVI, and MOV.
How to Screenshot a Frame in DaVinci Resolve Using a Keyboard Shortcut
If you want a more convenient and quicker way to take a screenshot in DaVinci Resolve, then you can directly use a combination of keys to get the job done. Here are the steps.
Step 1. Click on DaVinci Resolve in the top-left corner of the screen and select “Keyboard Customization.”
Step 2. Select All Commands in the Commands column and type “Current Frame as Still” in the right-hand search box.
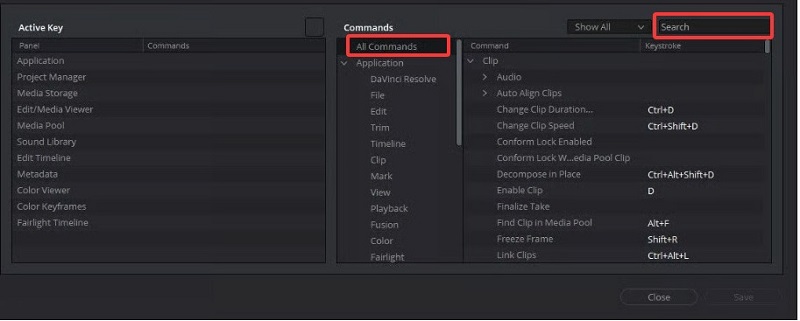
Step 3. Click on the command and assign a new keyboard shortcut to it (e.g, Alt +3). Then, press Enter to save your shortcut.
Step 4. Still in DaVinci Resolve, open your project and navigate to the desired frame.
Step 5. Press the key combination you just assigned (e.g, Alt + 3).
Step 6. A menu will pop up to let you name and save your still image.
Alternatively, you can use your operating system’s screenshot tool to capture the wanted frame as well.
Capture full-screen: you can press Ctrl + F on Windows and Cmd + F on Mac.
Take a screenshot of any area: Press Windows key + Shift + S to activate the snipping tool and drag to select the frame on a Windows computer. Press Shift + Command + 4 to select an area and drag to capture the frame on a Mac.
The Bottom Line
How to take a screenshot in DaVinci Resolve Windows? This guide has given you the answers. Knowing how to take screenshot of video in DaVinci Resolve is important, as it helps you capture the perfect moment from your video clip. Furthermore, you can use the newly captured clip for various purposes, such as reference or content creation.
Whatever, these methods can help you do it effortlessly. Usually, you can get the job done using the native screenshot feature, but it is not enough for people who need more advanced features like annotation, editing options, and more. If this is what you want, then you can download iTop Screen Recorder to get the job done. That’s all about how to take a screenshot DaVinci Resolve! Choose the right way based on your needs.