In today's digital age, many users encounter issues when trying to access blocked content. This could be due to legal restrictions, ethical considerations, or technical barriers. These challenges can be frustrating, especially when the information is crucial or the content is highly desired.

Fortunately, this article will serve as a comprehensive guide to help you bypass these obstacles, allowing you to access and save blocked content locally for future use. Keep reading to learn ways to access these restrictions effortlessly and know how to screen record blocked content with ease.
How to Access Blocked Content?
Accessing blocked content can be crucial in regions with stringent censorship. Here are three effective methods to bypass such restrictions:
1. Use VPN
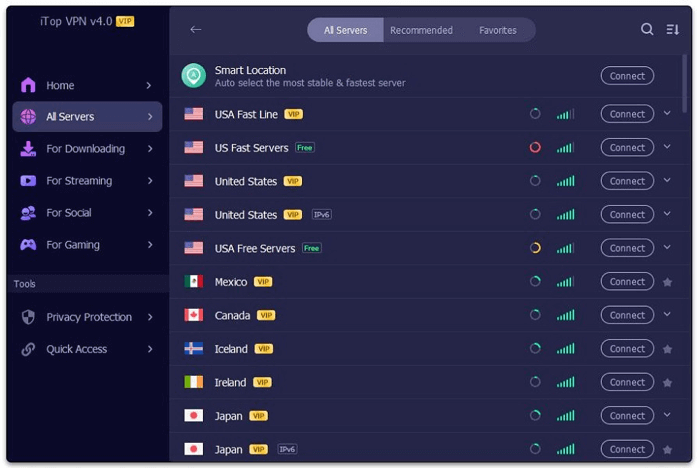
How to access blocked content? The easiest way is to use a Virtual Private Network. A VPN helps users bypass censorship by encrypting their internet connection and routing it through a server in a different location. This masks the user's actual IP address, making it appear as if they are browsing from a different country. VPNs are powerful tools for accessing blocked content because they offer both security and anonymity.
Some reliable VPNs include iTop VPN, ExpressVPN, and NordVPN. These services provide high-speed connections and robust encryption, ensuring that users can access restricted websites and services without compromising their privacy or security.
2. Use Proxy Servers
A proxy server acts as an intermediary between a user's device and the internet. When a user connects to a proxy server, their internet requests are routed through the proxy, which then accesses the desired content on their behalf.
This method can effectively bypass geo-restrictions and IP-based blocks, as the target website sees the IP address of the proxy server instead of the user's real IP. By using a proxy server located in a region without restrictions, you can access websites and services that are otherwise blocked in their location.
3. With the Tor Browser
The Tor Browser provides anonymity by routing internet traffic through a network of volunteer-operated servers called nodes. Each connection is encrypted and passed through multiple nodes, making it extremely difficult to trace the user's activity back to their original IP address.
Using the Tor Browser ensures a high level of privacy and can bypass censorship, allowing users to access blocked content. Tor is particularly useful in heavily censored regions, offering a secure way to browse the internet without revealing one's identity or location. For example, when you are troubled by how to access blocked sites on school computer.
Now you may access the forbidden content successfully, the next question is, how to screen record blocked content?
How to Screen Record Blocked Content?
Accessing blocked content is one challenge, but recording it for later use or sharing adds another layer of complexity. However, with the right tools and methods, screen recording blocked content becomes manageable. Here’s how to screen record blocked content using third-party software and built-in screen recorders on Windows and macOS.
Way 1. Using a Third-Party Screen Recorder
For those who need advanced features and more flexibility, such as editing, timing, or other needs, third-party screen recording software is the best way to go. Among the various options, iTop Screen Recorder stands out as an excellent choice due to its robust performance and user-friendly features.
- 100% free screen recording for blocked content. iTop screen recording tool offers a completely free solution for capturing screen activity without any time limits or watermarks for blocked content.
- Various annotation widgets like text, numbers added. iTop Screen Recorder offers a free video editor in which users can add annotations such as text, numbers, and shapes to their recordings, making it easier to highlight important information.
- HD screen recording plus scheduled recording. It supports high-definition screen recording and allows users to schedule recordings in advance, ensuring you capture content at the right time. In the meantime, iTop Screen Recorder ensures screen recording no lag.
- Built-in screenshot function for highlights saving. With screenshot feature by this screen recorder Windows 10, users can take snapshots of important moments, saving them separately for quick reference or sharing.
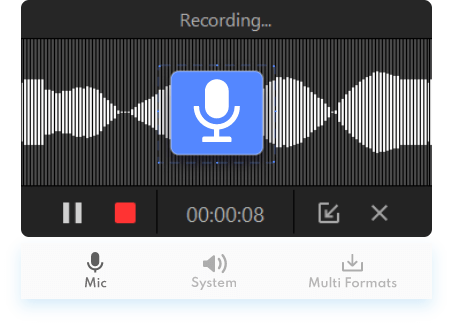
How to screen record blocked content with iTop Screen Recorder:
Step 1: Visit the official iTop website, download the installer, and follow the instructions to install the software on your device. Or, you can click on the button below to start downloading.
Step 2: Open iTop Screen Recorder, and adjust the settings as needed. Select the recording area, whether it's the full screen or a specific window. Set the audio source if you need to capture system sound, microphone, or both.

Step 3: Click the ‘Rec’ button to start capturing the blocked screen. Use the annotation tools during the recording if you need to highlight or comment on specific sections.

Step 4: Once you have captured the desired content, click the ‘Stop’ button. The recording will be saved automatically in your chosen format and location.
Additionally, you can use the built-in editor to trim or enhance your video before exporting it. That’s it! That’s how to screen record when it's blocked using iTop screen recorder free download.
Way 2. Built-in Screen Recorder
If you prefer not to install additional software, built-in screen recorders on Windows and macOS offer a convenient alternative. Here’s how to record blocked content with built-in recording software for each operating system.
How to screen record blocked content in Windows using Xbox Game Bar
Step 1: Press Win + G on your keyboard to open the Xbox Game Bar overlay.
Step 2: Click on the Settings icon within the Xbox Game Bar overlay. Adjust the recording settings as needed. Ensure that the correct audio sources (system sound, microphone, or both) are selected.

Step 3: Click on the Capture option in the overlay. Hit the Start Recording button or press Win + Alt + R on your keyboard to begin capturing your screen.
Step 4: When you are finished recording, press Win + Alt + R again to stop the recording.
The video will be saved automatically in the Captures folder under your Videos directory.
How to screen record blocked content in macOS using QuickTime Player
Step 1: Launch QuickTime Player from your Applications folder.
Step 2: Click on 'File' in the menu bar, then select 'New Screen Recording.'

Step 3: In the recording dialog, select the entire screen or a portion of it to start recording.
Step 4: Click the stop button in the menu bar or press Cmd + Ctrl + Esc to end the recording.
Save the video by going to 'File' > 'Save' and choosing your desired location.
FAQs on How to Screen Record on Blocked Sites
1. Is it legal to screen record content from blocked sites?
The legality of screen recording content from blocked sites varies by jurisdiction and the nature of the content. Generally, it is important to respect copyright laws and terms of service. Always ensure you have the right to record and use the content.
2. How can I edit my screen recordings?
You can edit your screen recordings using built-in editors in screen recording software like iTop Screen Recorder, which offers basic trimming and annotation tools. Alternatively, you can use dedicated video editing software such as Adobe Premiere Pro, Final Cut Pro, or free options like DaVinci Resolve for more advanced editing needs.
3. How do I ensure high-quality screen recordings?
To ensure high-quality screen recordings, use a reliable screen recording tool with HD capabilities, like iTop Screen Recorder. Configure the settings to record at the highest resolution your device supports, and ensure your system is performing optimally.
Conclusion
In summary, accessing and recording blocked content can be efficiently achieved through various methods, including using VPNs, proxy servers, and the Tor Browser. In terms of how to screen record blocked content, tools like iTop Screen Recorder offer extensive features such as HD recording, annotations, and scheduled recordings, making it a top choice. Additionally, built-in screen recorders on Windows and macOS provide convenient alternatives.
Ready to capture blocked content with ease? Try iTop Screen Recorder today and experience its powerful features firsthand.