Vidnoz AI creates engaging videos with realistic AI avatars. Free, fast and easy-to-use.


Nowadays, life and work are becoming more intelligent, convenient, and diverse. Everyone can work remotely only if he has the Internet and a computer. You don’t have to communicate the project details face to face, screen recording with audio to describe your requirements and questions is much more visual and efficient.
Similarly in daily life, recording sounds with screen recording makes it easy to access online training or courses as well as the live streamings or already paid films without time or location restriction anymore.
So come to the point, how to record sounds on screen recording? Keep reading to get a 3-minute guide to easily record audio with screen.
Best Tool to Record Sounds on Screen Recording on Windows PC
To record sounds with screen recording means you can arbitrarily capture any area on your screen and meanwhile the sound from the system or the mic will be recorded.
Here we recommend a 100% free and effective screen and audio recording tool - iTop Screen Recorder.
iTop Screen Recorder is a three-in-one video recording and creating tool. With it, everyone can start from capturing HD videos and sounds, and then further editing the recordings via the built-in free video editor. Finally, the screen recorder’s compressor will help reduce the edited files’ size without much quality loss.
Learn the Specific Functions of Recording Audio with Screen Recording
Record screen in 1080p HD/4K resolution. iTop Screen Recorder supports the best resolution recording with 1080p/4K 60fps. Besides, it utilizes GPU acceleration to speed up the recording and editing process, and the low CPU usage makes the screen recording with voice extremely smooth without lag.
Record screen and webcam of virtual background. This feature enables you to record your Windows PC screen, the sound, and your face via the camera. And you can customize the webcam background to make it blurry, transparent, or replace it with a virtual image.

Record sounds from speaker and Mic. The sound recording function is rather flexible because you can choose to record it or not, to record sound from the Windows PC, or record the sound through the microphone, as well as recording from the stereo channel or mono channel is also customizable.

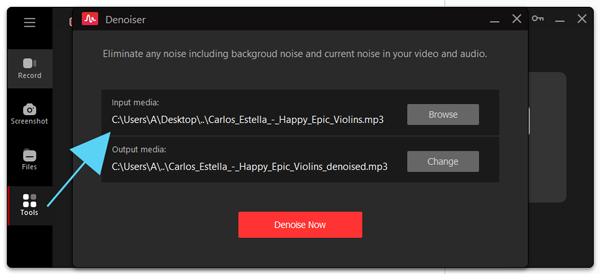
Reduce noise in the recorded audio with built-in denoiser. By applying the Denoiser tool to the recorded audio, you can eliminate the spare background noise and improve the audio quality easily.
Except for the Audio Denoiser, iTop Screen Recorder also has Video Editor, Screenshot Tool, and Compressor to make your videos more shareable and beautiful. Except for routine screen recording, you can also use it to record Zoom without permission, and to record protected video without any limitation.
How to Record Audio While Screen Recording on Windows PC
Just a few clicks, you’ll clearly know how to record audio with screen recording on iTop Screen Recorder.
Step 1. Free download and install iTop Screen Recorder on Windows PC.
Step 2. Click on the “Screen” button to set the recording area, audio, webcam and mouse.
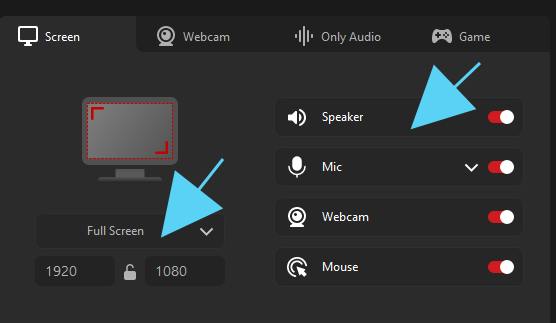
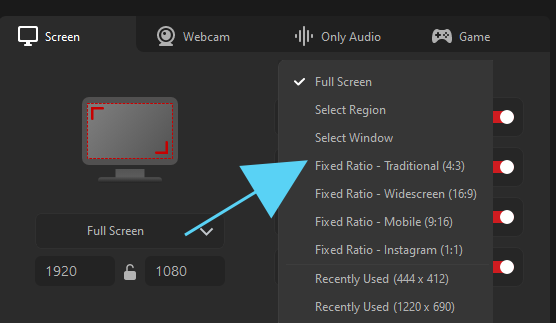
You can drag the select block to flexibly square the region or directly choose a fixed ratio, also, you can type in an aspect ratio.
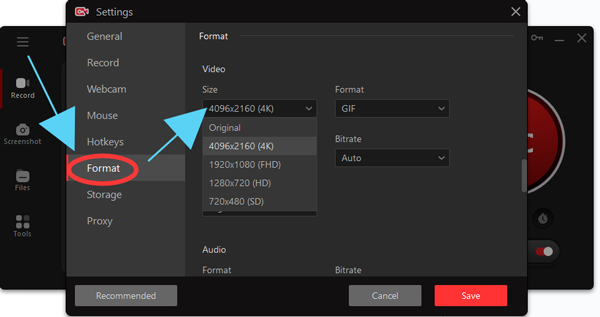
Go to the settings, to refine the recording demands of format, size, quality, webcam background, voice tone, storage, etc.

Step 3. Back to the interface and click the “REC” button. Wait for a 3-second cut-down, and it will auto record the selected area and sound source.
Step 4. Click the “Stop” button on the floating tool-bar to end at the time point you want.
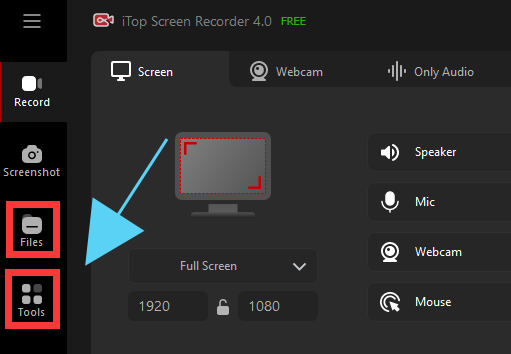
Step 5. Preview your recorded videos in “Files” or do more on the recordings via “Tools” in the navigation bar.
Why Need to Record Voice with Screen Recording
Only knowing how to record sounds on screen recording is not enough, to figure out what can screen recording with voice do will make your work and life more convenient.
Actually, recording screen with sound can break the barriers between different softwares and platforms, also it has no timeliness on the recorded content.
So, to record audio while screen recording mainly comes into play in 4 scenes.
- To save films or live streaming or TV shows for later watching. Sometimes, content like paid or rented films, TV shows, courses which have timeliness always expire before you find time to watch. Via screen recording, you can record Netflix with a few clicks.
- To create montage videos or daily vlogs. For video creators, not everyone is budget enough to shoot footage to create totally original videos. Thus, to record clips from the existing videos or consciously record messenger video calls with your friends, and use them to express your theme or life inspirations is the easiest and most effective method.
- To create training videos or pre-recorded courses. Teachers and trainers may need the answer to how to record sounds on screen recording more because of the increasing webified tendency of skill training, operation commentary, and subject courses.
- To create gaming videos or gameplay commentaries. In order to share gameplay operations and shoot a gaming commentary video, gamers occupy a big portion in using a game recorder to record gaming screen with system and mic sound.
FAQs of Screen Record with Audio on Windows PC
Q: Can I record audio or screen only with the iTop Screen Recorder?
A: Definitely. When recording screen only, you just need to disable the speaker and mic. iTop Screen Recorder has “Only Audio” recording mode for you to record YouTube audio into MP3 at one touch.
Q: How many video formats are supported in screen recording with audio?
A: This screen recorder supports more than 12 output video and audio formats, including MP4, AVI, MKV, MOV, MP3, FLAC, etc.
Q: What can I do with my recorded videos with iTop Video Editor?
A: Not limited to the recorded videos, you can drag and drop your local video and audio in the editing tool to beautify them with texts, stickers, subtitles, filters, transitions, special effects, speed changer, cutting, splitting, merging, and transforming.
The Bottom Line
To sum up, this article has listed the detailed steps of how to record sounds on screen recording on Windows PC. iTop Screen Recorder is introduced as a compressive recording tool with 3 assistant tools - video editor, video compressor, and audio denoiser. Therefore, no matter what you want to edit, compress or reduce noise with the video and audio you record, you can get them done in only one app - iTop Screen Recorder. Download to give it a try right now!