Ableton Live is a premier Digital Audio Workstation (DAW) designed for fast and intuitive music production. It is popular for the two-view workflow, which enables people to create and play around with loops in Session View and then record their live performances and arrangements directly into the Arrangement View for final production. Thanks to this intuitive workflow, many people use Ableton for music creation and performance. If this is also what you want, check this guide to learn essential techniques to create clear, powerful, and polished vocal tracks with Ableton. Now, let's record vocals in Ableton Live.
What to Prepare Before Recording Vocals in Ableton
Before getting started recording vocals in Ableton, it’s crucial to do some preparations if you want to get high-quality audio, prevent technical glitches, and maintain creative flow. Here’s a checklist to guide to:
1. Hardware essentials
- PC or Mac (at least 4GB RAM, 8GB+ recommended).
- Converts analog signals (mics/instruments) to digital.
- Condenser or dynamic mic for vocals.
- Closed-back headphones are recommended to prevent mic bleed.
- XLR for mics, 1/4" instrument cables for guitars/basses.
2. Set Up Your Environment
- Choose a quiet room to minimize background noise.
- Use sound-absorbing materials like foam panels, carpets, or blankets to reduce reflections and echoes.
3. Warm-Up the Voice and Prepare for Performance
- Spend some time warming up your voice to ensure clarity and range.
- Have your lyrics and vocal arrangement ready to ensure a smooth recording session.
How to Record Vocals in Ableton Live
Everything is ready. Get started with recording on Ableton Live.
Step 1. Launch Ableton Live
- Launch Ableton Live on your computer
- Create a new project.
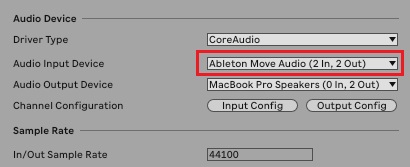
Step 2. Set Up Your Audio Preferences
- Install the right drivers for your audio interface model and connect your audio interface to your computer via a USB
- Launch Ableton and go to Live > Settings/Preferences, and set Audio Input Device to Ableton Move Audio
- Adjust sample rate and buffer size settings according to your needs
- Speak to your microphone to make sure everything works properly
Step 3. Start Recording
- Create a new vocal track by clicking Create > Audio Track, and name it.
- Adjust the input levels to make sure it works correctly.
- Click on the Record icon to start recording.

How to Record on Ableton Live in a Simpler and Quicker Way
Though Ableton Live is a powerhouse for music production, it still has some shortcomings, such as a steep learning curve, high cost, and heavy CPU usage. If you just need to record yourself singing or your song with instrumental playing, iTop Screen Recorder offers a more intuitive way to capture microphone with clear sounds. It is also a quick solution to record vocals that are playing in Ableton Live for a backup or instant sharing.
iTop Screen Recorder supports capturing both internal and external sources. Whether you want to record streaming/playing audio or sounds from microphones, it ensures high-quality outputs. It employs a denoiser to remove background noise and microphone echo for enhanced quality. After recording, you can export your audio file in various formats, such as MP3, AAC, and AC3.
Serving as an all-on-one screen recorder and video editor, you can also use iTop Screen Recorder to create a music video with audio or an instructional video of how to record vocal in Ableton Live.
How to record Ableton Live using iTop Screen Recorder
Step 1. Download and launch iTop Screen Recorder on your computer.
Step 2. Open your project in Ableton and ensure your microphone is plugged in, and audio inputs/outputs are set correctly in Preferences > Audio.
Step 3. Create an audio track and select your microphone as the input. Arm the track for recording by clicking the circle icon.
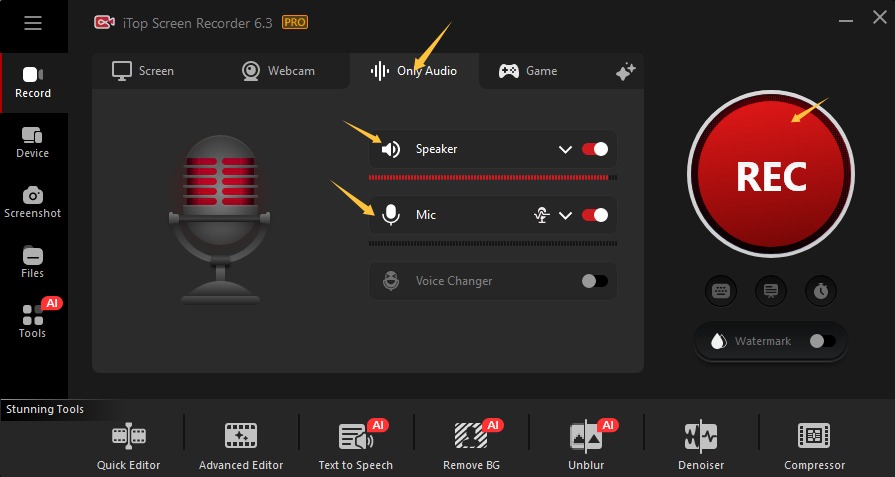
Step 4. Open iTop Screen Recorder and select Only Audio. Enable the microphone and speaker. Once done, click the Record button to start recording.
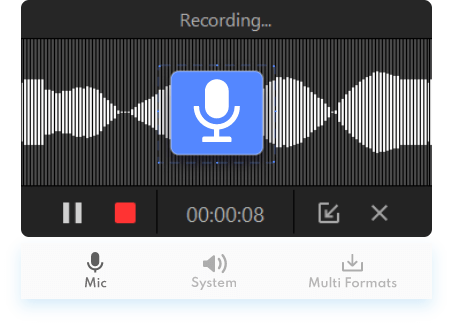
Step 5. Click the stop icon to end the recording process. Then, you can check your recordings in Files > Audio.
Pro Tips: iTop Screen Recorder offers a range of powerful features beyond audio recording. With its ability to screen record protected videos, you can effortlessly capture streaming content from any service with no restriction. Additionally, it allows you to record video calls and virtual meetings on WhatsApp, Zoom, etc, making it easy to save valuable moments for both work and personal purposes.
How to Record Vocals in Ableton Perfectly?
How to record an Ableton Live session perfectly? That involves careful preparation and attention to detail.
Here's a comprehensive guide to ensure the highest quality Ableton Live recordings:
- Minimize background noise, avoiding rooms with high traffic or constant ambient sounds.
- Select the Right Equipment. Use a condenser microphone for rich vocal detail and ensure your audio interface has high-quality preamps and low latency. Additionally, use high-quality, noise-free cables to prevent interference.
- Use a pop filter to reduce plosive sounds (e.g., 'p' and 'b'). If possible, use a shock mount to minimize vibrations and handling noise.
- Spend 10-15 minutes warming up your voice to enhance tone and reduce strain.
Troubleshooting Tips to Can't Hear My Vocals in Ableton
After learning about how to record vocals in Ableton Live, it’s time to explore something else. The problem “Can’t hear your vocals in Ableton? “ is a typical problem met by users. This problem can be triggered by many factors, such as incorrect input/output settings, disabled track monitoring, or improper audio interface routing. If you unfortunately meet these problems, just fix them using the following solutions.
-
Check Input/Output (I/O) Settings
Ensure the vocal track's "Audio From" is set to "Ext. In" and the correct input channel (e.g., Input 1) where your microphone is connected. Verify the "Audio To" is sent to "Master". -
Arm the Track
Click the Record Arm button (a small circle icon) at the bottom of the track header. This tells Ableton to listen to the incoming signal on that specific track. -
Set Monitoring to 'In'
In the track's monitoring section, select "In" to always hear the input signal regardless of whether the track is armed. If set to "Auto," you will only hear the vocals when the track is armed for recording. -
Audio Preferences
Open Settings/Preferences (Ctrl/Cmd + ,) and go to the Audio tab. Confirm the correct Audio Input Device (your interface) and Audio Output Device (your interface or speakers) are selected. -
Check Interface/Hardware
Verify your microphone is plugged in, the interface's Gain knob is turned up, and 48V Phantom Power is on if using a condenser mic. Also, check if your interface has a "Direct Monitor" knob that might be blending out the computer's signal. -
Check for Mutes
Ensure the track activator button (the yellow number at the bottom of the track) is ON. Also, check if the Master channel or any other tracks are Soloed (S), which would mute your vocal track.
Buffer Size
In Audio Preferences, check the Buffer Size. If it is set too high, you may experience significant latency (delay) that makes it feel like you can't hear yourself in real-time. Setting it lower (e.g., 128 or 256 samples) reduces this delay for recording.
The Bottom Line
In conclusion, our guide on how to record vocals in Ableton Live highlights the effective use of native solutions alongside iTop Screen Recorder for a seamless experience. By combining these tools, you can enhance your recording quality and streamline your workflow. Whether to record an Ableton Live session or directly record your own songs at home, download iTop Screen Recorder today to elevate your vocal recordings and capture every moment effortlessly.