


Have you ever wondered how to self record on PC? Maybe you need to record yourself talking on the PC for a presentation at work or a tutorial video for your YouTube channel. Or maybe, you just want to record Goat Simulator 3 gameplay and share it with your herd of other goats.
Lucky for you. You don't need fancy equipment or a high investment to self-record. Recording the video on your PC will do just fine. Here in this guide, we gathered some easy and decent solutions on how to record yourself on PC. Whether you want to video or talking record yourself on your PC, you'll find the right option.

- Contents
- How to Video Record Myself on PC
- How to Record Yourself Talking on PC
How to Video Record Myself on PC
“How to record myself on PC” is a question every novice will ask. As said, you don't need to cost an arm and a leg. Everyone can easily make a basic, talking-head-style video with a webcam and a screen recorder.
Solution 1
The built-in screen recorder on PC can do the job if all you want is to self record on PC and capture some quick video clips. But it's not the most feature-equipped program. For example, it doesn't include a built-in virtual webcam. And the necessary screen recording and basic editing features are missing. That's why you might need another recorder when it comes to how to self record on PC.
iTop Screen Recorder is the all-in-one video recorder and editor you may need. This program solves the problem of how to record yourself talking on PC, and it can also record your screen in PiP mode at the same time. That's quite convenient when you want to record a presentation or a reaction video. In addition to the flexible recording modes, below are the reasons you may need when self-recording on PC.
- No Limit of Time. The limitation on recording time can be frustrating, but iTop Screen Recorder allows you to record as long as you want.
- HD Video Quality. No one wants a grainy look when self-recording. iTop Screen Recorder supports 4K/1080P screen recording smoothly with no quality loss.
- Built-in Advanced Video Editor. iTop Screen Recorder offers a free built-in video editor program to help polish your recordings before sharing.
- No Watermark. The watermark thing is one of the most frustrating elements for content creators, so iTop Screen Recorder will leave no watermark on your recordings.
See the detailed steps of how to record yourself on PC with iTop Screen Recorder.
Step 1. Download and install iTop Screen Recorder on your Windows PC.
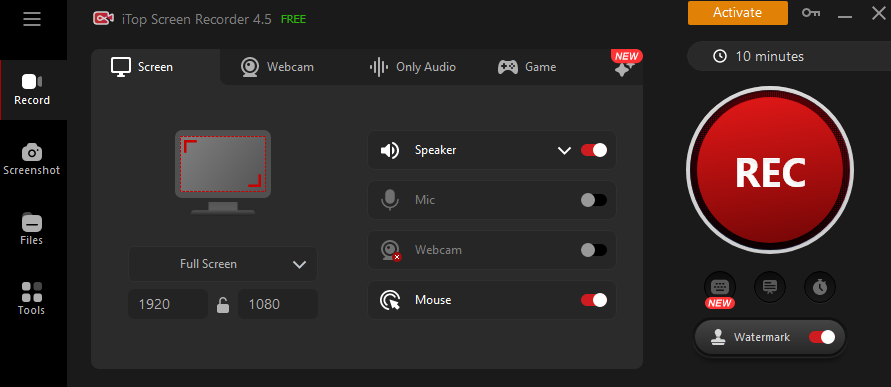
Step 2. Launch iTop Screen Recorder and set self recording settings.
Choose a recording mode by clicking and expanding the "Full Screen" drop-down list. You can either record the entire screen or record part of the screen.
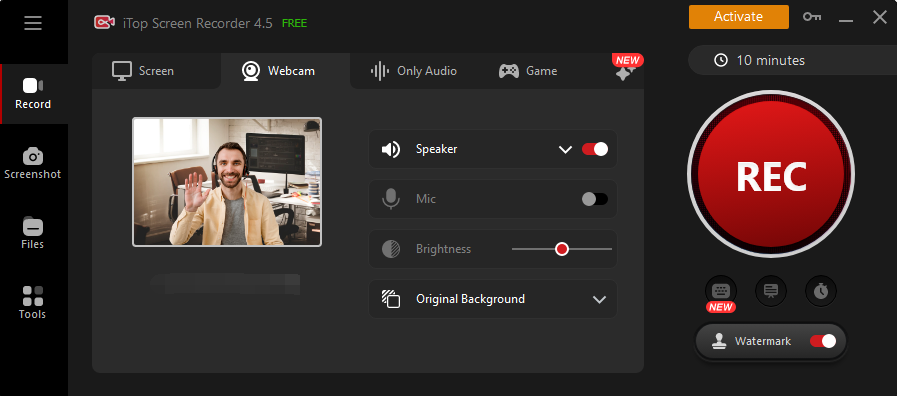
Click on the "Webcam" button to enable the webcam recorder. That's how to record yourself talking on PC. You can also choose whether to record the speaker, mic, or mouse as per your needs.
Step 3. Start self-recording on the PC.
Click the big REC icon to start recording. After recording, use the STOP button to stop and save the recordings to your device.
Step 4. Edit and save your recordings.
You'll find the recordings in the "My Creations" panel. Click the Edit icon to access them in the built-in video editor of iTop Screen Recorder.
Solution 2
If you ask, "how to record myself on computer," the Windows Camera app is a good solution. The built-in Camera app allows for taking photos and recording videos. You can easily point and shoot to start recording on any PC running record screen on Windows 10. Below are the steps on how to record yourself on computer with the Windows Camera app.
Step 1. Make sure the webcam is connected to your Windows PC. You can skip this step if you are using a laptop with a built-in webcam.
Step 2. Go to the Start menu and scroll down to find Camera in the list of all apps. Or you can also type and search for the Camera app.

Step 3. Open the Camera app. Then click the video icon to enable the video recording mode.

Step 4. Click the video icon again to start recording a video of yourself on Windows 10. After recording, you can head to Start > Photos to check the recorded video.
How to Record Yourself Talking on PC
For people who don't want to video record themselves on PC, there are various solutions to only record yourself talking on PC.
Solution 1
You can use the built-in Voice Recorder app to record yourself talking on a PC. The Voice Recorder app of Windows 10 is incredibly easy to use with the self-explained interface. You can start or stop a recording with a single click of your mouse. After recording, the files are auto-saved in the Documents folder of your PC for easy access. You can choose to play, cut, or delete the recordings.
Follow the steps below on how to self record on PC with the Voice Recorder app.
Step 1. Head to the Start menu. Type and search for the Voice Recorder app.

Step 2. Click the microphone icon to start recording.

Step 3. Click the Pause icon to pause, and the Stop icon to stop recording.

Step 4. Use the tools in the lower right corner of the interface to edit and save your recordings.
Solution 2
The voice recorder application for Windows 10 only has the most basic recording and editing features. If you want to make further editing, there are audio editing software such as Audacity or Adobe Audition for you to choose from. These programs typically offer more advanced features, including multi-track audio editing, high-quality resampling, dithering, etc. However, there may be a learning curve for novices. Follow the steps below on how to self record on PC with Audacity.
Step 1. Download and install the Audacity audio editor from its website.
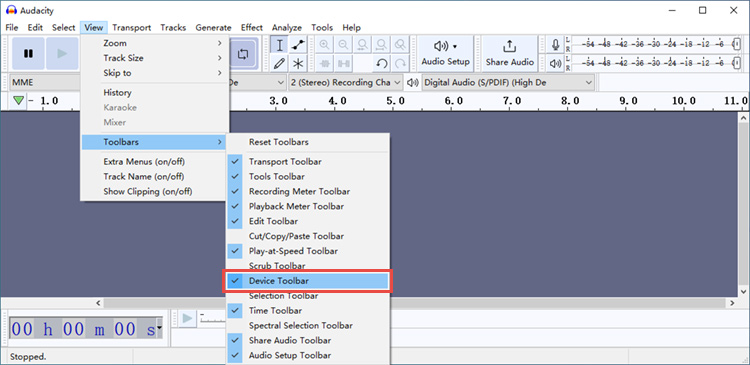
Step 2. Open Audacity. Go to View > Toolbars to enable the "Device Toolbar" from the top menu.
Step 3. Click to expand the "recording devices" drop-down menu, then select the device you want to record with.
Step 4. Go to "Tracks > Add New" to add a new audio track according to your needs.

Step 5. Click the red "Record" button to start recording yourself talking on your PC. After recording, click the black square "Stop" button to stop recording.

Conclusion
So that's all about how to self record on PC. As you can see, there are various solutions. However, in terms of ease of use, functionalities, and output quality, iTop Screen Recorder could be one of the go-to options for most people. Hope this guide helps answer the question of "how to record yourself on PC."


