 Vidnoz AI creates engaging videos with realistic AI avatars. Free, fast and easy-to-use.


Why do you need to screen record Windows 10? No doubt, capturing on-screen activities is the easiest solution to make various videos. Teachers can make lecture presentations for remote learning; Software developers can create tutorial videos to show how to use a program; games can capture game clips for sharing on SNS; also, you can record online meetings/webinars, streaming videos/audios, live streams for later watching.

Screen recorder Windows 10 offers a handy way to record everything on your PC, which can help you create a high-quality screen recording with audio. In this article, we will introduce 5 ways of how to screen record on Windows 10 or 11 with audio easily.
How to Screen Record on Windows 10 and 11 with Game Bar
Yes, some even don't know that there's a built-in screen recorder for Windows 10 - Xbox Game Bar. As its name suggests, it is primarily designed for gamers to record clips of video games. Even though, it is convenient to use and works well in most apps used as a screen recorder Windows 10. Let's go to see how to find the native screen capture tool and how to record screen in Windows 10 with it.
First and foremost, you need to find and turn on Xbox Game Bar.
Step 1. Click the Start button at the bottom and the Gear icon to open the Settings.
Step 2. Select Gaming. Then the Xbox Game Bar section load by default. On the right, there is a toggle shat is to turn on or off the Bar. If it reads Off, click the toggle and turn on the video capture tool. Then you can record screen in Windows 10.

How to record your screen on Windows 10 with Xbox Game Bar?
The screen recorder does work in regular apps, but it still has some disadvantages. Not all actions on Windows 10 can be recorded by the tool. Desktop, File Explorer cannot be recorded. So before starting press the shortcut key to open Xbox Game bar, remember to open the app you want to record at first. Otherwise, it will notify that gaming features aren't available for the Windows desktop or File Explorer. Then you could follow the steps to record screen Windows 10 instantly.
Step 1. Press Windows Key + G to open the pre-installed screen recorder Window 10.
Step 2. Click the Start Recording button (or press Windows Key + Alt + R) to record your screen in Windows 10. You could click the Setting button and change default settings, such as choose to record audio or not.

Step 3. On the top right of the computer screen, you could see the Capture Status, which shows the time of the recording. To end the recording, just click the green button.

To view the video you've recorded, press Windows Key + G and open the tool. Click the Widget Menu, choose Gallery, and you could watch all videos you've recorded. These videos are saved as MP4 files. Another way to find your recorded videos in Windows 10 is to go to the Captures subfolder under the Videos folder.
Cons of the built-in screen recorder for Windows 10:
- Cannot record full screen or specify a resolution to capture.
- Cannot pause while recording.
- Limited video editing features.
- Sometimes the gaming features not available for the Windows desktop.
Also Read: How to Troubleshoot Xbox Game Bar not Working on Windows 11/10 >>
How to Record Screen on Windows 10 and 11 with iTop Screen Recorder
Third party software is the leading solution to record screen in Windows 10 when Xbox Game Bar can't satisfy you. iTop Screen Recorder is an easy, free and powerful screen recorder for Windows 10 and the latest 11. It unblocks the power to capture every activity on your Windows screen, from mouse clicks/keyboard inputs to video/audio playing on the computer. You can record programs, browsers and any selected area on your screen with no effort.
iTop Screen Recorder provides multiple options to meet virous screen recording requirements on Windows 10. It also builds additional video processing tools, like video editor, video compressor, to further enhance your recording for later watching or sharing.
- Record any area on your Windows 10 screen. Flexible screen capturing can be easily realized with iTop Screen Recorder. You can freely choose to record part of screen (selected region), full screen, a window and an area with fixed ratio (4:3 or 16:9).
- Record screen in Windows 10 with audio & webcam. The screen recording mode enables you to record screen with audio and webcam at the same time. Addition to capturing system audio and built-in camera on computer, the screen recorder for Windows 10 also supports external microphone and webcam. Therefore, it can help create how-to videos, training videos, explainer videos etc., efficiently.
- Record Windows 10 screen in high quality with no lagging. You can customize video quality for your recording, in 720p, 1080p, 4k, 60fps and more. Hardware acceleration is utilized to promise a smooth recording progress. You can capture HD videos with no shutters or other issues.
- Record everything on screen in Windows 10. iTop Screen Recorder can exactly capture what is happening on the screen. You can use it to record zoom meeting or other online webinars, gameplays, video calls or streaming videos/audios with no quality loss.
iTop Screen Recorder is an easy-to-use program for beginners with an intuitive interface. You can get your screen recording just in few clicks.
How to Screen Record in Windows 10/11 with iTop Screen Recorder
Step 1. Free Download and install iTop Screen Recorder for Windows 10. It is also compatible with Windows 11, 8 and 7.
Step 2. Set preference.
Launch iTop Screen Recorder. Go to Settings and make your customization if necessary. For example, if you want to adjust video parameters, click on Format > Video, and then, you can set size (resolution), format, frame rate, bit rate and quality.

Step 3. Select recording area.
- Go to Record > Screen.
- Select what to record, full screen, a region, a window or area in fixed region.

Step 4. Start recording your Windows 10 screen.
- Turn on Speaker only to record screen with system audio.
- Turn on Mic to record screen with your voice.
- Turn on Webcam to record screen with yourself.
- Turn on Mouse and click gear icon to set effects if you need to record mouse movements.
- Click REC button to start recording.

Step 5. Stop recording in Windows 10.
- Soon, a mini control bar appears.
- On the bar, click the pen icon to open doddle panel. Use arrows, shapes to highlight content or add text as annotations during recording.
- Click Done (the red square shaped) button to stop recording.

Your recording file will be automatically saved in Files > Video. Click Edit button to launch video editor for cutting, resizing, rotating and adding text/image/effects. Also, you can play, rename, delete the recording or directly upload it to social media.
iTop Team develops a free online screen recorder enabling you to record the entire screen or a program/browser tab in Windows 10 from browser conveniently. It is a good choice if you want to screen record in Windows 10 without downloading anything.
How to Screen Record on Windows 10 and 11 with OBS
OBS is a popular open-source screencasting and streaming application for Windows, Mac and Linux. It delivers high performance to record screen, audio, webcam, game in Windows 10 and 11. You can also customize settings to output a recording with high quality. How to record screen in Windows 10 or 11 with OBS? Follow the guide.
Step 1. Download and install OBS on your PC.
Step 2. Launch the screen recorder for Windows 10.
Step 3. Create a scene at first. Then, click + button in Source panel to add a Display Capture source. If you want to record screen with audio on Windows, add Audio Input/Output Capture to record speaker and microphone.
Step 4. Click Start Recording to let it capture your display.
Step 5. Click Stop Recording to finish the task.

How to Record Screen on Windows 10 and 11 with Microsoft PowerPoint
Microsoft PowerPoint is more than a presentation maker but has hidden recording feature making it to be used as a screen recorder Windows 10. If you just want to capture screen with audio and mouse movements, PowerPoint is the most convenient helper. Now, let's learn how to record Windows 10 screen using PowerPoint.
Step 1. Create a new slide. Click Insert > Screen Recording.

Step 2. Then, you can enable PowerPoint to screen record selected region in Windows 10. Click on Select Area or press Windows logo key +Shift + A. Then, drag the cursor and select the area of screen you want to record.
Step 3. Click Record or press Windows logo Key + Shift + R to start recording. Click Stop or press Windows logo key + Shift + Q when you want to end the recording.

Tip: PowerPoint will automatically record screen with audio and pointer in Windows 10. If you want to record screen without sound, turn off the audio option before recording.
Step 4. The recording will be automatically insert to the slide. To save it as a separate file, right-click the video frame and select Save Media. Choose a folder and give it a name. Click Save.
How to Record Screen on Windows 11 with Snipping Tool
When coming to Windows 11, Snipping tool adds a screen recording feature to record a portion of the screen or whole screen without installing a third-party application. It offers a efficient way to record your screen in Windows 11 with audio.
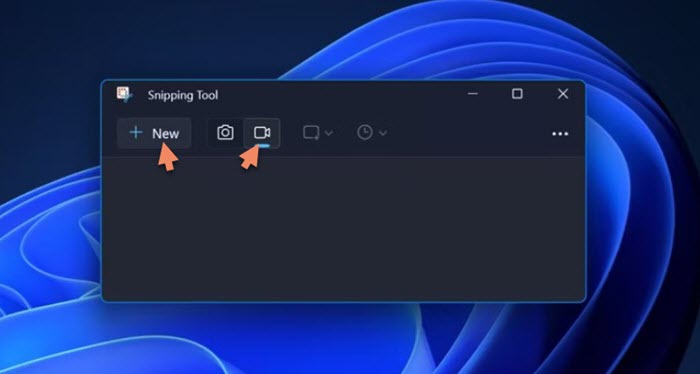
Step 1. Open Snipping Tool on your Windows 11 PC.
Step 2. Select Record button and click New to create a new screen recording.
Step 3. Drag and drop the rectangle to select recording area.
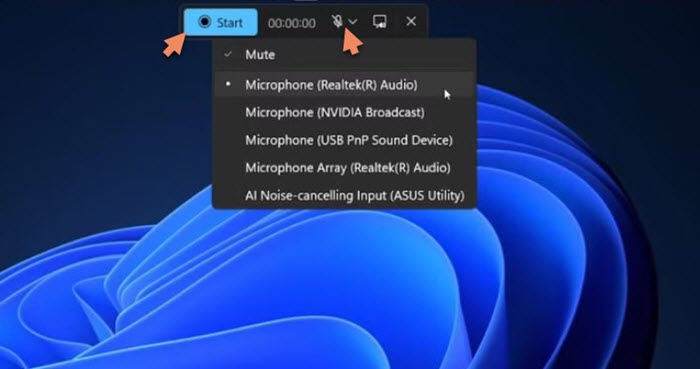
Step 4. Click the Microphone icon and select the audio recording device to record Windows 11 screen with audio.
Step 5. Click Start button to start recording.
Step 6. Click Stop button after you finish. The screen recording will be saved in the Videos folder by default.
Notice: Snipping Tool for Windows 10 has no screen recording feature and is only available take screenshots on your screen.
Conclusion
There are several ways to screen record in Windows 10 or 11. Xbox Game Bar is the native screen recorder for Windows 10 to help you conveniently without installing third-party apps record gameplay, apps on your PC, but it doesn't allow you to flexibly select recording area and not working issue happens from time to time. If you have installed Microsoft Office, PowerPoint is another good choice to record your Windows 10 screen. But, if you need a professional Windows 10 screen recorder, iTop Screen Recorder can give you a big hand. It is a powerful and versatile program to record your screen with audio and webcam on Windows 10 and 11. It delivers the highest quality and smoothest recording process thanks to hardware acceleration. Also, it can record audio and webcam video only with no effort.


