For mobile phone users, it’s convenient to record screens with the phone’s inbuilt recorder. While, how to record your screen on a laptop? If your laptop is installed with Mac or Windows 10, you could just start the recording with its own native screen recorder; For other systems, you need to seek assistance from third-party screen recorders. No matter which method is adopted, before that, it is necessary to be clear about the purpose and requirements of the recording.
What will you record with a screen recorder determines which method is more suitable for you. HD screen, unlimited time, and no lagging on the frame, and audio recording are particularly worthy of attention for recording working meetings, presentations, tutorial videos, etc, demandingly. If fast and simple to use is your priority, some online screen recorders can already meet your needs without downloading. This post brings you 4 practical and fast ways on recording a laptop screen and audio on Windows and Mac.

- This is an Article Index.
- Do not insert any text in here.
- This index will be generated automatically when displayed on the front end.
- Of course we still love you.
How to Record Your Screen on A Laptop Windows Free Online
Corresponding to diverse Windows systems, this part proposes 2 methods (without download) to record laptop screens in a targeted manner: an inbuilt tool and an online free screen recorder.
1. How to Record Your Laptop Screen Windows 10 - Xbox Game Bar
Laptop users of Windows 10 system, look over here. Do you are looking for a screen recorder Windows 10, you are so lucky, for there is a shortcut for Windows 10 screen recording. Xbox Game Bar is a customizable game overlay tool built into Windows 10, suitable for most computer game screen recording and also basic program recording operations. But this method, only working on a Win 10 laptop, applies to record merely one program window simply.
Step 1: Press the Window Logo Key and G to open Game Bar, and select the checkbox "Yes, this is a game".
Step 2: Open the program window that you plan to record.
Step 3: Click the microphone button to record the laptop screen with sound. If you won’t, skip this step.

Step 4: Click the record button to start Windows 10 screen recording.

Step 5: Click the stop button after completing the recording.

For the entire screen recording on PC, use the Windows Logo Key + Alt + G to start and stop recording. If the Xbox Game Bar does not display a full-screen program, try the Windows logo key + Alt + R to start and stop.
Pro:
- Easy and fast
- Absolutely safe as an inbuilt tool
- Without download
- With sound or not (both system and microphone sound)
- Screenshot supported
Cons:
- Only capture 1 program window
- Cannot record a part of your screen
- Only MP4 format output
2. How to Record on Laptop Windows 7, 8, 10 with Audio [Recommended]
Since a lower version of the Windows System laptop has no inbuilt tool to record the screen, such as Win 7 and Win 8 laptops, you need to find a third-party tool. Or provided you pursue a better experience of recording that the Xbox Game Bar cannot achieve or have higher requirements for recording video and audio, a professional and functional third-party screen recorder works better.
Here this post recommends a free online screen recorder available all for Windows 7, Windows 8, Windows 8.1, and Windows 10 so that you don’t have to download software and easy to use. That is iTop Screen Recorder.
iTop Screen Recorder is a newly launched screen recording tool. Although short in its history, it has overarching functions and can make up for the shortcomings that many other screen recorders have. More crucially, it is totally free!
Here are the easy steps on how to record your laptop screen free online.
Step 1: Open the iTop Online Screen Recorder.
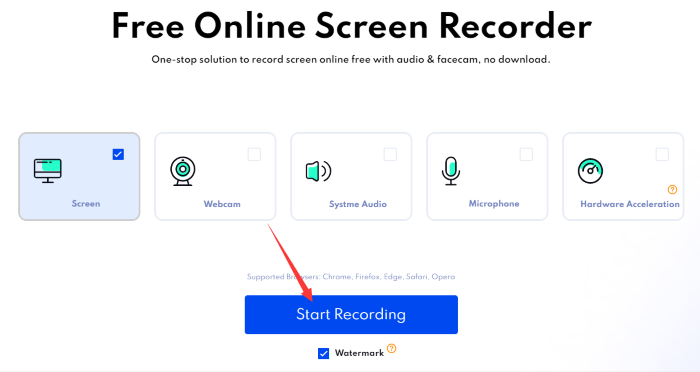
Step 2: Select recording mode and click Start Recording.

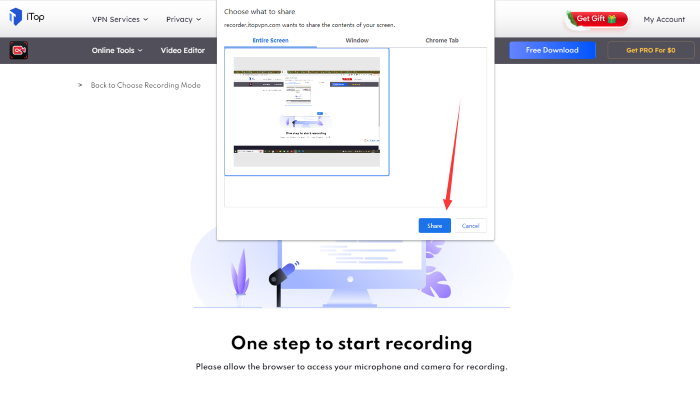
Step 3: Allow your browser to access the webcam or microphone. Select the recording area and click Share to record the screen on a laptop free online.

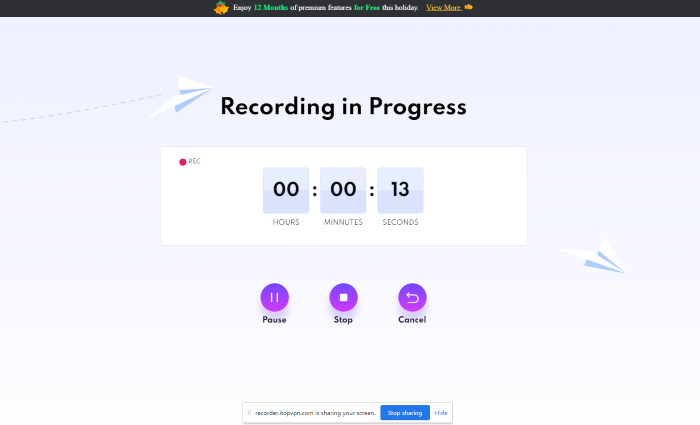
Step 4: Recording in laptop screen with audio free online!

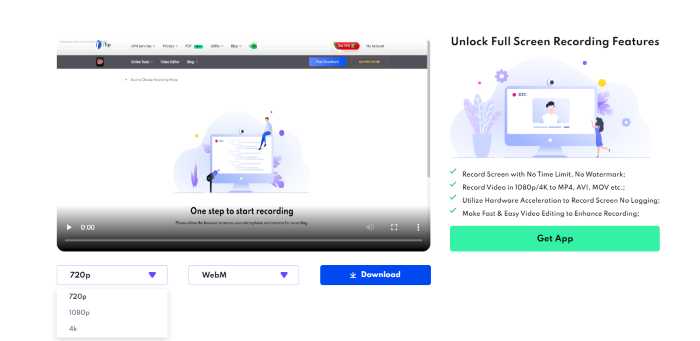
Step 5: Click Stop when you want. Select the definition and formats, and download it to your laptop.

Pros:
- Select screen area: Entire screen, Application Window or Browser Tab
- With audio (Microphone Audio, Browser Audio) or no audio
- No lagging while recording
- No login, no need to install plugin or extension
- Save video in WebM format, which can be recognized by Windows' default player
Cons:
- Only available for 5 minutes online recording for free, if you want to record longer, you can download the app.
More Free Features and Settings of iTop Screen Recorder
iTop Online Screen Recorder is usually handy for occasional use. If you want more settings for recording or use it frequently, freely download it to your Windows laptop, for its more functions and features:
- The app is a free screen recorder for PC no time limit
- Entire screen, selected portion or window, specific frame ratio (4:3, 16:9)
- With sound or not (both system and microphone sound)
- 12 Output formats supported
- No lagging while recording
- No login, no need to install plugin or extension
- Additional function: screenshots, trim or share to mainstream social media
How to Record Your Laptop Screen Mac with Audio
There are also 2 methods to record Mac screen and macOS Mojave screen with their respective inbuilt tools.
1. Record Your Laptop Screen on macOS - QuickTime Player
If you have not upgraded to macOS Mojave, how to record your laptop screen and voice? Try QuickTime Player, the native capture tool of Mac.
Step 1: Find the Application Folder to open QuickTime Player.
Step 2: Tap File at the top of the display, and choose New Screen Recording.

Step 3: Click the arrow (next to the recording button) to change the recording settings.

Step 4: Hit the round recording button and then:
- Click anywhere on the screen to record the entire screen.
- Drag to select an area to record, then click Start Recording within the area.
Step 5: Tap stop recording button or press Command+Control+ESC to finish recording.
As soon as you complete the recording, the QuickTime Player would automatically open the recording for you to play, edit or share.
Pros:
- Entire screen or a selected portion of screen
- Without download
- Safe & easy to use
- Trim & share directly
Cons:
- Only laptop system sound supported
Don’t Miss: 13 Best Screen Recorder Apps for Android & iPhone
2. Record Your Laptop Screen on macOS Mojave and Higher - Screenshot Toolbar
Mac comes with its own screen-recording feature on macOS Mojave and higher. That is Screenshot Toolbar. In Screenshot Toolbar, you could select the recording portion, trim and share the videos and audios after recording.
Step 1: Press Shift+Command+5 to open the system’s recorder.

Step 2: Opt in the bottom toolbar to select entire screen or a selected portion of screen.

Step 3: Choose where to save the recording and activate countdown timer to start recording. (At this time, choose whether to turn on the microphone or not.)
Step 4: Click the stop button in the menu bar (Or press Command-Control-Esc).
After completing the recording, a thumbnail of the video appears briefly in the bottom right corner of your screen. Click it to trim or share. Auto-save if you have no action.
Pros:
- Entire screen or partial screen
- Without download
- Safe & quick
- Trim & share directly
Cons:
- Only laptop system sound supported
You May Like: How to Record on Zoom without Permission
Bottom Line
How to record a screen on a laptop is no longer a challenge. The basic single-window screen recording with sound can be done by using the laptop’s inbuilt tool. QuickTime Player and Screenshot Toolbar (macOS Mojave) are capable to record Mac laptop screen conveniently, Xbox Game Bar to record Windows 10 screen, while other Windows systems laptop screen recording requires a third-party screen recorder. iTop Screen Recorder, with its Online Screen Recorder, offers more professional recording functions and settings to output high-quality videos and audios without time limits.
 Vidnoz AI creates engaging videos with realistic AI avatars. Free, fast and easy-to-use.


