Video compression refers to the process to shrink the overall file size of a video file. The video compression process is critical in this digital world since you have a big chance to get lots of large-sized videos, such as 4K footage, time-lapse video, and Ultra HD films, to name a few. Sharing and editing videos with a bulky file size can be frustrating. Most video-sharing methods, from email to messages, have file size limits. Compressing videos fixes the issue. Here’s how to compress video on Windows 11/10 easily with high-quality reserved.

Why Do You Need to Compress Video in Windows 11/10?
Video compression is quite regular and important in tons of cases. Reducing the file size of videos saves time, storage, and bandwidth. Below are some cases in that a smaller video size is preferred.
- Send via Email. Wanna send your video file over email? You need to compress video for email. Maximum attachment file size emails allow ranges from 10MB to 25MB. For example, Gmail accepts messages up to 25MB, Outlook allows you to attach only 10MB.
- Upload to YouTube, Facebook, etc. When the video is large, it will take a long time to upload, so you can waste lots of time. If you upload video in smaller video file size to YouTube, Facebook, Instagram, etc. viewers will get a better experience on phones, and older PCs with slow internet connection speed.
- Save Storage on Hard Drive. It’s also quite common to compress a video file in windows 10 for storage saving on hard drives. Storage equals money.
- Reduce Bandwidth for Video Transferring. Bigger videos require more bandwidth. Video compression can reduce bandwidth usage during video transferring, upload time, and less buffering, providing a better user experience when the video is viewed. The list goes on.&
- Ensure Smooth Video Editing. It’s easy to run into high CPU usage issues when processing large video files on older PCs. To compress video Windows 10/11 saves time in video production and offers more efficient video editing on older PCs.
What is the Best Software to Compress Video in Windows 11/10?
When reducing video file size in the wrong way, the output video can be corrupted and unplayable. So make sure you pick the right tool. A good video compressor can compress video on Windows 10 with a good balance between file size and output quality. iTop Screen Recorder, with a built-in powerful video compressor, can suit your needs. It comes with an array of features to reduce video file size quickly and effortlessly.
- Compress All Types of Videos on Windows 11/10. The program supports compressing videos in 1080p, 4K UHD, 8K, MP4, MOV, HEVC, H.264, any resolution, and any format. All your videos can be handled. As an all-in-one screen recorder and video compressor, it enables you to capture a screen video and then reduce size of screen recording in Windows 11/10 at one stop.
- Compress Video with no Quality Loss. Thanks to the advanced compression algorithm, iTop Screen Recorder enables you to compress video file Windows 10 from GB to MB while still keeping the same high quality.
- Compress Video on Different Levels. There are three compression levels: Normal, Advanced, and Ultimate. You can compress video Windows 10 by up to 30% without losing quality or reduce video size by 50% off with nearly original quality.
- Support Various Output Formats. The tool outputs videos in MP4, MOV, AVI, or other video formats for email, YouTube, Facebook, and other usages.
- 100% Safe to Compress Videos on Windows 11/10. The whole video compression process is safe - there are no ads, no plugins, and no tricks.
- No File Size Limit. 1GB, 10GB, 1TB, it’s all of your choices. It has no video file size limit.
Focusing on screen recording, iTop Screen Recorder allows you to capture screen activities and various videos with good quality and small file size. It helps record Zoom meetings, streaming videos, make training videos and more. With additional tools, you can edit, compress and take screenshot on your PC without trouble.
How to Compress Videos in Windows 11/10 with no Quality Loss?
Compressing video in Windows 11/10 is very easy in iTop Screen Recorder with drag and drop actions. Here are the steps you can follow to learn how to compress video on windows 10/11.
Step 1. Download iTop Screen Recorder, install and run it.
The program is 100% safe and clean, there are no plugins during the installation process.
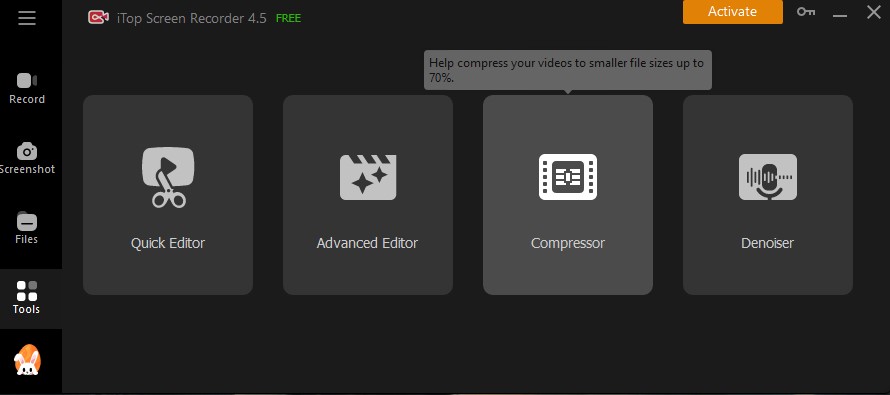
Step 2. Enable the video compression tool of iTop Screen Recorder.
Click the Compressor icon under the Tools section on the right panel of its main interface. The Video Compressor window opens and gets ready for video compression.
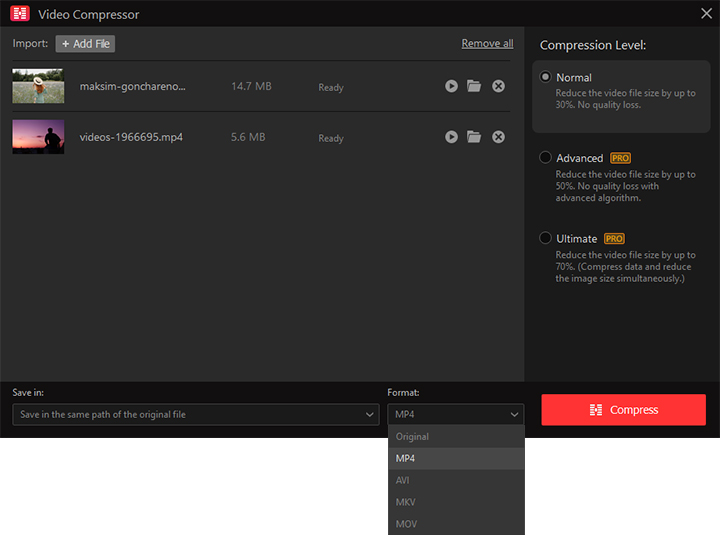
Step 3. Import the video you want to compress.
Click the Add button and specify a video to compress. Batch video compression on Windows 10 is supported. You can also import the video via drag-and-drop.
Step 4. Select a compression level and output format.
On the right side of the window, you should see the compression level options. Select the level you desire. There are three compression levels available: Normal, Advanced, and Ultimate. With the Normal option, you can reduce the video file size by up to 30%, the Advanced compression level can reduce video size by up to 50%, and the Ultimate shrink the file size by 70% down. Then click the Format drop-down menu and select an output format, Original, MP4, AVI, MKV, or MOV.

Step 5. Start reducing file size in Windows 11/10.
Click the Save in the drop-down icon and select a folder to store the output compressed video file. After you’ve all set, click the red compress button to start to compress video Windows 10 without losing quality.
Addition: If you try to create and compress a screen recording in Windows 11/10, follow the guide.
- Go to Record > Screen. Choose recording area and set up Mic/Webcam if necessary. Click REC to start recording.
- Click Done button in the mini control bar to stop recording.
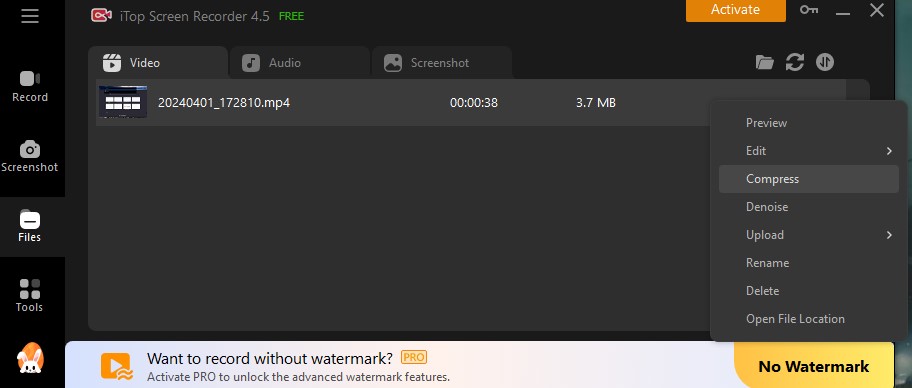
- Go to Files > Video and find the recorded video. Click More (...) > Compress to reduce size screen recording in Windows 11/10.
Also Read: How to Record Screen in Windows 11 and 10 >>
Conclusion
It can be frustrating to share, store, edit, and stream large-sized videos. Compressing videos solves the issue easily. iTop Screen Recorder, primarily designed as a free screen recorder for Windows, comes with a built-in video compressor that a hassle-free way to compress video on Windows 11/10 without losing quality. The video compressor makes it effortless to reduce video file size at different compression rates. You don’t need to worry much about quality. Nearly original quality can be reserved after compression, thanks to the cutting-edge compression algorithm. Get started with iTop Screen Recorder and get the smallest video files with the highest possible quality.