


There are multiple areas where one needs a screen recorder. Some go to record teaching or tutorial video for online courses; some record video meetings for keeping work plan; and, some film themselves with webcam or record gameplay for later sharing on SNS.

Fortunately, Windows 10 built-in screen recorder is a free screen recorder born for Windows 10, which can help you finish every record without installing third-party applications. Well, what’s the built-in screen recorder in Windows 10? How to use it and how to fix Windows screen recorder not working issue? We’d like to lead you out.
- This is an Article Index.
- Do not insert any text in here.
- This index will be generated automatically when displayed on the front end.
- Of course we still love you.
What Is Windows 10 Built-in Screen Recorder
Xbox Game Bar, the Windows 10 built-in free screen recorder, is a portion of the Xbox app. Indeed, it is pretty easy-to-use screen recording software for Windows users but packed with powerful features.
This built-in screen recorder Windows 10 allows people to record each activity on the screen, not limited to make an instruction, but to record gameplays, online meetings, streaming videos/audios etc. What’s more, the LFG feature of Xbox game bar enables to enhance user’s experience. One can find new teammates for the game and can also chat with them on the Xbox console. It’s great that the quality of videos can absolutely you. You can enjoy vivid images without any comprising.
You can choose to record the whole screen or any particular screen portion with Windows 10 built-in screen recorder. It also supports the webcam and microphone, which means you can also film yourself with audios like your own voice for explanation or special effects. Moreover, it enables you to take screenshots and make memes.
How to Use Windows 10 Built-in Screen Recorder
Before recording, please confirm what you want to record and start the corresponding program, for example, to join in the right online room for recording Zoom meeting, to open the streaming service for recording online videos. Then, follow the guide to use Xbox Game Bar, the built-in screen recorder in Windows 10.
Notice: Xbox Game Bar does not capture all programs (Entire desktop or File manager) but works seamlessly on desktop apps.
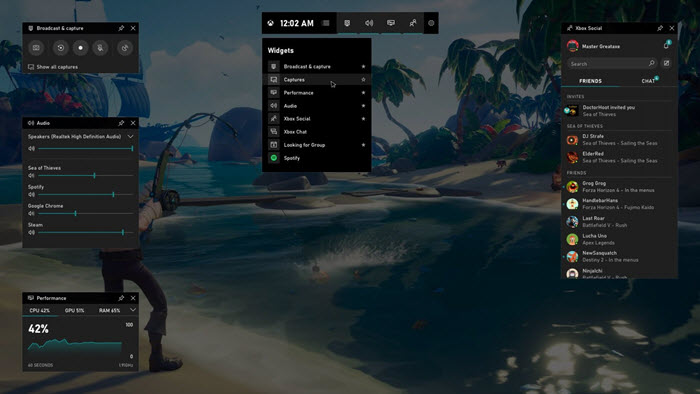
Step 1: Open Xbox Game Bar. Press the Windows key + G on the keyboard.
Step 2: The recording tools are by default presented on the top-left corner in the “Capture” Window. If it is not there, reach the long toolbar at the top of the screen. Now, click the icon familiar to a webcam.
Step 3: The capture window has a white circle icon. Click it to start the recording. You can also start the screen recording at any time by pressing the Window key + Alt + R. You can observe the recording time duration at the right side of the screen.
Step 4: By clicking the microphone icon, you can record your voice. It will start to record your voice from the default microphone.
Step 5: After recording, you can stop the recording from either the game bar menu or the recording timer. All the recordings will be accessible from the PC's "Videos" folder under the "Captures".
How to Fix Windows 10 Screen Recorder Not Working Issue
It’s not surprised that you may encounter the inbuilt screen recorder not working issue on Windows 10. Don’t be worried if Windows 10 built-in screen recorder not working issue happens and try the following troubleshooting tips.
Fix 1: Allow the Microphone/ Recording Device
Your disabled microphone might be the cause of problems you face while recording. When a user uses more than one recording device, some of them get disabled. This fix solution will describe how to resolve this issue:
Step 1: Right-click the speaker/volume icon available at the Windows taskbar. Select the "Recording Devices".
Step 2: From the recording devices, check if the microphone/recording device is enabled or not. If it is not enabled, right-click on it and select "Enable".

Fix 2: Adjust Microphone Levels
There are different microphone levels in the built-in screen recorder. You can try adjusting the levels and pick the one that suits you. This fix will explain how to adjust microphone levels:
Step 1: Right-click on the respective device and select "Properties". Now, click the "Recording Devices".
Step 2: You will find the "Levels" tab, and there will be sliders. Adjust the microphone levels to achieve the best possible output.

Better Solution: Get a Windows 10 Built-in Screen Recorder Alternative
Sometimes, you’re unlucky the fix Windows 10 screen recorder not working issue even though trying all possible solutions. But the alternative – iTop Screen Recorder – can deliver an innovative and convenient way to record screen on Windows PC.
There is no time limit to record a specific video. One can record up to unlimited time without any disturbance. It can be used for multiple occasions, to record TV shows, Instagram Stories/Reels, PC gameplay or any others. As a matter of fact, there are various other Windows 10 built-in screen recorders, but what makes the iTop Screen Recorder an exception? Here, we will acknowledge its best and unique features:
- Flexible Screen Capturing: It supports various displays. You can flexibly select any area of your screen and start its recording.
- Facecam Recording: It is ahead of every other screen recorder as it also offers people to record their faces while screen recording. You can use this feature for giving online lectures or playing games.
- Taking Screenshots and Screen Recording Simultaneously: It breaks all the technical barriers. It allows you to take screenshots of the screen while you screen records it.
- Screen Recording with Audio: It helps in screen recording with your voice in it. This feature will be useful for gamers, bloggers, and teachers.
- Edit Screen Recording with Ease: It has a video editor that enables you to make easy and fast editing on your screen recordings. You can cut, split, merge clips; rotate and flip frames as well as add transitions, effects, text and music to the video.
Now, let’s learn how to use this alternative to Windows 10 built-in screen recorder.
Step 1: Download and install iTop Screen Recorder on your Windows 10 PC.
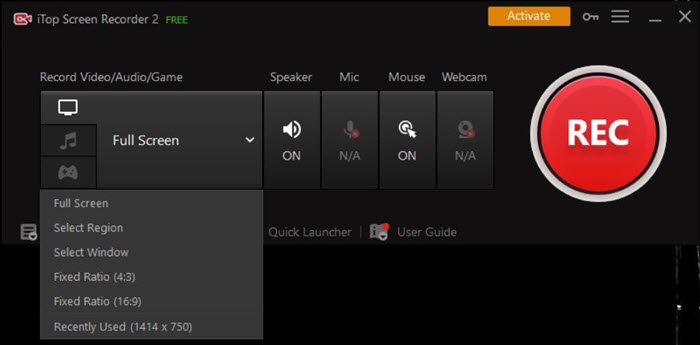
Step 2: Launch the program and the interface shows some setting buttons on video recording by default. At first, you can click Full Screen to set the region you want to record, for example, a window or the area with specific aspect ratio. Then, you can turn on speaker, mic or webcam according to your requirements.
What’s more, you can make further settings by clicking Options > Settings.
Step 3: Click the big red REC button and then it will record your Windows 10 PC screen instantly.
iTop Screen Recorder is not only available for capturing video on Windows 10 for free, but can support the latest Windows 11 and Windows 8/7.
The End
Windows 10 built-in screen recorder – Xbox Game Bar – is welcomed by Windows 10 users, especially gamers, who requires recording screen frequently. However, not working issue bothers lots of users. iTop Screen Recorder, is the best alternative to the built-in screen recorder in Windows 10, can record every activity on the screen without comprising the video and audio quality. It delivers a great performance that you can capture video without lagging or other troubles. Try it and enjoy recording on PC


