VLC Media Player is a very popular open source, cross-platform multimedia player that supports a wide range of audio and video formats. VLC is known for its ability to play almost any media file, which makes it a favorite among users worldwide. However, despite being widely acclaimed, some users still encountered the issue of the VLC record not working. Why does this happen, and how to troubleshoot this issue? Luckily, this blog will offer you several effective solutions to help you fix VLC not recording.

6 Solutions to VLC Record Not Working
If you are experiencing the problem of the VLC not recording video, don’t worry! Follow these useful solutions to fix this issue.
Case 1. VLC Fails to Record Audio
Solution 1. Restart the Sound Card
If VLC’s recordings are missing audio, you should check if the sound card is unresponsive or if any other apps on your system is accessing it. In this case, trying to restart the sound card is a quick fix to correct VLC’s video-only recording problem. Follow the simple steps:
Step 1. Right-click the Start icon and choose the Device Manager option > Double-click the Sound, video, and game controllers option.
Step 2. Right-click the sound driver and and choose Disable device to initiate a device restart.

If prompted, go ahead and restart your computer to reactivate the sound card.
Solution 2. Change Audio Output Module
If a simple sound card restart does not resolve the audio issue and you notice crackling in your VLC recordings during playback, consider adjusting the audio format to resolve the glitch. Here is how to fix VLC via changing audio output module:
Step 1. Launch VLC Media Player on your PC and access the Tools menu.
Step 2. Select Preferences and locate the Audio panel in the dropdown menu.
Step 3. Within the output module, switch it to DirectX audio output and click Save to enable VLC to capture audio.

Case 2. VLC Not Recording Video
Solution 1. Restart, Re-Install or Upgrade VLC
To quickly resolve the issue of the VLC not recording, you can also try to restart VLC and reboot your computer. If the problem persists, consider upgrading VLC, as an outdated version of VLC Media Player may introduce glitches. Here’s how to do it:
Step 1. Launch the VLC Media Player and access the Help tab.
Step 2. Select the Check for updates option from the drop-down menu.
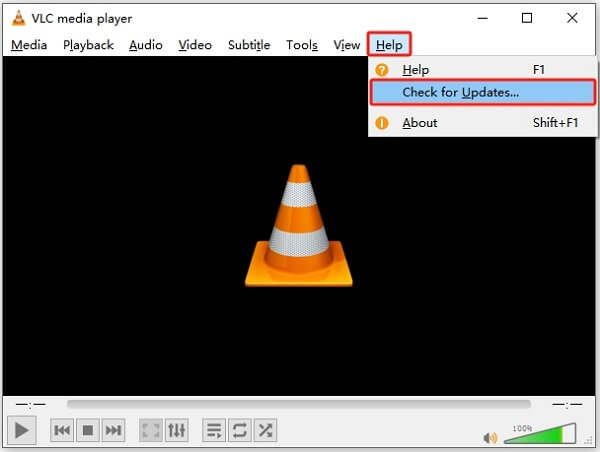
If an update is available, a notification screen will appear immediately. Click Yes to download and reinstall VLC.
Solution 2. Disable Video Acceleration
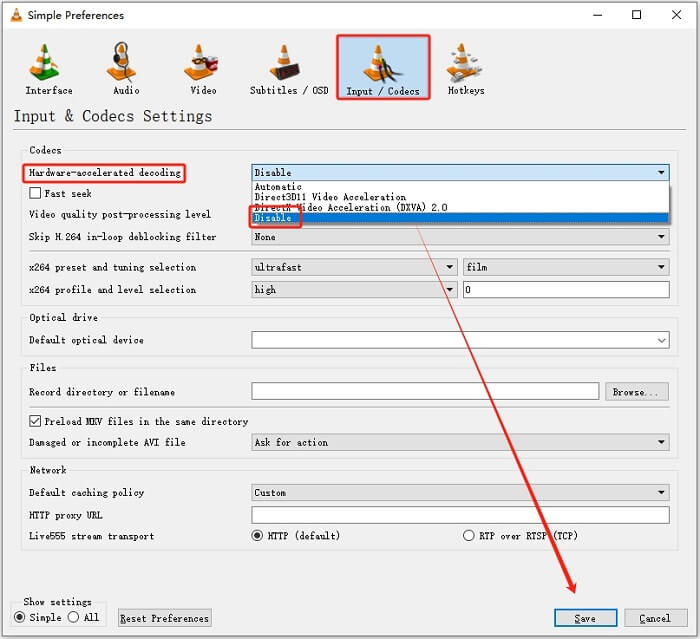
sometimes, hardware acceleration can cause the VLC not saving recording issue, resulting in the recorded file becoming an MP3 file. To resolve this issue, the acceleration must be disabled. Here’s how:
Step 1. Navigate to the VLC Media Player, access the Tools menu, and select Preferences.
Step 2. Proceed to Video and click the Input/Codec tab > In the Codecs section, locate and disable the Hardware-accelerated decoding option > Click Save to confirm this action.
Solution 3. Change Video Output Module
In addition to changing audio output module, you can try to change video output settings to fix VLC record not working. Here is a simple guide to doing that:
Step 1. Launch VLC and navigate to Tools > Preferences. In the Preferences window, access the Video section.
Step 2. Select the DirectX (DirectDraw) video output option from the list of output modules > Click the Save button to complete the process.

Case 3. VLC Record Button Not Working
Having problems with VLC record button not working? This issue may be due to a conflict between Windows Defender settings and VLC recording configuration. In this case, consider temporarily disabling Windows Defender to test if the record button on VLC has been restored.

Simply put, by performing these troubleshooting steps, you can resolve common problems and enhance the performance of your VLC Media player. If the problem persists, consider trying an alternative for VLC to record videos.
Best Alternative to Record Video Easily
If the above solutions do not work for you or you are tried of fixing the VLC record not working issue, there are many other recording tools you can explore to help you record videos. iTop Screen Recorder may be the first choice for those who need a powerful and free screen recorder.
With this screen recorder, you can easily record in HD with customizable screen sizes. Whether you use iTop Screen Recorder to capture online meetings, gaming sessions, or educational content, its user-friendly interface and additional video editing tools can help you better record and edit your videos.
Some advantages of this screen recorder are listed below:
-
100% free screen recorder to record flexible screen size
iTop Screen Recorder is a 100% free screen recording tool that allows you to select a specific area to record part of screen or select the application windows you want to capture. -
Record screen with audio and webcam
iTop Screen Recorder not only enables you to capture visual content, but also includes the option to record audio and webcam footage at the same time. -
HD screen recording with voice changer and teleprompter
This HD screen recorder supports high-quality screen recording and also comes with voice changer and teleprompter features, allowing you to customize your screen recording. -
Quick/advanced editor to choose from
iTop Screen Recorder provides you with a quick and advanced built-in video editor, which can help you add text/images, add background music, trim videos, and do more complex editing. -
Multi video/audio output formats supported
This screen recorder supports multiple video and audio output formats, giving you the flexibility to choose the format that best suits your needs or platform requirements.
So, how to record video with iTop Screen Recorder? Here is a step-by-step guide to helping you do that:
Step 1. Download and install iTop Screen Recorder on your Windows PC > Launch iTop Screen Recorder to its main interface.
Step 2. Click the arrow next to Full Screen and choose your recording area from the drop-down list > Activate the Speaker and Mouse and click REC to start recording.

Step 3. After the 3-second countdown, the app is going to record a video. Then, click the Done button to end the screen video recording.
Step 4. Next, you can go to the Files section to check your recording files. Choose the file and click the More (...) button to preview, edit, rename, or do other actions on this video.

VLC Not Recording FAQs
1. How to record with VLC?
Step 1. Launch VLC Media Player, navigate to the top-left corner and click Media > From the dropdown menu, select Open Capture Device.
Step 2. In the Capture Device tab, adjust the Capture Mode to Desktop > Modify the frame rate to your preference, whether it’s 30, 60, 24, 12, or any other desired value.
Step 3. Locate the play button at the bottom right and find a small down arrow next to it > Click the arrow and select Convert > Designate your desired destination folder and click Start.
Don't Miss: How to Record Screen by Using VLC (With Sound, Alternative offered) >>
2. How to change the VLC video recording directory?
Step 1. Run VLC Media Player on your PC, access the menu bar, and choose Preferences under the Tools tab.
Step 2. Go to the Input/Codecs tab and locate the Files section > Select the Browse… button beside the Record directory or filename box to designate a specific folder for storing recordings.
Step 3. Confirm your choice by clicking Save to implement the modification.
3. What format does VLC support?
VLC is compatible with a large number of widely used video and audio formats, including MPEG, MP4, MOV, WMV, H.263, WAV, FLV, and AVI. The player also facilitates the conversion of media into many of the same formats it can read, including MPEG, ASF, AAC, and MP3 formats.
Conclusion
That’s all about how to fix VLC record not working. Hope these solutions in this blog can help you troubleshoot this issue. In addition, you can try a free and safe alternative for VLC Media Player to record audio or videos smoothly. iTop Screen Recorder could be an excellent option for you, which is a reliable screen recorder for Windows 10. With the help of this screen recorder, you cannot only capture videos with audio and webcam but also edit your recordings with ease. Why not try it out? Download and use iTop Screen Recorder right now!