


Adobe is a software developed for creating, viewing, editing, managing, and printing PDF files. Anyway, it is capable of dealing with various tasks with PDF files. Sometimes when you work with Adobe, you may have a need for a screenshot, whether to share specific content, create visual notes, or avoid editing restrictions. Whatever, you can find some proven methods to screenshot in Adobe in this guide. Now, let’s check them out!
How to Take Snapshot in Adobe Acrobat with Snapshot Tool
“How to take snapshot in Adobe Acrobat?” “How to take a snapshot in Adobe Acrobat Pro?” “Where is snapshot tool in Adobe Reader?” These are some of the most frequently asked questions collected from various forums. And here we’ll reveal the answer for you. Now, follow these steps to screenshot Adobe Acrobat.
Step 1. Open the PDF document you wish to screenshot in Adobe Acrobat Reader or Pro.
Step 2. Locate the Snapshot tool.
- Screenshot in Acrobat Reader: Head to Edit > More > Take a Snapshot.
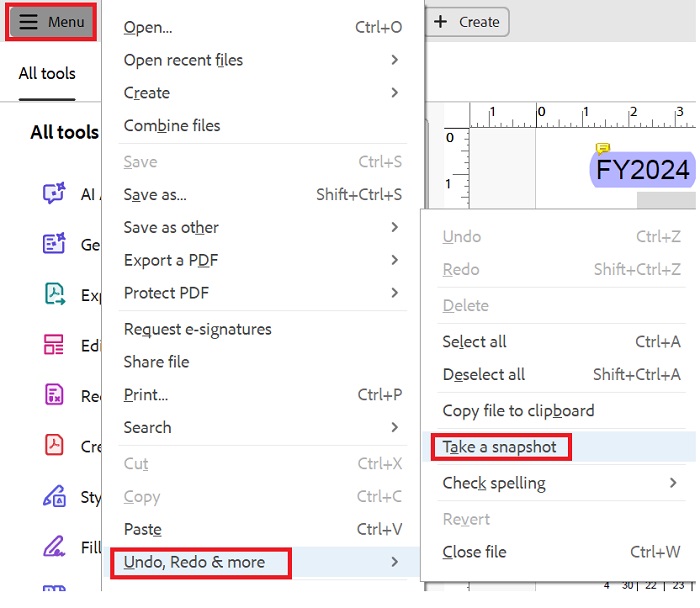
- Screenshot in Adobe Acrobat DC: Click the three horizontal lines, then go to Undo, Redo & more > Take a Snapshot.
Step 3. Then, you can choose the area you wish to take a screenshot by clicking and dragging a rectangle.
Step 4. If you want to exit Snapshot mode, just press the Esc key.
If you want to make the “Take a Snapshot” tool more accessible, you can add it to your toolbar by right-clicking on the empty space in the toolbar, selecting “Show Edit Tools,” and then “Take a Snapshot.”
Take Screenshot in Adobe Using Shortcuts
This part mainly focuses on using some shortcuts to take a screenshot in Adobe. Shortcuts can help you access the snapshot tool and quickly take a screenshot of the picture you want. This method is more suitable for business. Here are the steps.
1. Using Single-Key Accelerator
Step 1. Open Adobe Acrobat.
Step 2. Go to Edit > Preferences> General.
Step 3. Check the box next to “Use single-key accelerators to access tools.” Click OK.
Step 4. Once enabled, you can press G to activate the snapshot tool.
2. Use Alt + E + A
Or you can press Alt+E+A simultaneously and navigate to Edit > More > Take a Snapshot to complete this job.
3. Windows key + Shift + S
For general Windows screenshots, you can press the Windows key + Shift + S to capture a selected area.
4. Add the Snapshot tool to the toolbar for quicker access
To do this, you can right-click on the toolbar and select Show Edit Tools, then choose Take a Snapshot.
5. Using PrtScn on Windows or Command + Shift + 4
If you don’t like using shortcuts in Adobe Acrobat, then you can directly use the keyboard shortcut on your computer (PC or Mac) to conduct a screenshot task.
- On Windows, you can press PrtScn to capture the entire screen or Alt + PrtScn to capture only the active window. Then, you can open an image editor or a document and paste it with Ctrl + V.
- On macOS, you can press Command + Shift + 4 to capture a selected area. Click and drag to select the area, and the screenshot will be saved to your desktop.
How to Screenshot in Adobe Using iTop Screen Recorder
Though Adobe offers screenshot options for users, it is not the option for screenshots. If you want more robust editing features or want to streamline the entire screenshot process, just try iTop Screen Recorder. It is a professional screen recorder as well as screenshot tool. With it, you can do things like:
Flexible screenshot options: It can screenshot any selected ared according to your needs. Likewise, you can screen record part of screen, the full screen, or a specific window.
Scrolling window capture: It also allows you to capture a scrolling window for long documents or web pages, which ensures you can’t miss any details.
Built-in editing options: It includes a video editor and a quick screenshot editor for immediate editing. So you can trim, add text, filters, stickers, and more to your screenshot easily and quickly.
Drawing and annotation tools: It offers some drawing tools like shapes, arrows, and text for highlighting important information or adding annotations. This is great for the Grindr screenshot.
Multiple output formats: You can export your screenshots in various formats like JPG, PNG, and BMP for later editing or sharing.
Here are the steps to screenshot in Adobe using iTop Screen Recorder
Step 1. Download iTop Screen Recorder on your Windows computer.
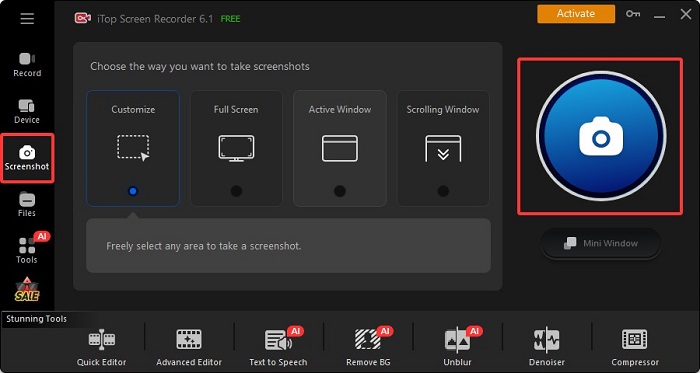
Step 2. Locate the Screenshot section on the left panel. Then, choose the way you want to take screenshots and click the Capture icon to start taking a screenshot.
Step 3. Once finished, your screenshot will be saved in your desired location.
iTop Screen Recorder is also a screen recorder that enables you to record any screen activity you want. So, you can use it to capture TV shows, live streams, gameplays, and more. If needed, you can even use it to screen record protected videos.
FAQ
1. How do I add screenshot to a PDF in Adobe?
It's easy to add screenshot to a PDF. First, you’ll need to launch Adobe Acrobat and open the PDF file you want to edit. Then, click on the Tools tab and select Edit PDF. In the toolbar, click on Add Image. Browse to select your screenshot file and click Open.
2. How to take a picture on Adobe?
Adobe doesn’t offer a built-in camera feature for taking pictures directly, so you can use a screenshot tool or import images.
3. Unable to find snapshot tool in Acrobat Reader, how to do it?
If you can’t find the snapshot tool in Adobe Acrobat Reader, you can use some alternatives to take a screenshot. The Snapshot tool is sometimes still available in some older versions of Acrobat. You can find it under Edit > Take a Snapshot. If you can’t find it, you can use a screenshot tool like the screen recorder Windows 10 introduced above.
The Bottom Line
That’s all about our tips to screenshot in Adobe. Whether you want to screenshot in Adobe Premiere Pro or screenshot in Adobe PDF, this guide will give you the answer. Though Adobe offers a native screenshot solution, we recommend you to use dedicated screenshot tools like iTop Screen Recorder, which not only allows for high-quality screenshots but also provides robust screen recording capabilities. That makes it perfect for creating tutorials and presentations or recording meetings. For example, you can use it to record Zoom meeting.


