


Many PC players may not even know that NVIDIA has its screen recorder, the NVIDIA Share. The NVIDIA Share is a monster among all game video recorders, which support both screen capture, instant replay, general recording, and live streaming. Where can we find it?

If your personal computer is with a modern NVIDIA graphics card, there’s a good chance you have access to the NVIDIA Share as the built-in function. Just like Windows 10’s Microsoft Game Bar, but available on not only Windows 10 but also Windows 7, with more powerful features. You will get NVIDIA Share automatically after you’ve installed NVIDIA GeForce Experience for setting up the NVIDIA graphic card drivers. With the powerful hardware as the backing up, how do we use NVIDIA Share to record the gameplay? What makes the NVIDIA Share outstands another screen recorder? Let’s dig it out.
- How Good NVIDIA Share Is
- How to Record Gameplay with NVIDIA Share Screen Recorder
- Screen Recorder You May Prefer Is to Use iTop Screen Recorder [Alternative]
- Steps to record the screen with Free & iTop Screen Recorder (Works for All Situation)
- Overview
How Good NVIDIA Share Is
Compare NVIDIA Share to other screen recorders, one most conspicuous feature is it supports automatically records gameplay in the system background. The maximum auto-recording time could be extended to a 20 minutes video clip (You can custom the record time from 1 minute to 20 minutes, configure in the “Shadow time” option). That could be an extremely handy feature than others.
Another merit the NVIDIA Share has is that it shows up the FPS counter which overlayed your game graphic. This means the counter will not be recorded/ streamed but keep showing up on the upper left corner of your screen. You can turn on/off its display by press Alt+F12 anytime while NVIDIA Share is running in the background.
How to Record Gameplay with NVIDIA Share Screen Recorder
Here's how to record your gameplay with screen recorder NVIDIA:
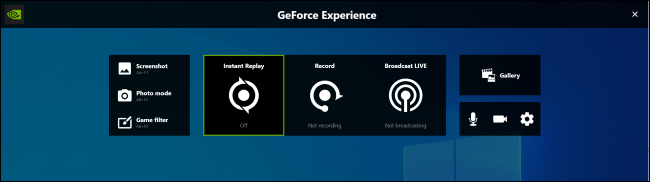
Step 1. Inherited from NVIDIA Shadow Play, you can also call the NVIDIA Share overlay interface by pressing Alt+Z. If you failed to wake up the NVIDIA Share by pressing the hotkey combination, First make sure you are using an NVIDIA graphic card (GTX 900 series and later) and have GeForce Experience installed on your computer. Open the GeForce Experience in Windows “Start” menu. Then click the green “Share” button to the left of the settings button on the NVIDIA Share toolbar to open the overlay.
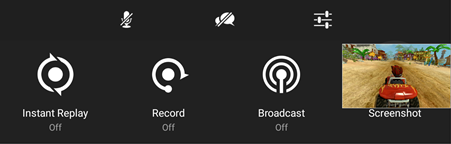
Step 2. To activate the automatic record feature, where NVIDIA Share will automatically record all your gameplay in the background while you playing a game, just click the “Instant Replay” icon and click “Turn On.” The automatic record function will be enabled.

Step 3. With Instant Replay mode enabled, you can press Alt+F10 to save the last couple of minutes of your gameplay video clip. Please notice that the NVIDIA Share will record the video clip no more than 20 minutes, which means your gameplay video older than 20 minutes ago will be discarded. And make sure to manually save your video, NVIDIA Share will automatically discard your video when the game process terminated.

Step 4. If you want to start recording manually, you can call NVIDIA Share the overlay by pressing NVIDIA screen recorder hotkey: Alt+Z, then click the “Record” button and “Stop and Save.” You can also activate the record will appear in a game-specific subfolder of your Videos folder by default.

You can configure your NVIDIA Share in the setting menu. You can switch your recording graphic quality from high to low. For example, the high quality allows you to record with an in-game resolution, 60 frames per second, and coded with H.264 encoder.
Also Read >> [Free and Paid] 10 Best Game Screen Recorder Meeting All Your Needs - iTop<<
Problems You May Encountered with NVIDIA Share
One biggest & initial problem for NVIDIA Share is, you must use an NVIDIA graphic card (newer than GTX 700 series). If you are using an AMD graphic card or integrated graphics chip, then you won’t be able to access the NVIDIA Share.
We should be noticed that: Recording with NVIDIA Share will give a negative influence on your gaming performance. NVIDIA indicated that a general performance penalty of 5% is typical. In some cases, it could up to 10% in some more demanding games. If you have a fast enough PC, this shouldn’t be a real matter. But if you are running an old computer, then the NVIDIA Share could become a considerable burden to your PC (because NVIDIA Share will keep recording in the background). In that situation, you may like to disable the NVIDIA Share.
1.Click on the System Tray to show hidden icons
2.Right-click the Nvidia icon Nvidia_icon.png
3.Click GeForce Experience
4.Click on the Settings icon
5.Toggle "In-Game Overlay" to off
6.Close the GeForce Experience window
Screen Recorder You May Prefer Is to Use iTop Screen Recorder [Alternative]
Several reasons may cause you might give up the NVIDIA record screen method:
1. You are not adopting an NVIDIA GTX Series Gaming GPU for your computer. Hence you will not able to get installed their driver & software, including the NVIDIA Share
2. For customers who use relatively outdated PCs which not capable of running high payload software like NVIDIA Share.
3. NVIDIA Share can only fully support recording in-game content. If you have any kind of workplace usage, like if you want to record your Windows screen or to record the worksheet…etc, then NVIDIA isn’t a handy tool to use.
For general screen recording tasks, I would personally strongly recommend you have a try to iTop Screen Recorder as the expert to assist you to record & capture the screen. It is compact (28MB size); capable of all features you will need to record screen; clean (no addon, no malware); and most important point is, it is completely FREE TO USE. No time limitation, no function restriction, plus no watermark on the captured video.
Steps to record the screen with Free & iTop Screen Recorder (Works for All Situation)
First, you need to Install & open up the iTop Screen Recorder, the UI design is intuitive enough, all general functions are presented directly and clearly.
Then, to start recording, click the “Select a region” button & choose the recording region. In the drop-down list, click the game window/ screen you want to record, then click the red “REC” button.

Thirdly, the record will begin and the video of the screen (or select region) will be perfectly captured by iTop Screen Recorder with audio. I would strongly recommend you download & have a try of this wonderful freeware if you got trouble with NVIDIA screen capturing.
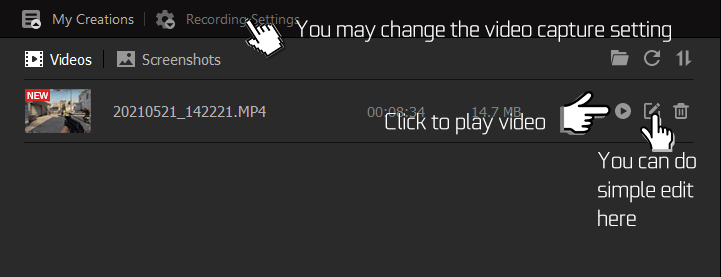
In the end, you may find your recorded videos in the “My creation” tab. Also, you can do some trims to your video with the built-in editor.
Overview
I would say the NVIDIA Share is a wonderful software that offers the great capability of game video recording, it’s performance & convenience could help many gamers to create their own content. My best hope is, someday for those people not using a GTX video card platform, they can still have their choice to use NVIDIA Share as a handy tool. To record game & screen with iTop Screen Recorder would be a nice idea. Give it a try!
Powered by Froala Editor


