


Whenever you are doing a screen recording session, you may want your face to be part of it. That way, people know who is there, and combining that with reactions is a great way to relay the message you are sending.
A facecam screen recorder has been in various scenarios such as tutorials, game recording, and when calling people in general. The problem is that the quality of the facecam is not the same as the screen video you are recording.

People have been pushing for clarity when it comes to the webcam and face recording, and in most cases, the sound is not captured in the best way. Don’t worry, though, because this article will offer practical solutions towards making the facecam recording great and audible.
- This is an Article Index.
- Do not insert any text in here.
- This index will be generated automatically when displayed on the front end.
- Of course we still love you.
The Cruel Reality – No Qualified Default Facecam Recorder on Wins or Mac
Find
ing a perfect scre
en rec
order that does quality facecam
recording is a needle in a haystack. The worst case is that Windows does not have an excellent screen recorder with a facecam, even with the addition of an Xbox Game Bar.
Mac users can take pride but not too far since QuickTime facecam recording has its limitations. The quality is still wanting, and there are problems with the format you get after recording since it can only be played using the QuickTime Player.
QuickTime Disadvantages
- Poor quality: 1080p resolution may not be poor quality, but we are in the era of 4K and 8K. So, when you use QuickTime as a facecam screen recorder, you will face quality limitations.
- No perfect sound capture: If you speak, QuickTime will get the sound, but the results will not be the best. The same applies to the system sound if you use it to record meetings on your screen or gameplay.
- QuickTime is not instructive: Apart from getting poor audio quality, there are no annotation tools if you would like to illustrate something. That prompts you to check elsewhere for a better facecam screen recorder.
3rd Party Facecam Screen Recorder Advantages
There are third-party applications that solve the QuickTime problems. The benefits you gain by going the third party direction include:
- Easy adjustments: You can position your facecam screen recorder anywhere you would like by just dragging it. This is great for those who would like to pave the way for easy content visibility and avoid distractions.
- Better resolutions: Now, third-party facecam recorders offer to record 4K quality videos. That is what we need in this era, and there are more options.
- Quality video combination: You get video and audio recorded with the best quality in mind. Therefore, your audience will not miss a thing by the time they finish viewing. The best part is that the video will be in an acceptable format across platforms.
With the advantages relayed by the third-party options, you have more reasons to check out the best. Keep reading to get the best facecam screen recorder that will change the facecam recording on your PC, whether you are on Mac or Windows.
iTop Screen Recorder – Freely Capture Facecam & Sounds
If you want a facecam screen recorder that will give you the output you need and more, then check out what iTop Screen Recorder has to offer. It’s a Windows application that offers 4K quality videos, and you can also change the resolution in the settings.
It’s possible to move the webcam position to where you would like it, but it’s on the bottom right by default. You get a smooth recording when using this free screen recorder, and it’s free to download. It can record the whole screen or a part of it.
There are various options you can use when selecting the screen size. It also supports game recording using the game mode that picks the current FPS as you record. Therefore, there is no lagging as you record, thanks to the HUD (heads-up display) and the GPU rendering technology.
After recording, you can get the video via My Creations, and it’s stored in acceptable formats, which you can choose via the settings. As you learn more about iTop Screen Recorder on the main website, here is how to use it to record facecam.
How to Record a Facecam Video with iTop Screen Recorder?
Step 1: Download the iTop Screen Recorder from the main website and install it on your PC.
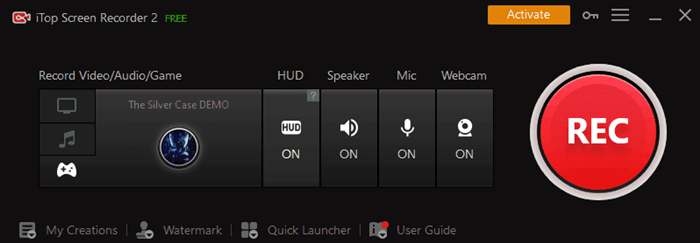
Step 2: Launch the app and select the screen size you want to record. After that, choose what to record, including turning on the webcam setting.

Step 3:Click the big REC button or press F9 to start recording.
How to Add Facecam to OBS – OBS Advanced Tutorial
OBS is another top facecam screen recorder, and you can use it to do more than that. It’s, however, a complex package to deal with, and you have to learn the basics after installing it on your computer.
It’s available for Mac, Windows, and Linux environments, and facecam recording is one of the robust software features. If you want to use OBS to record facecam as you capture the screen proceedings, the guide below will get you there, and it also serves as a step closer to mastering it.
Step 1: After launching OBS, click on the + sign under ‘Sources’. Check the ‘video capture device’ choice and click there.

Step 2: Label the layers you will be adding, which is essential for using OBS.
Step 3: Go to the ‘devices’ dropdown and choose webcam. Specify the resolution you need.
Step 4: If you want to record the audio, enable the microphone feature by manually adding it via the settings button.

Step 5: Go to the audio tab on the left in the settings window. Under ‘Mic/Auxilliary Audio Device’, choose webcam, and you are good to go.
Facecam Screen Recorder Online – ScreenCastify
If you want to record webcam video online, ScreenCastify is your best bet. Many have used it, especially in the education sector. You may not get the right quality here, and that’s something that most online facecam recorders face. The videos you get are pretty choppy, so don’t worry if you see some little waves on the final output.
Screencastify has made a name as the best facecam recorder online. Follow the guide below to start using it.
How to Record Facecam Videos Online?
Step 1: Visit the ScreenCastify website and click on the ‘Add to Chrome (it’s free)’ button.

Step 2: You will see the ‘Add to Chrome’ button on the extensions page. Click to add it.
Step 3: Access ScreenCastify via extensions on your browser and then sign up and allow the asked permissions.
Step 4: Enable the microphone feature and click on ‘Record’.

Step 5: Select the screen size you would like to record and click the ‘Share’ button.

Step 6: You can now proceed to record. Once you are done, click the ‘Stop Sharing’ button.
Conclusion
Third-party applications offer better facecam screen recorder features, and that’s why you should leverage them. You don’t want to keep dealing with low quality and lack of advanced features on options like QuickTime and other inbuilt applications. To evade that, explore what iTop Screen Recorder has to offer and download it to get up to 4K quality on your facecam record. It’s free to use, and there is no limitation to the video length.
Powered by Froala Editor


