


Clipchamp is primary designed as an easy and quick online video editor allowing users to edit and create videos from browser. Owned by Microsoft in 2021, it is integrated as a desktop application in Windows 11. The mobile app for iOS and Android is also available to create videos on the go. In addition to video editing, Clipchamp builds in a recording feature to capture screen, webcam and audio with ease. So, how to record audio in Clipchamp? Follow us to explore.

Why Do You Need to Record Audio in Clipchamp
Audio plays an important part in video creation. Apart from using an existing audio file, sometime content creators need to record audio in Clipchamp for the following reasons:
● Record a voiceover or presentation directly in Clipchamp: Clipchamp allows you to record high-quality voiceovers or presentations within the editor. This frees you from switching between different applications.
● Record and edit a podcast/song at one stop: Clipchamp's audio recording and editing capabilities make it a great all-in-one tool for creating podcasts or even basic music recordings. You can record multiple audio tracks, apply effects, and edit the audio directly within the platform.
● Record background music for your video: Clipchamp lets you quickly capture these audio elements and mix them into your video project.
● Record narration for a training/e-learning video: For educational or instructional videos, high-quality narration is often essential. Clipchamp's audio recording features make it easy to capture professional-sounding narration that can be synced with your visual content.
Also Read: How to Record Audio on Microsoft PowerPoint >>
How to Record Audio or Voice in Clipchamp
Microsoft Clipchamp integrates a standalone audio recorder that assists you in recording and saving MP3 audio tracks with no extra software installations. It can get access to both internal and external microphone to create various voice recordings. Besides, the screen recording feature empowers you to record, webcam or both with audio. In the following, let’s learn how to record audio only and record screen, webcam with audio in Clipchamp respectively.
How to Record Your Voice in Clipchamp
Step 1. Head to Clipchamp and select the audio recorder.
Step 2. Select your microphone source and speaker coach.
Step 3. Click on the red button to start recording. Then, save your recording to the timeline.
Step 4. Now export the recording.

Also Read: Best Free Voice Recorder for Windows 11/10 >>
How to Record Screen with Audio in Clipchamp
Step 1. On the main screen of Clipchamp, click on the record & create tab on the toolbar. Then, click on the screen button.
Step 2. Once you see the screen recorder window, select your microphone source and disable the speaker coach.
Step 3. Next, click on the record button to start recording.

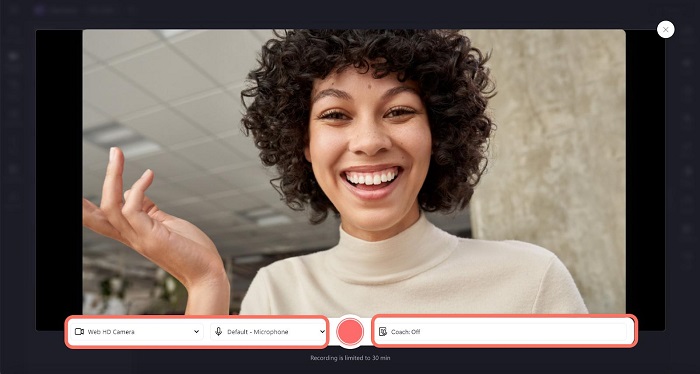
How to Record Webcam with Audio in Clipchamp
Step 1. Launch Clipchamp and create a new video or open an existing one.
Step 2. Select the Record & Create tab on the toolbar. To record a webcam video, you should select the camera option.
Step 3. If asked, give Clipchamp the permission to access your camera and microphone. Click on the done button to continue.
Step 4. Once set, click on the red record button to start recording.
How to Record Screen and Webcam with Audio Simultaneously in Clipchamp
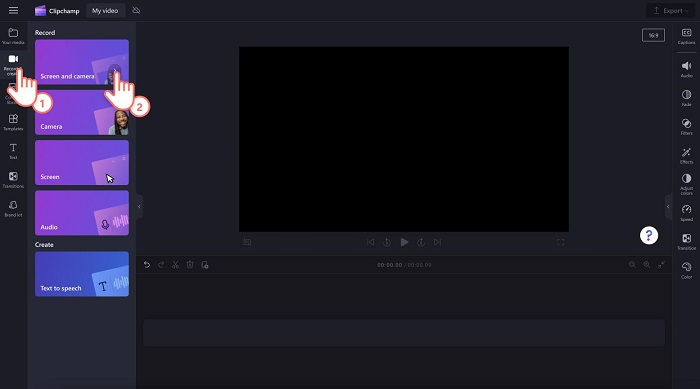
Step 1. Launch Clipchamp and select Screen & camera from the three listed recording options.
Step 2. Choose your microphone and camera from the bottom. Then, click the Record button to start recording.
Step 3. Select the recording area you want and click Share to start recording.
What are Limits of Clipchamp Audio Recording
Though Clipchamp is convenient for users to capture a video, it has some limits that cannot be ignored. Some of these limits include:
● Only 30 minutes long: There’s a 30 minutes limit on all recordings. If you want to record videos with no time limit, then you will need to create multiple recordings.
● Compromised quality: The video resolution depends on your built-in camera or external camera. Usually, it is compromised to 480P or 720P.
● Compatibility issue: the online version is only available in Chrome and Edge.
● Can’t export as a standalone audio file: Clipchamp only allows exporting all videos in MP4 format, so you can’t export MP3 files or audio files alone.
What is the Best Alternative to Clipchamp Audio Recorder
As you can see, there are some limitations of using Clipchamp to record videos or audio. To break all limits of Clipchamp audio recording, we recommend you use the best alternative - iTop Screen Recorder to do the same thing. It is an all-in-one screen recorder, audio recorder and video editor to deliver you the best experience to record audio and voice on PC.
Record both computer audio and your voice.
iTop Screen Recorder enables you to record any sound on computer. It can be used to record audios from YouTube, Spotify and other streaming services as well as record your voice through microphone.
Record audio with lossless quality.
It won’t compromise your audio quality while recording. In addition, the denoiser can remove background noise and microphone echo to get better audio quality when you singing, reading or playing music.
Voice changer and teleprompter for storytelling as a pro.
For some bloggers or gamers, iTop Screen Recorder’s voice changer might surprise you with its various effects. That makes it easy to modify or fake your voice. And, teleprompter offers you a chance to read a script while recording a video more smoothly and professionally.
Record audio only as MP3/AAC/FALC etc.
Unlike Clipchamp that only allows you to export files in MP4, iTop Screen Recorder allows you to record audio only and export as MP3, AAC, FLAC, and more.
Besides the powerful ability for audio recording, iTop Screen Recorder empowers you to record screen or/and webcam with audio for creating tutorial/training videos. The inbuilt video editor offers an array of tools to enhance the recording by adding text, image, special effects etc.
So, how to record audio with iTop Screen Recorder? Follow the guide.
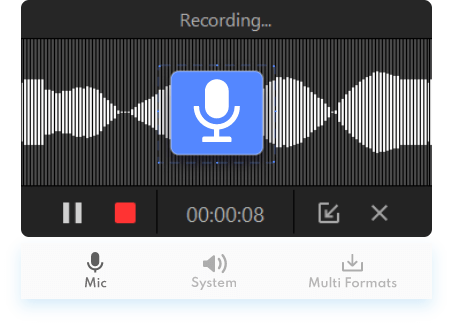
Step 1. Download and launch iTop Screen Recorder on your computer. It is fully compatible with Windows 11, 10, 8 and 7.
Step 2. Launch iTop Screen Recorder. Go to Record > Only Audio. Turn on Speaker to record system audio. Turn on Mic to record sound through microphone. Turn on Voice Changer and select a filter to change your voice in real time if needed.
Step 3. Click REC to start recording. After 3-second countdown, a mini control bar appears. Click Done button to stop recording.

Your recording is saved to Files > Audio. From here, you can play, manage and edit it at will.
For how to record screen with audio on Windows 10/11, please check here >>
Conclusion
That’s all about our guide on how to record audio in Clipchamp. As you can see, Clipchamp offers a convenient way for users to record audio online. You can record audio in Clipchamp and set it as voiceover, narration, BGM for your video. Also, you should face the limits when using Clipchamp as an audio recorder. To break these limitations, it’s recommended to use an alternative to get the job done. iTop Screen Recorder gives you advanced features and better experience to record audio and voice.


