 Vidnoz AI creates engaging videos with realistic AI avatars. Free, fast and easy-to-use.


How to record your voice for voice memos? How to record your voice on PC for voiceovers? How to record your voice for music production and so on? If you have similar needs, then you have landed in the right place. This article will reveal to you how to record my voice on my PC and mobile device in simple ways.

How to Record My Voice on My Windows PC
Whether you're a podcaster, content creator, or ASMR maker, it's crucial to know how to record your sound on a computer effectively. In addition to basic recording equipment like a microphone, headphones, and a quiet space, you'll also want to find a trustworthy voice recorder for Windows that meets your needs.
Windows offers built-in recording software, but it only meets basic needs and the recording quality isn't that good. An excellent voice recorder can improve the quality of recording to a great extent, and iTop Screen Recorder is such an outstanding choice for you. It can record your voice with high quality on Windows PC. It can not only outside voice but also it can record the system sound. As the name goes, this screen recorder can record your screen and your voice together. What a nice program, right?
How to record my voice on my computer with iTop Screen Recorder:
Step 1. Select, connect, and adjust your microphone settings to make sure your computer recognizes the device.
Step 2. Download iTop Screen Recorder on your Windows PC and launch it.
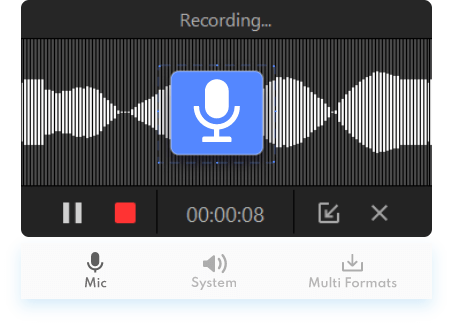
Step 3. Switch to Record > Only Audio to record your voice. You can just whether to record the computer speaker with the mic together. there is also an option for you to change your voice into other effects.

Step 4. When the settings are ready, click REC to start your voice recording. If you cannot remember your script, you can enable the teleprompter feature as well.

Step 5. When the recording is over, you can see the recording in the Files tab. Here, you can preview the recording, edit it for better effect, and denoise the background.

Learn about what iTop Screen Recorder can bring to you:
- 100% free to record your voice and screen: This screen recorder for Windows 10 not only records your voice 100% free of charge, but also captures any activity on the screen along with the sound recording.
- Record internal and external voices: This voice recorder not only supports you in recording your voice, but also records the system sound. You can record a voicemail, record Google translate voice, etc.
- Provide voice changer to hide real you: If you don't want to record with your real voice, this tool's built-in voice changer offers you a wide range of voice possibilities.
- Convenient teleprompter templates: To make your speech smoother and more natural, this best screen recorder offers you customized scripts and ready-made teleprompter templates with auto-scroll.
- Multiple audio output formats: When everything is done, you can output the recorded audio in multiple formats such as MP3, AAC, AC3, FLAC, etc., and share it on different platforms.
- Capture any activity with customized area: As the name suggests, this HD screen recorder is capable of capturing any activity on the screen, you can record part of screen no matter games, streams, meetings, etc. without limitations.
How to Record Your Voice on a Mac
How to record my voice on Mac? For Mac users, recording your voice is a seamless process thanks to the built-in application called GarageBand. GarageBand is a versatile and user-friendly digital audio workstation that comes pre-installed on most Mac computers. Whether you're a musician, podcaster, or content creator, GarageBand provides powerful tools for you to record and edit audio. Let's dive into the functions and usage steps of GarageBand.
How to record your voice on a computer Mac:
Step 1. Launch GarageBand, and choose the "Voice" template for a basic setup optimized for voice recording to create a new project.

Step 2. Select and adjust input levels, and then click the red record button (circle) at the top of the screen to start recording. Speak into your microphone clearly.

Step 3. Click the square stop button to stop recording once you've finished. You'll see your recorded audio waveform appear on the track.
Use the editing tools to refine your recording. Trim unnecessary sections, adjust volume levels, and experiment with audio effects to enhance the overall quality. Once you're satisfied with your recording, save your project and export the audio file.
How to Record Your Voice on iPhone
Using the above two methods to record your voice on a computer is relatively professional. If you only need basic recording functions, then the easiest and most convenient way to record your voice is to record a voice memo on your iPhone. The Voice Memos app can quickly and easily record your voice, but the disadvantages are limited editing tools and low recording sound quality.
How to record your voice on iPhone:
Step 1. Open the Voice Memos app on your iPhone.
Step 2. Tap the red record button (circle) at the bottom of the screen to start a new recording.
Step 3. Tap the red square button to stop recording once you've finished speaking. Your recording will be saved automatically.

Step 4. If needed, tap on the ellipsis (three dots) on the recording and select "Edit Recording." Here, you can trim the start or end of the recording by dragging the handles. Tap "Done" to save your recording.
Conclusion
Now you know how to record your voice on Windows, Mac, and iPhone. Recording voice may seem daunting at first, but with this complete tutorial, you can achieve professional-level recording results in the comfort of your own space. Whether you're creating a podcast, voiceover, music, or any other audio content, these voice recorders can help you create high-quality recordings that will captivate your audience. If you are a Windows user who is seeking the best voice recorder, try the best screen recorder for PC – iTop Screen Recorder now!


