Want to capture error messages or pop-ups and show them to others? Or keep a bunch of essential numbers on your Acer laptop for later follow-up? There are many other situations you need to share important information that you can't save or download, which is where the screen capture feature on Acer laptops comes in handy.
Taking a screenshot on Acer is an easy must-to-have skill while many users are unaware that various methods could achieve it. Check this article to learn 5 ways on how to screenshot on Acer with each screen size and image format you intend to keep.

How to Screenshot on Acer? [5 Easy Methods]
Method 1: Screenshot on Acer with Robust Screenshot Tool
Soliciting help from a powerful screenshot tool is a cost-effective option as it offers varied functionality. It is also an excellent choice for potential feature requests that may come up later on. If you are looking for an easy-to-use and powerful screenshot tool for Windows, then look no further than iTop Screen Recorder.
Boasting support for customizing screenshot size and even scrolling pages, this screenshot software allows you to take screenshots effortlessly with an intuitive workflow and user-friendly interface, regardless of your previous recording experience.
- Take a screenshot on Acer 100% free. iTop Screen Recorder is a 100% free Acer screenshot software for all levels of users, even for beginners, with no additional skills required. Simply press the hotkey F11 to activate the screenshot function, and all operations are completely Free.
- Partial or full Acer screen, at your choice. In contrast to the defined screenshot feature, you can select the screen size to capture at will, whether active windows, full screen, or customized screen. To top it off, this screenshot Windows 11 also supports scrolling screenshot, no worries about the content-heavy page.
- Customizable gadgets for screenshots. Add indicative icons to your Acer screenshots for instant highlighting or clear explanations, or blur certain personal information with pixelation. More customizable widgets are waiting to be explored.
- Seamless sharing on social media. iTop Screen Recorder also enables you to instantly upload to YouTube, Instagram, Facebook, Twitter and other social media. No more time to waste on uploading.
- Save image files freely, easy to find. Backed by this screenshot tool for Windows, you can freely save Acer screenshots without having to look for them in resolved files. In addition, a variety of image formats are available for you to choose from, such as JPG, PNG, and so on.
Try this 100% free Acer screenshot software now and take customized screenshots!
Step 1. Download this software on your PC and follow the instructions to launch it.
Step 2. Switch to Screenshot on the right toolbar, select the size you want to capture, and click the blue screenshot icon to start.

Step 3. Select the gadget to highlight, blur, or indicate on the bottom right workbench, if you need. Click Save when it's perfectly done.

Step 4. Keep the screenshot anywhere you want, rename the image file and choose the desired format. Then click Save again.

Method 2. Screenshot on Acer with Keyboard
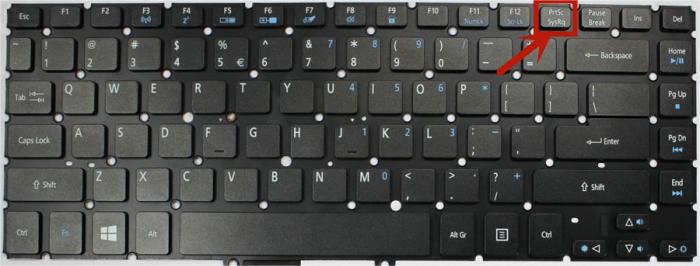
PrtSc key: One straightforward way to take a screenshot on Acer laptop is by pressing the “Print Screen button”(abbreviated as PrtSc) on the keyboard, which is usually located in the function row. This key will capture the entire screen image and store it to the clipboard. Alternatively, you can paste (Ctrl+V) the image into a web page, email or other content.

Win+PrtSc key: By bypassing the clipboard, you can take a screenshot of an entire page and immediately store it in a file. Simply press Win+PrtSc and the screenshot will be stored in the C:\Users\[username]\Pictures\Screenshots folder.

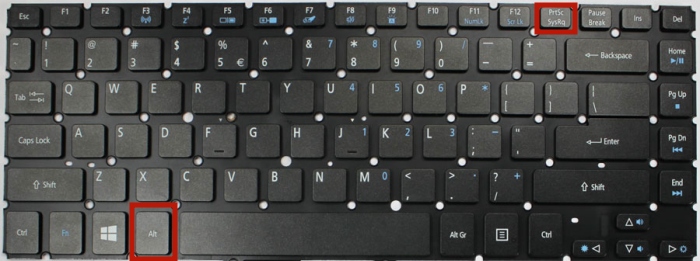
Alt+PrtSc key: If you intend to screenshot a single window, press Alt+PrtSc to make it happen. In addition, the screenshot will be saved in the clipboard and you can use Ctrl+V to paste it into apps or documents.

Method 3. Screenshot on Acer with Snipping Tool
To take screenshots with more flexibility, minus the keyboard and third-party software, you can use the "Snipping Tool'' software that comes pre-installed on Acer laptops. Here are the steps below to screenshot on Acer.
Step 1. Select Start menu > All apps > scroll to Snipping Tool.
Step 2. Click New and choose your desired screenshot mode: Rectangle, Window, Full-screen, and Free-form Snip.

Step 3. Press Save As to store it on your computer, or the copy button to store it in the clipboard.
Don't Miss: 6 Best Snipping Tool Alternative for Windows Full Review >>
Method 4. Screenshot on Acer with Snip & Sketch Tool
In Windows 10, you can use the built-in Snip & Sketch tool. Press the Windows key + Shift + S to activate the Snip & Sketch tool, which allows you to capture a custom area. The captured screenshot will be saved to the clipboard and then you can paste it into image editing software or any other application.
Step 1. Type Snip & Sketch in the taskbar to search for it, or click Windows key + Shift + S to activate the Snip & Sketch tool.

Step 2. A small functional row will appear at the top of the screen, and you can drag your mouse to select the screen area.
Step 3. Upon taking a screenshot, it will be saved in Clipboard. Otherwise, click it to enter the edit page to touch up and save it.

Method 5. Screenshot on Acer with Xbox Game Bar
Another way to take a screenshot on Acer is to resort to Xbox game bar. Although this pre-installed Windows function is specially designed for screen capturing video games, it still works well with screenshots. Follow the steps below to take screenshots on Acer:
Step 1. Press Windows + G to open the Xbox Game bar.
Step 2. Click Capture icon > Take Screenshot icon.

Step 3. Your screenshot will be saved by default in the C:\Users\Username\Videos\Captures folder. Moreover, you can click See my captures to find the screenshots.
Note: This method only screenshots the active window and ignores background windows. For more details, please read: Troubleshoot Xbox Game Bar not Working on Windows 11/10 >>
Screenshot on Acer Quick Comparison Table
As you may know how to screenshot on Acer with images guide, let's take a look at these screenshot methods in detail.
| Methods |
Ease of Use |
Image Quality |
Capture Ability |
Flexibility | Editing Capabilities |
| iTop Screen Recorder |
User-friendly |
High |
Customizable capture |
Highest |
Advanced |
| Keyboard |
Intuitive |
Low | Limited | General |
Few |
| Snipping Tool |
User-friendly |
General |
Customizable capture |
Higher | Basic |
| Snip & Sketch Tool |
User-friendly |
General |
Customizable capture |
Higher |
Basic |
| Xbox Game Bar |
User-friendly |
Low |
Limited |
Higher |
Few |
FAQs: How to Take a Screenshot on Acer
1. How to screenshot on Acer Chromebook?
You can simply press the Screenshot key on your Chromebook or press Shift + Ctrl + Show windows in case the Chromebook doesn’t have the screenshot key.
Don't Miss: How to Screenshot on Chrome Browser on PC/Mac [4 Ways] >>
2. How to screenshot on a Dell laptop?
A Dell laptop also has a PrtSc key, but you may need to take a different action based on the model. Some versions place the PrtSc key on top of the F10 key, which means you may need to hold down Fn when pressing the key.
3. Can I capture only a specific area of the screen on my Acer device?
Yes, you can capture a specific area of the screen on your Acer device using the "Snipping Tool" or "Snip & Sketch" application on Windows. Moreover, free screen recorder with built-in screenshot function is also a good option to capture customized screen area.
Conclusion
Till now, you can intercept screenshots on Acer laptops with the 5 methods mentioned above. It's always an option if other screenshot methods don't work for you! So stop asking “How to screenshot on Acer”, go use it when you need this skill. Among them, iTop Screen Recorder could be your first pick, which offers more editing widgets for your future screen recording needs. Try it now!
 Vidnoz AI creates engaging videos with realistic AI avatars. Free, fast and easy-to-use.


